Overview

This is a work in progress; I will try to keep this book updated as I learn more, writing down what seems significant to me.
Summary
Introduction
Summary
Basic Principles
Data Types
Code Organization
Scoping and Namespaces
Code Operations
File Handling
Advanced Topics
- Decorators
- Generators
- Context Managers
- Concurrency
- Memory Management
- Profiling and Optimization
- API
- Environment Variables
- Web Scraping
Libraries and Frameworks
Tools and Best Practices
- Version Control
- Integrated Development Environments (IDEs)
- Build Tools
- Code Review
- Continuous Integration and Deployment
S.O.L.I.D Principles
- Good Architecture
- Single Responsibility Principle
- Open/Closed Principle
- Liskov Substitution Principle
- Interface Segregation Principle
- Dependency Inversion Principle
Design Patterns
Principles

Python is a high-level, object-oriented, general-purpose programming language.
You can use it as a procedural language in scripting, or as an object-oriented, imperative or functional programming language.
Other peculiarities of this language are portability and coherence, where coherence is meant as the ironclad logic that distinguishes it , which often allows to deduce the meaning of unknown objects, simply, from their names.
Basic rules to write good code
D.R.Y. (Don't Repeat Yourself)
Duplicating some parts of code is an extremely bad practice.
It causes the code to become hardly readable, redundant and difficult to maintain.
PEP8
PEP8 is a style guide for Python code.
This acronym, PEP, stands for Python Enhancement Proposal, and it is the primary way to propose new features in Python and share issues and suggestions with the community.
The most famous, PEP8, lays down a simple set of guidelines to keep the code readable and maintainable.
Some PEP8's rules are:
- Use 4 spaces per indentation level.
- Use 79 characters per line.
- Surround top-level function and class definitions with two blank lines.
- Method definitions inside a class are surrounded by a single blank line.
- Extra blank lines may be used to separate groups of related functions.
- Use blank lines in functions, sparingly, to indicate logical sections.
- Imports should usually be on separate lines:
- Imports are always put at the top of the file.
KISS (Keep It Simple, Stupid)
Simplicity is key in coding. Keeping code simple makes it more readable, maintainable, and less prone to errors. Avoid over-engineering and aim for the simplest solution that works.
Refactoring
Refactoring involves changing the structure of existing code without changing its behavior to improve readability and maintainability. Regular refactoring helps in keeping the codebase clean and adaptable.
- Extract Methods: Break down large functions into smaller, more manageable ones.
- Rename Variables: Use descriptive names to make the code more understandable.
- Remove Dead Code: Eliminate unused or redundant code to reduce complexity.
Testing
Testing ensures that your code works as expected and helps catch bugs early.
- Unit Tests: Test individual units of code (e.g., functions or classes) in isolation.
- Integration Tests: Test the interactions between different parts of the application.
- Test-Driven Development (TDD): Write tests before implementing the code to ensure that the code meets the desired specifications.
Coding Standards
Coding standards are a set of guidelines that dictate how code should be written and formatted. They help maintain consistency across a codebase, making it easier to read, understand, and maintain. Adhering to coding standards also facilitates collaboration among developers and aids in code reviews.
Key Aspects of Coding Standards
- Consistency: Ensure uniformity in naming conventions, indentation, and formatting throughout the codebase.
- Readability: Write code that is clear and easy to read. Use descriptive names for variables, functions, and classes.
- Documentation: Include meaningful comments and docstrings to explain the purpose and usage of code components.
- Error Handling: Implement standardized error handling practices to manage and log exceptions effectively.
- Code Layout: Follow a consistent layout for code blocks, including indentation and spacing.
Common Coding Standards
-
Naming Conventions:
- Use
snake_casefor variables and function names. - Use
CamelCasefor class names. - Constants should be in
UPPER_CASE.
- Use
-
Indentation:
- Use 4 spaces per indentation level (as per PEP8).
-
Blank Lines:
- Surround top-level functions and class definitions with two blank lines.
- Method definitions inside a class are separated by a single blank line.
Benefits of Following Coding Standards
- Enhanced Readability: Consistent formatting makes code easier to read and understand.
- Improved Maintainability: Well-structured code is easier to maintain and modify.
- Better Collaboration: Uniform standards facilitate smoother teamwork and code reviews.
- Reduced Errors: Standard practices help in catching and avoiding common mistakes.
Adopting and enforcing coding standards helps ensure high-quality code and a more efficient development process.
Error Handling
Error handling is crucial for creating robust and reliable software. It involves anticipating potential issues and managing them gracefully to prevent the application from crashing and to provide useful feedback to users.
Basic Concepts
- Exceptions: An exception is an event that disrupts the normal flow of a program. Python uses exceptions to signal errors.
- Try-Except Block: This block is used to catch and handle exceptions that occur during the execution of code.
Syntax
try:
    # Code that might raise an exception
except SomeException as e:
    # Code that runs if an exception occurs
finally:
    # Code that always runs, regardless of whether an exception occurred
Types of Exceptions
- Built-in Exceptions: Python provides a range of built-in exceptions, such as
ValueError,TypeError, andFileNotFoundError. - Custom Exceptions: You can define your own exceptions by subclassing the
Exceptionclass.
ValueError Example
def square_root(x):
    if x < 0:
        raise ValueError("Cannot compute square root of a negative number.")
    return x ** 0.5

try:
    result = square_root(-9)
except ValueError as e:
    print(f"ValueError: {e}")
TypeError Example
def add(a, b):
    return a + b

try:
    result = add(5, "10")
except TypeError as e:
    print(f"TypeError: {e}")
FileNotFoundError Example
try:
    with open("non_existent_file.txt", "r") as file:
        content = file.read()
except FileNotFoundError as e:
    print(f"FileNotFoundError: {e}")
Best Practices
-
Catch Specific Exceptions: Handle specific exceptions rather than using a generic
exceptclause to avoid masking other issues.try: # Code that might raise an exception except ValueError: # Handle ValueError specifically except TypeError: # Handle TypeError specifically -
Use Finally for Cleanup: Use the
finallyblock to ensure that cleanup actions, such as closing files or releasing resources, are executed.try: file = open('file.txt', 'r') # Read from the file except IOError as e: print(f"An error occurred: {e}") finally: file.close() # Ensure the file is closed -
Log Exceptions: Use logging to record exceptions and provide detailed information for debugging.
import logging try: # Code that might raise an exception except Exception as e: logging.error(f"An error occurred: {e}") -
Avoid Bare Excepts: Avoid using bare
except:clauses, as they can catch unexpected exceptions and make debugging difficult.try: # Code that might raise an exception except: # Avoid this; it catches all exceptions -
Reraise Exceptions if Necessary: Sometimes, it's useful to catch an exception, perform some action, and then re-raise the exception to be handled further up the call stack.
try:
    # Code that might raise an exception
except ValueError as e:
    # Handle the exception
    raise  # Reraise the exception
Conclusion
Proper error handling ensures that your application can gracefully manage unexpected situations, providing a better user experience and making it easier to maintain and debug your code.
Error Types
These are the most common built in exceptions in Python.
| ERROR | EXPLANATION |
|---|---|
ValueError | Raised when a function receives an argument of the right type but an inappropriate value. |
TypeError | Raised when an operation or function is applied to an object of inappropriate type. |
FileNotFoundError | Raised when trying to open a file that does not exist. |
IndexError | Raised when trying to access an element from a list or tuple with an invalid index. |
KeyError | Raised when trying to access a dictionary with a key that does not exist. |
AttributeError | Raised when an attribute reference or assignment fails. |
ImportError | Raised when an import statement fails to find the module definition or when a from ... import fails. |
ModuleNotFoundError | Raised when a module could not be found. |
ZeroDivisionError | Raised when attempting to divide by zero. |
NameError | Raised when a local or global name is not found. |
UnboundLocalError | Raised when trying to access a local variable before it has been assigned. |
SyntaxError | Raised when the parser encounters a syntax error. |
IndentationError | Raised when there is an incorrect indentation. |
TabError | Raised when mixing tabs and spaces in indentation. |
IOError | Raised when an I/O operation (such as a print statement or the open() function) fails. |
OSError | Raised when a system-related operation causes an error. |
StopIteration | Raised to signal the end of an iterator. |
RuntimeError | Raised when an error is detected that doesn't fall in any of the other categories. |
RecursionError | Raised when the maximum recursion depth is exceeded. |
NotImplementedError | Raised by abstract methods that need to be implemented by subclasses. |
AssertionError | Raised when an assert statement fails. |
FloatingPointError | Raised when a floating point operation fails. |
OverflowError | Raised when the result of an arithmetic operation is too large to be expressed. |
MemoryError | Raised when an operation runs out of memory. |
EOFError | Raised when the input() function hits an end-of-file condition. |
KeyboardInterrupt | Raised when the user hits the interrupt key (usually Ctrl+C or Delete). |
ConnectionError | Base class for network-related errors. |
TimeoutError | Raised when a system function times out. |
BrokenPipeError | Raised when a pipe is broken during a write operation. |
IsADirectoryError | Raised when a file operation (such as open()) is attempted on a directory. |
PermissionError | Raised when trying to perform an operation without the necessary permissions. |
ChildProcessError | Raised when a child process operation fails. |
BlockingIOError | Raised when an operation would block on an object (like a socket) set for non-blocking mode. |
SystemExit | Raised by the sys.exit() function. |
GeneratorExit | Raised when a generator’s close() method is called. |
Testing
Testing is essential for verifying that code functions as intended and for identifying bugs early in the development process. It helps ensure that software is reliable, meets requirements, and performs well under various conditions.
Types of Testing
-
Unit Testing:
- Definition: Tests individual units or components of the code in isolation.
- Purpose: To verify that each unit functions correctly on its own.
- Tool: Python's built-in
unittestframework or third-party libraries likepytest.
import unittest def add(a, b): return a + b class TestMathFunctions(unittest.TestCase): def test_add(self): self.assertEqual(add(1, 2), 3) if __name__ == '__main__': unittest.main() -
Integration Testing:
- Definition: Tests the interactions between different components or systems.
- Purpose: To ensure that combined components work together as expected.
- Tool:
pytestor integration test frameworks.
def test_combined_functionality(): result = combined_function() # Function that integrates multiple components assert result == expected_result -
System Testing:
- Definition: Tests the complete and integrated software system.
- Purpose: To verify that the system meets the specified requirements.
- Tool: Automated testing tools or manual testing methods.
-
Acceptance Testing:
- Definition: Verifies that the software meets business requirements and is ready for delivery.
- Purpose: To ensure the software fulfills user needs and requirements.
- Tool: Behavior-driven development tools like
Behave.
-
Regression Testing:
- Definition: Ensures that new changes or features have not adversely affected existing functionality.
- Purpose: To maintain software integrity after changes.
-
Performance Testing:
- Definition: Tests the performance characteristics of the software, such as speed and responsiveness.
- Purpose: To ensure that the software performs well under expected load conditions.
- Tool: Tools like
LocustorJMeter.
Testing Best Practices
-
Write Tests Before Code (TDD):
- Definition: Test-Driven Development (TDD) involves writing tests before writing the actual code.
- Benefit: Helps define requirements clearly and ensures code meets those requirements.
def test_function(): # Define the test before implementing the function pass -
Keep Tests Independent:
- Ensure that tests do not depend on each other. Each test should set up its own environment and clean up afterward.
-
Use Assertions:
- Use assertions to check if the actual output matches the expected output.
assert function_output == expected_output -
Automate Testing:
- Use continuous integration tools to automate the running of tests. This helps in running tests frequently and catching issues early.
-
Maintain Test Coverage:
- Ensure that a significant portion of the codebase is covered by tests. Tools like
coverage.pycan help measure test coverage.
- Ensure that a significant portion of the codebase is covered by tests. Tools like
-
Handle Edge Cases:
- Test edge cases and scenarios where the input is at the boundary of acceptable values.
Conclusion
Testing is a critical aspect of software development that helps ensure code quality and reliability. By employing various types of testing and following best practices, developers can catch issues early, improve code quality, and deliver robust software.
Documentation
Documentation provides a clear and comprehensive explanation of code, making it easier for developers to understand, use, and maintain. Good documentation helps with onboarding new team members, facilitates code reviews, and supports long-term code maintenance.
Types of Documentation
-
Code Comments:
- Purpose: To explain specific sections of code or logic within the code itself.
- Best Practices:
- Inline Comments: Use for explaining complex or non-obvious lines of code.
- Block Comments: Use for sections of code or functions, describing their purpose and functionality.
# This function calculates the factorial of a number def factorial(n): # Base case: factorial of 0 or 1 is 1 if n == 0 or n == 1: return 1 # Recursive case return n * factorial(n - 1) -
Docstrings:
- Purpose: To provide structured documentation for modules, classes, and functions.
- Format: Use triple quotes to write docstrings, including descriptions, parameters, and return values.
def add(a, b): """ Add two numbers together. Parameters: a (int or float): The first number. b (int or float): The second number. Returns: int or float: The sum of the two numbers. """ return a + b -
User Documentation:
- Purpose: To guide end-users on how to use the software or library.
- Contents:
- Installation Instructions: How to set up and install the software.
- Usage Guides: Examples and instructions on how to use various features.
- FAQs: Common questions and troubleshooting tips.
-
Developer Documentation:
- Purpose: To assist other developers in understanding and contributing to the codebase.
- Contents:
- Architecture Overview: High-level description of the system’s architecture.
- API Documentation: Details of public methods and classes.
- Code Examples: Sample code snippets demonstrating usage.
-
Change Logs:
- Purpose: To keep track of changes made to the codebase over time.
- Format: Include date, version, and a summary of changes or fixes.
# Change Log
## [1.0.1] - 2024-08-14
- Fixed bug in the user authentication module.
- Improved performance of data processing functions.

## [1.0.0] - 2024-08-01
- Initial release of the application.
Best Practices for Documentation
-
Be Clear and Concise:
- Avoid jargon and write in a clear, straightforward manner.
-
Update Regularly:
- Ensure documentation is updated to reflect changes in the codebase.
-
Be Consistent:
- Use a consistent style and format throughout the documentation.
-
Include Examples:
- Provide examples and use cases to illustrate how the code should be used.
-
Review and Proofread:
- Regularly review and proofread documentation to ensure accuracy and clarity.
Conclusion
Effective documentation is crucial for maintaining a clear understanding of code and facilitating smooth development and usage. By adhering to best practices and including various types of documentation, developers can ensure that their code is accessible and useful for current and future users.
Numbers

In Python, numbers are divided into two main types: integers and floats (real numbers). These types are used for performing arithmetic operations and representing numerical values.
Key Concepts of Numbers in Python
-
Integers: Integers are whole numbers without a fractional component. They can be positive, negative, or zero.
num1 = 10 num2 = -5 num3 = 0 print(type(num1)) # Output: <class 'int'> -
Floats: Floats represent real numbers and include a decimal point. They can be used to represent fractions or floating-point arithmetic.
num1 = 3.14 num2 = -0.001 num3 = 2.0 print(type(num1)) # Output: <class 'float'> -
Type Conversion: You can convert between integers and floats using type conversion functions like
int()andfloat().int_value = 7 float_value = 3.14 converted_float = float(int_value) # 7.0 converted_int = int(float_value) # 3 -
Precision and Rounding: Floating-point numbers may have precision issues. Python provides the
round()function to round floats to a specified number of decimal places.pi = 3.14159 rounded_pi = round(pi, 2) # 3.14 -
Complex Numbers: Python also supports complex numbers, which have a real and an imaginary part. They are defined with a
jsuffix for the imaginary part.complex_num = 4 + 5j real_part = complex_num.real # 4.0 imag_part = complex_num.imag # 5.0 -
Mathematical Functions: Python's
mathmodule provides functions for more advanced mathematical operations.import math square_root = math.sqrt(16) # 4.0 power = math.pow(2, 3) # 8.0 log_value = math.log(100) # 4.605170185988092 -
Special Numeric Values: Python has special constants such as
inf(infinity) andNaN(not a number) for handling exceptional numeric cases.infinity = float('inf') nan_value = float('nan') print(infinity) # inf print(nan_value) # nan
Integers
Integers are a fundamental data type in Python, representing whole numbers (both positive and negative) without any fractional component. They are widely used in programming for counting, indexing, and performing various arithmetic operations.
Integer Operations
-
Arithmetic Operations:
- Addition: Adds two integers.
result = 5 + 3 # result is 8 - Subtraction: Subtracts one integer from another.
result = 5 - 3 # result is 2 - Multiplication: Multiplies two integers.
result = 5 * 3 # result is 15 - Division: Divides one integer by another (results in a float).
result = 5 / 2 # result is 2.5 - Floor Division: Divides and returns the integer part of the quotient.
result = 5 // 2 # result is 2 - Modulus: Returns the remainder of the division.
result = 5 % 2 # result is 1 - Exponentiation: Raises one integer to the power of another.
result = 5 ** 3 # result is 125
- Addition: Adds two integers.
-
Comparison Operations:
- Equal: Checks if two integers are equal.
result = (5 == 3) # result is False - Not Equal: Checks if two integers are not equal.
result = (5 != 3) # result is True - Greater Than: Checks if one integer is greater than another.
result = (5 > 3) # result is True - Less Than: Checks if one integer is less than another.
result = (5 < 3) # result is False - Greater Than or Equal To: Checks if one integer is greater than or equal to another.
result = (5 >= 3) # result is True - Less Than or Equal To: Checks if one integer is less than or equal to another.
result = (5 <= 3) # result is False
- Equal: Checks if two integers are equal.
Type Conversion
-
Converting to Integer: Use the
int()function to convert a float or a string to an integer. If converting a float, it truncates the decimal part.result = int(3.7) # result is 3 result = int("5") # result is 5 -
Converting to String: Use the
str()function to convert an integer to a string.result = str(5) # result is "5"
Working with Large Integers
Python's integers can handle arbitrarily large values, limited only by the available memory.
large_int = 123456789012345678901234567890
Floating Point Numbers
Floating point numbers, or floats, represent real numbers with decimal points. They are essential for calculations requiring precision, such as scientific computations, financial calculations, and more.
Characteristics of Floating Point Numbers
- Precision: Floats have limited precision due to their binary representation. This can lead to small rounding errors in calculations.
- Range: Floats can represent very large and very small numbers, but their precision decreases as the numbers grow larger or smaller.
Floating Point Operations
-
Arithmetic Operations:
- Addition: Adds two floating point numbers.
result = 5.5 + 3.2 # result is 8.7 - Subtraction: Subtracts one float from another.
result = 5.5 - 3.2 # result is 2.3 - Multiplication: Multiplies two floating point numbers.
result = 5.5 * 3.2 # result is 17.6 - Division: Divides one float by another.
result = 5.5 / 2.2 # result is 2.5 - Exponentiation: Raises one float to the power of another.
result = 5.5 ** 2 # result is 30.25
- Addition: Adds two floating point numbers.
-
Comparison Operations:
- Equal: Checks if two floats are equal.
result = (5.5 == 5.5) # result is True - Not Equal: Checks if two floats are not equal.
result = (5.5 != 3.2) # result is True - Greater Than: Checks if one float is greater than another.
result = (5.5 > 3.2) # result is True - Less Than: Checks if one float is less than another.
result = (5.5 < 3.2) # result is False - Greater Than or Equal To: Checks if one float is greater than or equal to another.
result = (5.5 >= 5.5) # result is True - Less Than or Equal To: Checks if one float is less than or equal to another.
result = (5.5 <= 5.5) # result is True
- Equal: Checks if two floats are equal.
Rounding Errors
Due to the way floating point numbers are represented in binary, some numbers cannot be represented exactly, leading to rounding errors.
result = 0.1 + 0.2 # result might be 0.30000000000000004, not 0.3
Formatting Floating Point Numbers
To control the number of decimal places displayed, you can format floats using string formatting.
result = 5.6789
formatted_result = "{:.2f}".format(result)  # formatted_result is "5.68"
Type Conversion
-
Converting to Float: Use the
float()function to convert integers or strings to a float.result = float(5) # result is 5.0 result = float("5.7") # result is 5.7 -
Converting to Integer: Use the
int()function to convert a float to an integer (truncates the decimal part).result = int(5.7) # result is 5
Complex Numbers
Representation of Complex Numbers
- Real Part: The real part of a complex number is the component that does not involve the imaginary unit
j. - Imaginary Part: The imaginary part is the component that is multiplied by
j, wherejis the square root of -1.
Example:
z = 3 + 4j # 3 is the real part, 4 is the imaginary part
Accessing Real and Imaginary Parts
You can access the real and imaginary parts of a complex number using the .real and .imag attributes.
z = 3 + 4j
real_part = z.real      # real_part is 3.0
imaginary_part = z.imag # imaginary_part is 4.0
Complex Number Operations
-
Addition:
- Adds the real parts and the imaginary parts separately.
z1 = 3 + 4j
z2 = 1 + 2j
result = z1 + z2  # result is 4 + 6j
- Adds the real parts and the imaginary parts separately.
-
Subtraction:
- Subtracts the real parts and the imaginary parts separately.
z1 = 3 + 4j
z2 = 1 + 2j
result = z1 - z2  # result is 2 + 2j
- Subtracts the real parts and the imaginary parts separately.
-
Multiplication:
- Multiplies complex numbers using distributive property.
z1 = 3 + 4j
z2 = 1 + 2j
result = z1 * z2  # result is -5 + 10j
- Multiplies complex numbers using distributive property.
-
Division:
- Divides complex numbers using the formula for complex division.
z1 = 3 + 4j
z2 = 1 + 2j
result = z1 / z2  # result is 2.2 - 0.4j
- Divides complex numbers using the formula for complex division.
-
Conjugate:
- The conjugate of a complex number is obtained by changing the sign of the imaginary part.
z = 3 + 4j
conjugate_z = z.conjugate()  # conjugate_z is 3 - 4j
- The conjugate of a complex number is obtained by changing the sign of the imaginary part.
Magnitude and Phase
-
Magnitude: The magnitude (or absolute value) of a complex number is the distance from the origin to the point represented by the number in the complex plane. It can be calculated using the
abs()function.z = 3 + 4j magnitude = abs(z) # magnitude is 5.0 -
Phase: The phase (or argument) of a complex number is the angle between the positive real axis and the line representing the number in the complex plane. You can calculate it using the
cmath.phase()function.import cmath z = 3 + 4j phase = cmath.phase(z) # phase is approximately 0.93 radians
Polar Coordinates
-
Conversion to Polar Coordinates: A complex number can be represented in polar form as (r \times e^{i\theta}), where (r) is the magnitude and (\theta) is the phase.
r, theta = cmath.polar(z) # r is 5.0, theta is approximately 0.93 radians -
Conversion from Polar to Rectangular Coordinates: You can convert polar coordinates back to a complex number using
cmath.rect().z = cmath.rect(5.0, 0.93) # z is approximately 3 + 4j
Use Cases for Complex Numbers
- Electrical Engineering: Used in the analysis of AC circuits, where impedance is represented as a complex number.
- Quantum Physics: Complex numbers are used in quantum mechanics to describe wave functions.
- Control Systems: Complex numbers are used in the analysis of control systems, particularly in the context of transfer functions.
Conclusion
Complex numbers are a powerful mathematical tool that extends the concept of one-dimensional numbers to two dimensions, incorporating both a real and an imaginary component. Understanding how to work with complex numbers in Python is crucial for fields that require advanced mathematical calculations.
Booleans
Booleans are used to represent true or false values (boolean algebra is the subset of algebra which variables are either true or false).
Booleans are often used in conditional statements to control the flow of a program. They are essential in decision-making constructs such as if, while, and for loops.

Booleans are subclasses of integers, and are represented as 1 (true) and 0 (false); their type is bool. and they can be combined in Boolean expressions using the logical operators and, or, and not.
-
Boolean Values: Python uses
TrueandFalseto represent boolean values. These are the only two possible values for a boolean. -
Boolean Operations: Booleans support logical operations like
and,or, andnot, which are used to combine or invert boolean expressions. -
and: Returns True if both operands are True.
-
or: Returns True if at least one operand is True.
-
not: Returns True if the operand is False, and False if the operand is True.
is_true = True is_false = False result_and = is_true and is_false # False result_or = is_true or is_false # True result_not = not is_true # False -
Boolean Expressions: A boolean expression is an expression that evaluates to a boolean value (
TrueorFalse). These expressions are commonly used in conditions and loops.age = 18 is_adult = age >= 18 # True -
Truthiness: In Python, objects can be evaluated in a boolean context to determine their "truthiness". Non-zero numbers, non-empty sequences, and non-empty objects are considered
True, while0,None, and empty sequences or objects are consideredFalse.if []: print("This won't print because an empty list is False") if [1, 2, 3]: print("This will print because a non-empty list is True")
Strings

In Python, strings are sequences of characters enclosed in quotation marks. They can be defined using single quotes, double quotes, or triple quotes. Each type of quoting has its use cases and characteristics.
Key Concepts of Strings in Python
-
String Definition: Strings can be defined using single quotes (
'), double quotes ("), or triple quotes ('''or"""). Triple quotes are used for multi-line strings.single_quote = 'Wolf' # Single quotes double_quote = "Wolf" # Double quotes multi_line = '''A Wolf is howling''' # Triple quotes for multi-line strings escaped_multi_line = 'this\nalso\nproduces\na multiline\nstring' # Escape characters for new lines -
String Operations: Strings support various operations such as concatenation, repetition, and slicing.
# Concatenation greeting = "Hello, " + "world!" # Output: "Hello, world!" # Repetition repeat = "Ha" * 3 # Output: "HaHaHa" # Slicing word = "Python" first_two = word[:2] # Output: "Py" last_three = word[-3:] # Output: "hon" every_two = word[::2] # Output: "Pto" new_step = word[1:4:2] # Output: "yh" -
Escape Characters: To include special characters in strings, use escape sequences. Common escape characters include
\n(new line),\t(tab),\\(backslash), and\"(double quote).escaped_string = "This is a line.\nThis is another line.\n\tThis is indented." # Output: "This is a line.\nThis is another line.\n\tThis is indented." -
Raw Strings: Raw strings treat backslashes as literal characters and do not interpret them as escape characters. Use
rorRprefix for raw strings.raw_string = r"C:\Users\Name\Path" # Output: "C:\Users\Name\Path" -
String Indexing: Strings are indexed sequences, and each character in the string can be accessed using its index. Indexing starts at 0 for the first character.
word = "Python" first_char = word[0] # Output: "P" last_char = word[-1] # Output: "n" -
Multiline Strings: Triple quotes are used to define strings that span multiple lines. They preserve line breaks and formatting.
multiline = """This is a string that spans multiple lines and preserves line breaks.""" -
String Immutability: Strings in Python are immutable, meaning once created, they cannot be modified. Any operation that alters a string will create a new string.
original = "Hello"
modified = original.replace("H", "J")  # Output: "Jello"
String Formatting
String formatting in Python allows you to create well-structured and readable strings by embedding variables or expressions into them. It is a powerful tool for generating dynamic content and making your code more maintainable.
Types of String Formatting
Python offers several ways to format strings:
-
Old-Style Formatting (
%):- This method uses the
%operator to format strings. - Example:
name = "Alice"
age = 30
formatted_string = "Name: %s, Age: %d" % (name, age)
# formatted_string is "Name: Alice, Age: 30"
- This method uses the
-
str.format()Method:- The
str.format()method allows you to insert values into placeholders{}in a string. - Example:
name = "Bob" age = 25 formatted_string = "Name: {}, Age: {}".format(name, age) # formatted_string is "Name: Bob, Age: 25" - You can also specify the order of insertion or use named placeholders:
formatted_string = "Name: {0}, Age: {1}".format(name, age)
formatted_string_named = "Name: {name}, Age: {age}".format(name="Charlie", age=28)
# formatted_string_named is "Name: Charlie, Age: 28"
- The
-
F-Strings (Formatted String Literals):
- Introduced in Python 3.6, f-strings provide a concise and readable way to format strings.
- Example:
name = "Diana" age = 22 formatted_string = f"Name: {name}, Age: {age}" # formatted_string is "Name: Diana, Age: 22" - F-strings also support expressions:
formatted_string = f"Next year, {name} will be {age + 1} years old."
# formatted_string is "Next year, Diana will be 23 years old."
Formatting Options
You can control the format of numbers, strings, and other data types with specific options:
-
Width and Alignment:
- Control the width and alignment of text within a formatted string.
- Example:
formatted_string = f"{name:<10} | {age:^5} | {'Student':>10}"
# formatted_string is "Diana      |  22  |    Student"
-
Number Formatting:
- Format numbers with specific precision, as decimals, or in scientific notation.
- Example:
pi = 3.14159
formatted_string = f"Pi to 2 decimal places: {pi:.2f}"
# formatted_string is "Pi to 2 decimal places: 3.14"
-
Thousands Separator:
- Add commas or other separators to large numbers.
- Example:
large_number = 1000000
formatted_string = f"{large_number:,}"
# formatted_string is "1,000,000"
-
String Formatting with Dictionaries:
- You can use dictionaries to pass multiple values to format strings.
- Example:
data = {"name": "Eve", "age": 27}
formatted_string = "Name: {name}, Age: {age}".format(**data)
# formatted_string is "Name: Eve, Age: 27"
Escaping Braces
If you need to include braces {} in your string without them being interpreted as placeholders, you can escape them by doubling:
formatted_string = f"{{Escaped braces}} and {{name}}"
# formatted_string is "{Escaped braces} and {name}"
String Methods
String methods in Python are built-in functions that allow you to manipulate and analyze text data. These methods help you perform common operations such as searching, modifying, and formatting strings efficiently.
Commonly Used String Methods
-
str.upper()andstr.lower():- Convert a string to uppercase or lowercase.
- Example:
text = "Hello, World!"
upper_text = text.upper()  # "HELLO, WORLD!"
lower_text = text.lower()  # "hello, world!"
-
str.capitalize()andstr.title():- Capitalize the first letter of a string or capitalize the first letter of each word.
- Example:
text = "hello, world!"
capitalized_text = text.capitalize()  # "Hello, world!"
title_text = text.title()  # "Hello, World!"
-
str.strip(),str.lstrip(), andstr.rstrip():- Remove leading and/or trailing whitespace (or other specified characters).
- Example:
text = "   Hello, World!   "
stripped_text = text.strip()  # "Hello, World!"
left_stripped = text.lstrip()  # "Hello, World!   "
right_stripped = text.rstrip()  # "   Hello, World!"
-
str.replace():- Replace occurrences of a substring with another substring.
- Example:
text = "Hello, World!"
replaced_text = text.replace("World", "Python")  # "Hello, Python!"
-
str.split()andstr.join():split(): Split a string into a list of substrings based on a delimiter.join(): Join a list of strings into a single string with a specified delimiter.- Example:
text = "Hello, World!"
words = text.split(", ")  # ["Hello", "World!"]
joined_text = " - ".join(words)  # "Hello - World!"
-
str.find()andstr.index():find(): Return the lowest index of the substring if found, otherwise return-1.index(): Similar tofind(), but raises aValueErrorif the substring is not found.- Example:
text = "Hello, World!"
index = text.find("World")  # 7
# index_not_found = text.index("Python")  # Raises ValueError
-
str.startswith()andstr.endswith():- Check if a string starts or ends with a specified substring.
- Example:
text = "Hello, World!"
starts_with = text.startswith("Hello")  # True
ends_with = text.endswith("World!")  # True
-
str.count():- Count the number of occurrences of a substring in a string.
- Example:
text = "Hello, World! Hello again!"
count = text.count("Hello")  # 2
-
str.isalpha(),str.isdigit(), andstr.isalnum():isalpha(): Check if the string consists only of alphabetic characters.isdigit(): Check if the string consists only of digits.isalnum(): Check if the string consists only of alphanumeric characters (letters and numbers).- Example:
text_alpha = "Hello"
text_digit = "12345"
text_alnum = "Hello123"
is_alpha = text_alpha.isalpha()  # True
is_digit = text_digit.isdigit()  # True
is_alnum = text_alnum.isalnum()  # True
-
str.center(),str.ljust(), andstr.rjust():- Adjust the alignment of a string to be centered, left-justified, or right-justified within a given width.
- Example:
text = "Hello"
centered = text.center(10, "-")  # "--Hello---"
left_justified = text.ljust(10, "-")  # "Hello-----"
right_justified = text.rjust(10, "-")  # "-----Hello"
Advanced String Methods
-
str.zfill():- Pad a string on the left with zeros until it reaches the specified length.
- Example:
text = "42"
padded_text = text.zfill(5)  # "00042"
-
str.partition()andstr.rpartition():- Split the string into a tuple with three parts: the part before the separator, the separator itself, and the part after the separator.
- Example:
text = "Hello, World!"
parts = text.partition(", ")  # ("Hello", ", ", "World!")
-
str.casefold():- Return a case-insensitive version of the string, useful for caseless matching.
- Example:
text = "Hello, World!"
casefolded_text = text.casefold()  # "hello, world!"
Lists

In Python, lists are used to store multiple items in a single variable. Lists are one of the most versatile data types available in Python.
Key Concepts of Lists in Python
-
List Definition: A list can be defined by placing all the items (elements) inside square brackets
[], separated by commas. Lists can contain items of different data types, including other lists.my_empty_list = [] my_empty_list = list() # same as above my_list = [1, 2, 3] my_list = list([1, 2, 3]) # same as above mixed_list = [1, "hello", 3.14, True] nested_list = [1, [2, 3], [4, 5, 6]] -
Ordered: Lists are ordered, meaning that the elements have a defined order, and this order will not change unless you explicitly modify the list.
fruits = ["apple", "banana", "cherry"] print(fruits[0]) # Output: apple print(fruits[2]) # Output: cherry -
Mutable: Lists are mutable, meaning that you can change their content without changing their identity. You can add, remove, or modify elements in a list.
my_list = [1, 2, 3] my_list[0] = 10 # my_list is now [10, 2, 3] my_list.append(4) # my_list is now [10, 2, 3, 4] my_list.remove(2) # my_list is now [10, 3, 4] -
Allow Duplicate Values: Lists can have duplicate values, meaning the same value can appear multiple times in a list.
my_list = [1, 2, 2, 3, 3, 3] print(my_list) # Output: [1, 2, 2, 3, 3, 3] -
Accessing List Elements: Elements in a list can be accessed by their index. Python uses zero-based indexing, so the first element has an index of 0. Negative indexing can be used to access elements from the end of the list.
my_list = ["a", "b", "c", "d"] first_item = my_list[0] # Output: 'a' last_item = my_list[-1] # Output: 'd' -
Slicing: You can access a range of elements in a list by using slicing. The syntax is
list[start:stop:step], wherestartis the index to begin slicing,stopis the index to end slicing (exclusive), andstepis the interval between elements.my_list = [0, 1, 2, 3, 4, 5] slice1 = my_list[1:4] # Output: [1, 2, 3] slice2 = my_list[:3] # Output: [0, 1, 2] slice3 = my_list[3:] # Output: [3, 4, 5] slice4 = my_list[::2] # Output: [0, 2, 4] -
List Methods: Lists come with several built-in methods that make them easy to work with:
append(item): Adds an item to the end of the list.extend(iterable): Extends the list by appending elements from an iterable.insert(index, item): Inserts an item at a specified index.remove(item): Removes the first occurrence of an item.pop(index=-1): Removes and returns the item at the specified index (default is the last item).clear(): Removes all items from the list.index(item, start=0, end=len(list)): Returns the index of the first occurrence of an item.count(item): Returns the number of occurrences of an item.sort(key=None, reverse=False): Sorts the list in ascending order.reverse(): Reverses the elements of the list.copy(): Returns a shallow copy of the list.
my_list = [3, 1, 4, 1, 5, 9] my_list.append(2) # [3, 1, 4, 1, 5, 9, 2] my_list.sort() # [1, 1, 2, 3, 4, 5, 9] my_list.reverse() # [9, 5, 4, 3, 2, 1, 1] my_list.pop() # [9, 5, 4, 3, 2, 1] -
Nested Lists: Lists can contain other lists as elements, creating a nested list. This allows for the creation of more complex data structures like matrices or tables.
matrix = [ [1, 2, 3], [4, 5, 6], [7, 8, 9] ] print(matrix[1][2]) # Output: 6 (second row, third column) -
List Iteration: You can iterate over the elements of a list using a
forloop.my_list = ["apple", "banana", "cherry"] for fruit in my_list: print(fruit) # Output: # apple # banana # cherry -
List Length: The
len()function returns the number of elements in a list.my_list = [1, 2, 3, 4] length = len(my_list) # Output: 4
List Comprehension
List comprehension in Python is a concise and powerful way to create lists. It allows you to generate new lists by applying an expression to each item in an iterable, optionally filtering items with a condition. List comprehensions are often used to replace loops, making the code more readable and concise.
Basic Syntax
The basic syntax of a list comprehension is:
# expression for item in iterablea
# e.g.
new_list = [new_item for item in list]
- expression: The value to include in the new list.
- item: The variable that takes each value in the iterable.
- iterable: The collection of items to iterate over.
Examples
-
Creating a List of Squares:
- Example:
squares = [x**2 for x in range(10)]
# squares is [0, 1, 4, 9, 16, 25, 36, 49, 64, 81]
- Example:
-
Filtering with List Comprehension:
- You can include an
ifstatement to filter items. - Example:
even_squares = [x**2 for x in range(10) if x % 2 == 0]
# even_squares is [0, 4, 16, 36, 64]
- You can include an
-
Nested List Comprehension:
- List comprehensions can be nested to handle complex cases like creating a matrix.
- Example:
matrix = [[row * col for col in range(5)] for row in range(3)]
# matrix is [[0, 0, 0, 0, 0], [0, 1, 2, 3, 4], [0, 2, 4, 6, 8]]
-
Flattening a List of Lists:
- Flatten a two-dimensional list into a one-dimensional list.
- Example:
nested_list = [[1, 2, 3], [4, 5, 6], [7, 8, 9]]
flattened = [item for sublist in nested_list for item in sublist]
# flattened is [1, 2, 3, 4, 5, 6, 7, 8, 9]
-
Using Functions in List Comprehension:
- Apply a function to each element in the list.
- Example:
def square(x):
    return x * x

squares = [square(x) for x in range(10)]
# squares is [0, 1, 4, 9, 16, 25, 36, 49, 64, 81]
List Comprehension vs. Loops
List comprehensions are often preferred over loops for their conciseness. However, they should be used when they improve readability and not just for the sake of brevity.
-
Using a Loop:
squares = [] for x in range(10): squares.append(x**2) # squares is [0, 1, 4, 9, 16, 25, 36, 49, 64, 81] -
Using List Comprehension:
squares = [x**2 for x in range(10)]
# squares is [0, 1, 4, 9, 16, 25, 36, 49, 64, 81]
Advanced Use Cases
- Multiple Conditions:
- Example:
result = [x for x in range(20) if x % 2 == 0 and x % 3 == 0]
# result is [0, 6, 12, 18]
- Example:
Tuples

Tuples are collections similar to lists, but with the key difference that they are immutable, meaning their contents cannot be changed once they are created. Tuples are used to group multiple items into a single variable and can be particularly useful when you need to return multiple values from a function.
Key Concepts of Tuples in Python
-
Tuple Definition: Tuples are defined using parentheses
()and can contain multiple items separated by commas. You can also create a tuple using thetuple()constructor.my_tuple = (1, 2, 3) # Tuple with multiple items another_tuple = tuple((1, 2, 3)) # Tuple created with tuple() constructor single_item_tuple = (5,) # Tuple with a single item (comma is necessary) -
Accessing Tuple Elements: Elements in a tuple can be accessed using indexing. Indexing starts at 0 for the first element.
my_tuple = (1, 2, 3) first_item = my_tuple[0] # Output: 1 last_item = my_tuple[-1] # Output: 3 -
Unpacking Tuples: Tuples can be unpacked into individual variables. The number of variables must match the number of elements in the tuple.
my_tuple = (1, 2, 3) a, b, c = my_tuple print(a, b, c) # Output: 1 2 3 -
Tuple Operations: Tuples support various operations such as concatenation, repetition, and membership testing.
tuple1 = (1, 2) tuple2 = (3, 4) concatenated = tuple1 + tuple2 # Output: (1, 2, 3, 4) repeated = tuple1 * 3 # Output: (1, 2, 1, 2, 1, 2) is_in = 2 in tuple1 # Output: True -
Immutable Nature: Tuples are immutable, which means once created, you cannot modify, add, or remove elements. Any attempt to do so will result in a
TypeError.my_tuple = (1, 2, 3) # my_tuple[1] = 4 # Raises TypeError: 'tuple' object does not support item assignment -
Nested Tuples: Tuples can contain other tuples or mutable objects like lists. This allows for complex data structures.
nested_tuple = ((1, 2), (3, 4)) first_pair = nested_tuple[0] # Output: (1, 2) second_item_of_first_pair = nested_tuple[0][1] # Output: 2 -
Tuple Methods: Tuples have two built-in methods:
count()andindex(). These methods are used to count occurrences of an element and find the index of the first occurrence of an element, respectively.my_tuple = (1, 2, 2, 3) count_of_twos = my_tuple.count(2) # Output: 2 index_of_two = my_tuple.index(2) # Output: 1 (index of the first occurrence) -
Immutability and Hashing: Because tuples are immutable, they can be used as keys in dictionaries or as elements of sets, unlike lists.
my_dict = { (1, 2): "value" }
my_set = set([(1, 2), (3, 4)])  # Tuples can be elements of a set
Dictionaries

A dictionary in Python is an unordered collection of items, where each item is a key-value pair. Dictionaries are mutable, meaning that they can be changed after their creation.
Key Concepts of Dictionaries in Python
Dictionary Definition:
A dictionary is defined by enclosing a comma-separated list of key-value pairs within curly braces {}.
  my_dict = {
      "key1": "value1",
      "key2": "value2",
      "key3": "value3"
  }
Keys and Values:
- Keys: The unique identifiers that act as the index to access the corresponding values. Keys must be immutable types (e.g., strings, numbers, tuples).
- Values: The data associated with the keys. Values can be of any data type and can be duplicated.
my_dict = {
    "name": "Alice",  # 'name' is the key, "Alice" is the value
    "age": 30,        # 'age' is the key, 30 is the value
    "city": "New York"
}
Accessing Values: Values in a dictionary can be accessed by using the key in square brackets [] or with the .get() method.
name = my_dict["name"]  # Accessing via key
age = my_dict.get("age")  # Accessing via .get() method
Adding and Modifying Entries: You can add new key-value pairs or modify existing ones by assigning a value to a key.
my_dict["email"] = "alice@example.com"  # Adding a new entry
my_dict["age"] = 31  # Modifying an existing entry
Removing Entries: Entries can be removed using the del keyword, the .pop() method, or the .popitem() method (which removes the last inserted item).
del my_dict["city"]  # Remove 'city' key-value pair
email = my_dict.pop("email")  # Remove and return the value of 'email'
last_item = my_dict.popitem()  # Remove and return the last inserted key-value pair
Looping through dictionaries
student_dict = {
    "student": ["Michele", "Eleonora", "Isabel", "Simone"],
    "age": [8, 6, 7, 5]
}
print(student_dict)
# output: {'student': ['Michele', 'Eleonora', 'Isabel', 'Simone'], 'age': [8, 6, 7, 5]}

for (key, value) in student_dict.items():
    print(key)
    # output: student
    #         age
    print(value)
    # output: ['Michele', 'Eleonora', 'Isabel', 'Simone']
    #         [8, 6, 7, 5]
Dictionary Methods:
- keys(): Returns a view object of all keys.
- values(): Returns a view object of all values.
- items(): Returns a view object of all key-value pairs as tuples.
- update(): Merges another dictionary or an iterable of key-value pairs into the dictionary.
keys = my_dict.keys()  # Get all keys
values = my_dict.values()  # Get all values
items = my_dict.items()  # Get all key-value pairs
my_dict.update({"name": "Bob", "city": "Los Angeles"})  # Update dictionary
Dictionary Comprehensions
Dictionary comprehensions in Python provide a concise way to create dictionaries by applying an expression to each key-value pair in an iterable. They are similar to list comprehensions but generate dictionaries instead of lists, making your code more readable and efficient when working with key-value pairs.
Basic Syntax
The basic syntax of a dictionary comprehension is:
# {key_expression: value_expression for item in iterable}
# e.g.
 new_dict = {new_key:new_value for item in list}
- key_expression: The expression that defines the key in the dictionary.
- value_expression: The expression that defines the value corresponding to the key.
- item: The variable that takes each value from the iterable.
- iterable: The collection of items to iterate over.
Examples
-
Creating a Dictionary from a List:
- Example:
numbers = [1, 2, 3, 4]
squares = {x: x**2 for x in numbers}
# squares is {1: 1, 2: 4, 3: 9, 4: 16}
- Example:
-
Using a Condition in Dictionary Comprehension:
- You can filter items using an
ifcondition. - Example:
numbers = range(10)
even_squares = {x: x**2 for x in numbers if x % 2 == 0}
# even_squares is {0: 0, 2: 4, 4: 16, 6: 36, 8: 64}
- You can filter items using an
-
Swapping Keys and Values:
- Example:
original_dict = {'a': 1, 'b': 2, 'c': 3}
swapped_dict = {value: key for key, value in original_dict.items()}
# swapped_dict is {1: 'a', 2: 'b', 3: 'c'}
- Example:
-
Combining Two Lists into a Dictionary:
-
Example:
keys = ['name', 'age', 'city']
values = ['Alice', 28, 'New York']
combined_dict = {k: v for k, v in zip(keys, values)}
# combined_dict is {'name': 'Alice', 'age': 28, 'city': 'New York'}
Note: the zip function takes two or more iterables and returns an iterator of tuples, where the i-th tuple contains the i-th element from each of the input iterables.
In this case, zip(keys, values) will produce an iterator of tuples: ('name', 'Alice'), ('age', 28), and ('city', 'New York').
-
-
Nested Dictionary Comprehensions:
- Example:
nested_dict = {x: {y: y**2 for y in range(3)} for x in range(3)}
# nested_dict is {0: {0: 0, 1: 1, 2: 4}, 1: {0: 0, 1: 1, 2: 4}, 2: {0: 0, 1: 1, 2: 4}}
- Example:
-
Converting values in a dictionary:
- Example:
weather_c = {"Monday": 12, "Tuesday": 14, "Wednesday": 15, "Thursday": 14, "Friday": 21, "Saturday": 22,"Sunday": 24}
weather_f = {day: ((weather_c[day] * 9/5) + 32) for day in weather_c}
# "weather_c[day]": section "Accessing values", in the previous chapter "Dictionaries"
print(weather_f)
- Example:
Advanced Use Cases
-
Handling Missing Keys with
get():- You can handle cases where keys might not exist by using the
get()method. Example:data = {'a': 1, 'b': 2, 'c': 3} result = {k: data.get(k, 0) for k in ['a', 'b', 'd']} # result is {'a': 1, 'b': 2, 'd': 0}
- You can handle cases where keys might not exist by using the
-
Creating Dictionaries with Complex Values:
- Example:
numbers = [1, 2, 3]
complex_dict = {x: (x, x**2, x**3) for x in numbers}
# complex_dict is {1: (1, 1, 1), 2: (2, 4, 8), 3: (3, 9, 27)}
- Example:
Sets

Sets in Python are unordered collections of unique elements. They are similar to lists or dictionaries, but with key differences, such as disallowing duplicate elements and not maintaining any order. Sets are particularly useful when you need to eliminate duplicates, perform membership tests, or apply mathematical set operations like union, intersection, and difference.
Creating Sets
You can create a set by using curly braces {} or the set() function.
-
Using Curly Braces:
my_set = {1, 2, 3, 4} # my_set is {1, 2, 3, 4} -
Using the
set()Function:my_set = set([1, 2, 3, 4]) # my_set is {1, 2, 3, 4} -
Creating an Empty Set:
- Use
set()to create an empty set (curly braces{}would create an empty dictionary instead).
empty_set = set() # empty_set is set() - Use
Key Characteristics
-
Unique Elements:
- Sets automatically eliminate duplicate values.
my_set = {1, 2, 2, 3} # my_set is {1, 2, 3} -
Unordered:
- The elements in a set are not stored in any particular order, and their order can change.
my_set = {3, 1, 2} # my_set could be displayed as {1, 2, 3} or any other order -
Immutable Elements:
- Sets can only contain immutable (hashable) elements like numbers, strings, and tuples, but not lists or other sets.
my_set = {1, "Hello", (2, 3)}
# This is valid
# my_set = {[1, 2], 3} would raise a TypeError
Common Set Operations
-
Adding Elements:
- Use
add()to add a single element to a set.
my_set = {1, 2} my_set.add(3) # my_set is {1, 2, 3} - Use
-
Removing Elements:
- Use
remove()to remove a specific element. RaisesKeyErrorif the element is not found. - Use
discard()to remove an element without raising an error if it’s not found.
my_set = {1, 2, 3} my_set.remove(2) # my_set is {1, 3} my_set.discard(4) # No error raised - Use
-
Set Union:
- Combine two sets using the
|operator orunion()method.
set1 = {1, 2, 3} set2 = {3, 4, 5} union_set = set1 | set2 # union_set is {1, 2, 3, 4, 5} - Combine two sets using the
-
Set Intersection:
- Find common elements between two sets using the
&operator orintersection()method.
set1 = {1, 2, 3} set2 = {2, 3, 4} intersection_set = set1 & set2 # intersection_set is {2, 3} - Find common elements between two sets using the
-
Set Difference:
- Find elements in one set but not in the other using the
-operator ordifference()method.
set1 = {1, 2, 3} set2 = {2, 3, 4} difference_set = set1 - set2 # difference_set is {1} - Find elements in one set but not in the other using the
-
Set Symmetric Difference:
- Find elements that are in either of the sets but not in both using the
^operator orsymmetric_difference()method.
set1 = {1, 2, 3} set2 = {3, 4, 5} symmetric_difference_set = set1 ^ set2 # symmetric_difference_set is {1, 2, 4, 5} - Find elements that are in either of the sets but not in both using the
Membership Tests
Sets are highly efficient for membership tests, meaning you can quickly check if an element is in a set.
- Checking Membership:
my_set = {1, 2, 3}
is_member = 2 in my_set  # True
not_member = 4 not in my_set  # True
Set Comprehensions
Similar to list comprehensions, you can use set comprehensions to create sets in a concise manner.
- Example:
squared_set = {x**2 for x in range(5)}
# squared_set is {0, 1, 4, 9, 16}
Modules

In Python, a module is a file containing Python definitions and statements. Modules allow you to organize your Python code into manageable sections and reuse code across different parts of your application. Each module has a .py extension.
Key Concepts of Modules in Python
-
Creating a Module: To create a module, simply save your Python code in a file with a
.pyextension. For example,mymodule.pyis a module file.# mymodule.py def greet(name): """Return a greeting message.""" return f"Hello, {name}!" pi = 3.14159 -
Importing Modules: You can import modules using the
importkeyword. This allows you to access the functions, classes, and variables defined in the module.import mymodule message = mymodule.greet("Alice") print(message) # Output: Hello, Alice! -
Importing Specific Items: You can import specific functions or variables from a module to avoid importing the entire module.
from mymodule import greet, pi message = greet("Bob") print(message) # Output: Hello, Bob! print(pi) # Output: 3.14159 -
Importing with Aliases: You can use the
askeyword to give a module or function an alias, which can make your code shorter and more readable.import mymodule as mm message = mm.greet("Charlie") print(message) # Output: Hello, Charlie! -
Module Search Path: Python searches for modules in a specific order: the current directory, then directories listed in the
PYTHONPATHenvironment variable, and finally in the default installation directories.You can view the module search path using the following code:
import sys print(sys.path) -
Standard Library Modules: Python includes a standard library of modules that provide useful functionalities. Some common standard library modules include:
math: Mathematical functions.datetime: Date and time functions.os: Operating system interfaces.sys: System-specific parameters and functions.
import math import datetime print(math.sqrt(16)) # Output: 4.0 print(datetime.date.today()) # Output: Current date -
Module Initialization: When a module is imported, Python executes its code. If you have initialization code that should only run when the module is executed directly (not when imported), use the
if __name__ == "__main__":construct.# mymodule.py def greet(name): """Return a greeting message.""" return f"Hello, {name}!" if __name__ == "__main__": print(greet("Main"))If you run
mymodule.pydirectly, it will print "Hello, Main!". If imported into another module, it will not print this message. -
Reloading Modules: To reload a module that has been modified since it was first imported, use the
reload()function from theimportlibmodule.import importlib import mymodule importlib.reload(mymodule)
Packages
Every Python file, which has the extension .py, is called a module. Python allows us to organize these modules into structures called packages, which are essentially directories that contain a special __init__.py file.

Key Concepts of Packages in Python
-
Definition of Packages: A package is a collection of modules organized in directories. A directory must contain an init.py file (which can be empty) to be recognized as a package.
my_package/ ├── __init__.py ├── module1.py └── module2.py -
Importing Modules from Packages: You can import modules or functions from a package using the dot notation. For example, to import
module1frommy_package, you would use:from my_package import module1To import a specific function or class from a module within a package:
from my_package.module1 import my_function -
Sub-packages: Packages can contain sub-packages, which are just packages within packages. Each sub-package must also contain its own
__init__.pyfile.my_package/ ├── __init__.py ├── module1.py ├── sub_package/ │ ├── __init__.py │ └── sub_module.pyImporting a module from a sub-package:
from my_package.sub_package import sub_module -
Relative Imports: Within a package, you can use relative imports to import modules or sub-packages using relative paths. This is useful for referring to modules in the same package or sub-packages.
# In my_package/module1.py from . import module2 # Import module2 from the same package from .sub_package import sub_module # Import sub_module from sub_package -
Namespace Packages: Starting with Python 3.3, the
__init__.pyfile is no longer required to create a package. This allows for namespace packages, which can span multiple directories. However, the traditional method with__init__.pyis still widely used.# Namespace package my_namespace/ └── my_package/ └── module1.py -
Installing External Packages: Python has a robust ecosystem of external packages that can be installed using package managers like
pip. These packages are typically hosted on repositories like PyPI (Python Package Index).pip install requestsAfter installation, you can use the installed package in your code:
import requests response = requests.get("https://example.com") -
Creating and Distributing Packages: To create your own package, you can include a
setup.pyfile with metadata and dependencies. This file is used for packaging and distributing your code.# setup.py example from setuptools import setup, find_packages setup( name='my_package', version='0.1', packages=find_packages(), install_requires=[ 'requests', ], )You can then build and distribute the package using:
python setup.py sdist bdist_wheel
pip install .
Variables
In Python, a variable is a named storage location that holds data, which can be modified during the execution of the program. Variables are used to store values for later use and are created when a value is assigned to them using the assignment operator (=).

Key Concepts of Variables in Python
-
Variable Assignment: Variables are assigned using the
=operator. The variable name is on the left side and the value on the right side of the operator.x = 5 # Assigns the value 5 to the variable x name = "Francesco" # Assigns the string "Francesco" to the variable name -
Dynamic Typing: Python is dynamically typed, meaning that variables do not need an explicit type declaration. The type of the variable is inferred from the value assigned to it.
x = 5 # Integer x = "Hello" # Now x is a string -
Variable Naming: Variable names must follow these rules:
- Begin with a letter or an underscore (
_). - Followed by letters, digits, or underscores.
- Case-sensitive (e.g.,
variable,Variable, andVARIABLEare different).
my_var = 10 _private_var = 20 variable1 = 30 - Begin with a letter or an underscore (
-
Variable Scope: Variables have different scopes:
- Local Scope: Variables defined within a function.
- Global Scope: Variables defined outside any function or class.
global_var = "I am global" def my_function(): local_var = "I am local" print(global_var) # Access global variable print(local_var) # Access local variable -
Reassignment: Variables can be reassigned to new values of any type.
my_var = 10 my_var = "Now I am a string" # Reassignment to a string -
Multiple Assignments: You can assign a single value to multiple variables or multiple values to multiple variables in a single line.
a = b = c = 5 # Assigns 5 to a, b, and c x, y, z = 1, 2, 3 # Assigns 1 to x, 2 to y, and 3 to z -
Data Types: Variables can hold different types of data, including but not limited to integers, floats, strings, lists, tuples, and dictionaries.
my_list = [1, 2, 3] # List my_tuple = (4, 5, 6) # Tuple my_dict = {"key1": "value1", "key2": "value2"} # Dictionary -
Variable Deletion: Variables can be deleted using the
delstatement, which removes the variable and its value from memory.x = 10 del x # x is deleted and accessing it will raise an error -
Type Conversion: You can convert variables from one type to another using type conversion functions like
int(),float(),str(), etc.x = "123" y = int(x) # Converts the string "123" to the integer 123 z = float(y) # Converts the integer 123 to the float 123.0 -
Constants: Python does not have built-in constant types, but by convention, variables intended to be constants are written in uppercase.
PI = 3.14159 # Conventionally a constant
Global vs. Local Variables
Global Variables
Global variables are defined outside of any function or class and are accessible from any part of the code. They retain their value throughout the lifetime of the program.
Characteristics:
- Defined at the top level of a script or module.
- Accessible from any function or method within the module.
- Can be modified inside functions using the
globalkeyword.
Example:
x = 10  # Global variable

def print_global():
    print(x)  # Accessing global variable

def modify_global():
    global x
    x = 20  # Modifying global variable
Local Variables
Local variables are defined within a function or method and are only accessible within that function or method. They are created when the function is called and destroyed when the function exits.
Characteristics:
- Defined inside a function or method.
- Accessible only within the function or method where they are declared.
- Cannot be accessed from outside the function or method.
Example:
def example_function():
    y = 5  # Local variable
    print(y)  # Accessing local variable

example_function()
# print(y)  # This will raise an error because 'y' is not accessible outside the function
Key Differences
- Scope: Global variables have global scope (accessible anywhere in the module), while local variables have local scope (accessible only within the function).
- Lifetime: Global variables exist for the duration of the program, whereas local variables exist only during the execution of the function.
- Modification: To modify a global variable within a function, use the
globalkeyword; local variables can be freely modified within their own scope.
Best Practices
- Minimize Global Variables: Overuse of global variables can make code harder to understand and maintain. Prefer using local variables when possible.
- Use Descriptive Names: Name variables clearly to indicate their purpose and scope, reducing confusion.
- Encapsulation: Use functions and classes to encapsulate and manage the scope of variables, keeping the global namespace clean and minimizing side effects.
Functions
In Python, a function is a block of organized code that is used to perform an action.

Functions provide better modularity for applications and a high degree of code reusing, in compliance with the DRY (Don't Repeat Yourself) principle.
Functions names, if made up of several words (compound names), are separated by underscores (e.g. my_function())
They can take parameters (inputs), perform some operations, and optionally return a value.
Key Concepts of Functions in Python
-
Function Definition: A function is defined using the
defkeyword, followed by the function name, parameters (if any) enclosed in parentheses, and a colon. The function body is indented and contains the code to execute.def function_name(parameters): # function body pass -
Function Example: Here’s a simple example of a function that adds two numbers:
def add_numbers(a, b): """Add two numbers and return the result.""" return a + b result = add_numbers(1, 2) # Output: 3 -
Parameters and Arguments: Functions can take parameters, which are inputs that the function can use to perform its task. When calling the function, the actual values passed are called arguments.
def greet(name): """Greet a person by their name.""" print(f"Hello, {name}!") greet("Isabel") # Output: Hello, Isabel! -
Return Statement: The
returnstatement is used to exit a function and optionally pass an expression back to the caller. If noreturnstatement is present, the function returnsNoneby default.def square(number): """Return the square of a number.""" return number * number result = square(4) # Output: 16 -
Default Parameters: Functions can have default parameter values, which are used if no argument is provided for that parameter when the function is called.
def greet(name="Guest"): """Greet a person with a default name.""" print(f"Hello, {name}!") greet() # Output: Hello, Guest! greet("Bob") # Output: Hello, Bob! -
Keyword Arguments: Functions can be called using keyword arguments, where the name of the parameter is explicitly stated. This allows arguments to be passed in any order.
def describe_pet(animal_type, pet_name): """Display information about a pet.""" print(f"\nI have a {animal_type}.") print(f"My {animal_type}'s name is {pet_name}.") describe_pet(animal_type="dog", pet_name="Buddy") describe_pet(pet_name="Whiskers", animal_type="cat") -
Variable-Length Arguments: Python functions can accept an arbitrary number of arguments using
*args(for non-keyword arguments) and**kwargs(for keyword arguments).def make_pizza(size, *toppings): """Print the list of toppings that have been requested.""" print(f"\nMaking a {size}-inch pizza with the following toppings:") for topping in toppings: print(f"- {topping}") make_pizza(16, "pepperoni", "mushrooms", "green peppers", "extra cheese") # Output: Making a 16-inch pizza with the following toppings: # - pepperoni # - mushrooms # - green peppers # - extra cheese -
Docstrings: Functions can include documentation strings (docstrings) to describe their purpose. These strings are written inside triple quotes
"""and can be accessed using the function’s__doc__attribute.def multiply(a, b): """Multiply two numbers and return the result.""" return a * b print(multiply.__doc__) # Output: Multiply two numbers and return the result. -
Function Scope: Variables defined inside a function are local to that function and cannot be accessed outside of it. This is known as the function's scope.
def my_function():
    x = 10  # x is local to my_function
    print(x)

my_function()  # Output: 10
# print(x)  # Raises a NameError because x is not accessible here
Lambda Functions
Lambda functions, also known as anonymous functions, are small, one-line functions defined using the lambda keyword. They are used for creating small, throwaway functions that are not necessarily required to be named.
Syntax
lambda arguments: expression
- Arguments: The inputs to the lambda function, similar to parameters in regular functions.
- Expression: A single expression that is evaluated and returned by the lambda function.
Example
Define a lambda function that adds two numbers:
add = lambda x, y: x + y
print(add(5, 3))  # Output: 8
Common Uses
-
Short-lived Functions: Lambda functions are often used for short operations where defining a full function is unnecessary.
-
Higher-order Functions: Useful in functions like
map(),filter(), andsorted()where a simple function is required.
Example with map():
numbers = [1, 2, 3, 4]
squared = map(lambda x: x**2, numbers)
print(list(squared))  # Output: [1, 4, 9, 16]
Example with filter():
numbers = [1, 2, 3, 4, 5, 6]
even_numbers = filter(lambda x: x % 2 == 0, numbers)
print(list(even_numbers))  # Output: [2, 4, 6]
Example with sorted():
points = [(2, 3), (1, 2), (4, 1)]
sorted_points = sorted(points, key=lambda point: point[1])
print(sorted_points)  # Output: [(4, 1), (1, 2), (2, 3)]
Limitations
- Single Expression: Lambda functions can only contain a single expression, not multiple statements or complex logic.
- Readability: Overusing lambda functions for complex operations can reduce code readability. For complex functions, prefer regular function definitions.
Best Practices
- Use for Simple Operations: Lambda functions are ideal for simple, short operations.
- Prefer Named Functions for Complex Logic: For more complex logic, define a named function using
defto improve readability and maintainability. - Keep it Readable: Ensure lambda functions are used in contexts where their brevity enhances code clarity, not detracts from it.
Higher-order Functions
Higher-order functions are functions that take other functions as arguments or return functions as results. They are a powerful feature in functional programming and are widely used in Python for tasks such as data processing and functional composition.
Characteristics
- Function as Argument: Higher-order functions can accept other functions as arguments.
- Function as Return Value: They can return functions as results.
- Encapsulation: They enable abstraction and code reusability by encapsulating behavior.
Examples
1. Functions as Arguments
Higher-order functions can take functions as parameters to customize behavior. For example, the map() function applies a function to all items in a list.
def square(x):
    return x ** 2

numbers = [1, 2, 3, 4]
squared_numbers = map(square, numbers)
print(list(squared_numbers))  # Output: [1, 4, 9, 16]
2. Functions as Return Values
Higher-order functions can return other functions. For example, you can create a function that returns a multiplier function.
def make_multiplier(factor):
    return lambda x: x * factor

double = make_multiplier(2)
print(double(5))  # Output: 10
3. Using filter()
The filter() function filters elements of a sequence based on a function that returns True or False.
def is_even(x):
    return x % 2 == 0

numbers = [1, 2, 3, 4, 5, 6]
even_numbers = filter(is_even, numbers)
print(list(even_numbers))  # Output: [2, 4, 6]
4. Using reduce()
The reduce() function from the functools module applies a function cumulatively to the items of a sequence, reducing the sequence to a single value.
from functools import reduce

def add(x, y):
    return x + y

numbers = [1, 2, 3, 4]
total = reduce(add, numbers)
print(total)  # Output: 10
Advantages
- Modularity: Higher-order functions promote modularity by allowing functions to be composed and reused.
- Abstraction: They provide a higher level of abstraction, making code more expressive and concise.
- Flexibility: Allow dynamic behavior by passing different functions as arguments.
Best Practices
- Use for Conciseness: Employ higher-order functions to write concise and readable code, especially for common operations like mapping and filtering.
- Avoid Overuse: Overuse can make code less readable and harder to debug. Use higher-order functions where they provide clear benefits.
- Document Behavior: Clearly document the behavior of higher-order functions, especially when they return other functions, to ensure code maintainability and clarity.
Difference Between yield and return in Python
The concepts of yield and return are fundamental in Python, particularly in the context of functions. Here’s a detailed breakdown of their differences:
1. Basic Definition
-
return:- Exits the function and optionally sends a value back to the caller.
- Once a
returnstatement is executed, the function's execution stops.
-
yield:- Pauses the function, saving its state, and allows it to be resumed later.
- It produces a generator, which can be iterated over to get results.
2. Function Behavior
-
With
return:- A function defined with
returnwill return a single value upon completion. - After a
returnstatement, the function cannot continue to execute.
def sum_numbers(a, b): return a + b result = sum_numbers(5, 3) # result is 8 - A function defined with
-
With
yield:- A function defined with
yieldis a generator function. It can return multiple values over time. - Each call to the generator function's
__next__()method will execute up to the nextyieldstatement.
def count_up_to(limit): count = 1 while count <= limit: yield count count += 1 counter = count_up_to(3) print(next(counter)) # Outputs 1 print(next(counter)) # Outputs 2 - A function defined with
3. Return Value
-
return:- Can return a value directly and can return multiple values as a tuple.
- The function must finish executing to provide a return value.
def get_coordinates(): return (5, 10) x, y = get_coordinates() # x is 5, y is 10 -
yield:- Returns a generator object instead of a single value.
- The function can be paused and resumed, allowing for lazy evaluation.
def generate_numbers():
    yield 1
    yield 2
    yield 3

gen = generate_numbers()
for number in gen:  # Outputs 1, then 2, then 3
    print(number)
4. Memory Consumption
-
return:- All values must be computed and stored in memory before they are returned.
- Can lead to higher memory usage for large outputs.
-
yield:- Produces values one at a time and only when requested.
- More memory efficient as it generates values on-the-fly.
5. Use Cases
-
return:- Best used when a function needs to output a single result or multiple results at once.
-
yield:- Ideal for handling large datasets, streams of data, or sequences where you want to generate values lazily.
- Commonly used in data processing or when working with infinite sequences.
6. Output Handling
-
return:- The values returned are accessible immediately once the function finishes execution.
-
yield:- The output must be iterated through (e.g., using a loop) to retrieve each value one-by-one as they are generated.
Summary Table
| Feature | yield | return |
|---|---|---|
| Execution | Pauses function execution | Exits function |
| Value Output | Generates multiple values lazily | Outputs a single value |
| Memory Usage | More memory efficient | Can be memory intensive |
| Output Handling | Must be iterated to access values | Accessed directly after execution |
| Use Cases | Streaming, large datasets | Calculated results, single outputs |
By understanding these differences, you can choose between yield and return based on the specific needs of your application in Python.
Methods
In Python, a method is a function that is associated with an object, and defines the behavior of the objects of a class.

In other words, methods are defined inside a class and are accessed via instances of that class (objects). They can take parameters (like regular functions) and operate on the object's internal state.
Key Concepts of Methods in Python
-
Instance Methods: These are the most common type of methods and are used to manipulate the state of an object or perform operations using its data. They take
selfas the first parameter, which represents the instance on which the method is called.class Wolf: def howl(self): """Instance method that simulates the wolf howling.""" print("Wooooooo!") wolf = Wolf() wolf.howl() # Output: Wooooooo! -
The
selfParameter: Theselfparameter is a reference to the current instance of the class and is used to access variables and methods that belong to the instance. It must be the first parameter in any instance method.
In other words, self refers to the actual object that's being created, initialised.
class Dog:
    def __init__(self, name):
        self.name = name  # Instance variable

    def bark(self):
        """Instance method that makes the dog bark."""
        print(f"{self.name} says Woof!")

dog = Dog("Scooby-Doo")
dog.bark()  # Output: Scooby-Doo says Woof!
-
Class Methods: Class methods are methods that operate on the class itself rather than on instances of the class. They are defined using the
@classmethoddecorator and takeclsas the first parameter, which represents the class.class Cat: species = "Feline" @classmethod def set_species(cls, species_name): """Class method that sets the species for the class.""" cls.species = species_name @classmethod def get_species(cls): """Class method that returns the species.""" return cls.species Cat.set_species("Big Feline") print(Cat.get_species()) # Output: Big Feline -
Static Methods: Static methods do not operate on an instance or the class itself. They are defined using the
@staticmethoddecorator and do not takeselforclsas a parameter. Static methods are typically utility functions that relate to the class but do not require access to class or instance variables.class MathUtility: @staticmethod def add(a, b): """Static method that adds two numbers.""" return a + b result = MathUtility.add(3, 4) # Output: 7 -
Special Methods (Magic Methods): Python classes have special methods, often referred to as magic methods or dunder methods (double underscore methods), that allow you to define how objects of the class behave in certain situations. These methods are prefixed and suffixed with double underscores (
__).__init__(self, ...): Called when an instance is created (constructor). It is used to initialise attributes.__str__(self): Defines the string representation of an object, used bystr()andprint().__repr__(self): Defines a more detailed string representation, used byrepr()and in debugging.__len__(self): Returns the length of the object, used bylen().__eq__(self, other): Defines behavior for the equality operator==.
class Book:
    def __init__(self, title, author, pages):
        self.title = title
        self.author = author
        self.pages = pages

    def __str__(self):
        """String representation of the object."""
        return f"'{self.title}' by {self.author}"

    def __repr__(self):
        """Detailed string representation, useful for debugging."""
        return f"Book(title='{self.title}', author='{self.author}', pages={self.pages})"

    def __len__(self):
        """Length of the book in pages."""
        return self.pages

    def __eq__(self, other):
        """Equality comparison between two books."""
        if isinstance(other, Book):
            return (self.title == other.title and
                    self.author == other.author and
                    self.pages == other.pages)
        return False

# Creating book instances
book1 = Book("1984", "George Orwell", 328)
book2 = Book("1984", "George Orwell", 328)
book3 = Book("Brave New World", "Aldous Huxley", 268)

# Using __str__ method
print(book1)        # Output: '1984' by George Orwell

# Using __repr__ method
print(repr(book1))  # Output: Book(title='1984', author='George Orwell', pages=328)

# Using __len__ method
print(len(book1))   # Output: 328

# Using __eq__ method
print(book1 == book2)  # Output: True
print(book1 == book3)  # Output: False
-
Method Overriding: In a subclass, you can override a method defined in the parent class. This allows you to customize or extend the behavior of inherited methods.
class Animal: def speak(self): return "Some sound" class Dog(Animal): def speak(self): """Override the speak method to return a dog-specific sound.""" return "Woof!" dog = Dog() print(dog.speak()) # Output: Woof! -
Method Chaining: Method chaining allows you to call multiple methods on the same object in a single line. To facilitate chaining, each method should return the object itself (
self).class Car: def __init__(self, brand): self.brand = brand self.speed = 0 def accelerate(self, increase): """Increase the car's speed.""" self.speed += increase return self def brake(self, decrease): """Decrease the car's speed.""" self.speed -= decrease return self def display(self): """Display the car's brand and current speed.""" print(f"{self.brand} is going at {self.speed} km/h") return self car = Car("Toyota") car.accelerate(30).brake(10).display() # Output: Toyota is going at 20 km/h
Note that method chaining requires a return (return self), in order to call the next method.
Otherwise, the returned value is None by default, and chaining method is not possible (a NoneType error is raised).
Instance Methods
Instance methods are functions defined within a class that operate on instances of the class. They take the instance itself as the first argument, conventionally named self. This allows the method to access and modify the instance's attributes and other methods.
Defining Instance Methods
Instance methods are defined using the def keyword inside a class. The first parameter of an instance method is always self, which refers to the instance on which the method is called.
Example:
class Car:
    def __init__(self, make, model):
        self.make = make
        self.model = model

    def display_info(self):
        return f"{self.make} {self.model}"

# Create an instance of Car
my_car = Car("Opel", "Astra")
print(my_car.display_info())  # Output: Opel Astra
Accessing and Modifying Attributes
Instance methods can access and modify instance attributes defined in the __init__ method or elsewhere in the class.
Example:
class BankAccount:
    def __init__(self, balance):
        self.balance = balance

    def deposit(self, amount):
        self.balance += amount

    def get_balance(self):
        return self.balance

# Create an instance of BankAccount
account = BankAccount(100)
account.deposit(50)
print(account.get_balance())  # Output: 150
Using self
The self parameter is used to access instance attributes and other methods from within an instance method. It is automatically passed by Python when the method is called on an instance.
Example:
class Rectangle:
    def __init__(self, width, height):
        self.width = width
        self.height = height

    def area(self):
        return self.width * self.height

    def perimeter(self):
        return 2 * (self.width + self.height)

# Create an instance of Rectangle
rect = Rectangle(4, 5)
print(rect.area())       # Output: 20
print(rect.perimeter())  # Output: 18
Best Practices
- Use Descriptive Names: Name methods clearly to reflect their functionality.
- Keep Methods Focused: Each instance method should have a single responsibility. Avoid making methods too complex or multi-functional.
- Document Methods: Use docstrings to describe the purpose and behavior of instance methods for better code readability and maintainability.
- Avoid Modifying Global State: Instance methods should generally operate on instance data rather than affecting global state or other unrelated instances.
Class Methods
Class methods are methods that operate on the class itself rather than on instances of the class. They take the class as their first parameter, conventionally named cls. Class methods can be used to access or modify class-level attributes and are defined using the @classmethod decorator.
Defining Class Methods
Class methods are defined using the @classmethod decorator and must have cls as their first parameter.
Example:
class MyClass:
    class_variable = "I am a class variable"

    @classmethod
    def get_class_variable(cls):
        return cls.class_variable

# Access the class method
print(MyClass.get_class_variable())  # Output: I am a class variable
Modifying Class State
Class methods can be used to modify class-level attributes or perform actions that affect the class as a whole.
Example:
class Counter:
    count = 0

    @classmethod
    def increment(cls):
        cls.count += 1

    @classmethod
    def get_count(cls):
        return cls.count

# Increment the count using the class method
Counter.increment()
print(Counter.get_count())  # Output: 1
Using Class Methods for Factory Methods
Class methods can be used as factory methods to create instances of the class in different ways. This can be useful for alternative constructors.
Example:
class Person:
    def __init__(self, name, age):
        self.name = name
        self.age = age

    @classmethod
    def from_string(cls, person_str):
        name, age = person_str.split('-')
        return cls(name, int(age))

# Create an instance using the class method
person = Person.from_string("John-30")
print(person.name)  # Output: John
print(person.age)   # Output: 30
Key Differences from Instance Methods
- First Parameter: Class methods use
clsto refer to the class, while instance methods useselfto refer to the instance. - Access: Class methods can access and modify class-level attributes, whereas instance methods operate on instance-specific attributes.
Best Practices
- Use for Class-Level Operations: Use class methods for operations that pertain to the class itself rather than to individual instances.
- Factory Methods: Use class methods to provide alternative ways to instantiate objects, especially when the initialization logic is complex.
- Keep Methods Focused: Ensure class methods are clear in their purpose and only handle class-level operations.
Static Methods
Static methods are methods that do not operate on an instance or the class itself. They do not require access to the instance (self) or the class (cls) and are used for utility functions that are logically related to the class but do not need to modify class or instance state. Static methods are defined using the @staticmethod decorator.
Defining Static Methods
Static methods are defined using the @staticmethod decorator and do not take self or cls as their first parameter.
Example:
class MathUtils:
    @staticmethod
    def add(x, y):
        return x + y

    @staticmethod
    def multiply(x, y):
        return x * y

# Call static methods directly on the class
print(MathUtils.add(5, 3))      # Output: 8
print(MathUtils.multiply(4, 6)) # Output: 24
Characteristics
- No Access to Instance or Class: Static methods do not have access to the instance (
self) or the class (cls). They operate independently of class or instance data. - Utility Functions: Typically used for utility functions that perform a task related to the class but do not need to access or modify class or instance state.
- Namespace Organization: They help organize related functions within a class namespace without needing to instantiate the class.
When to Use Static Methods
- Utility Functions: Use static methods for functions that perform operations not dependent on instance or class state but are logically related to the class.
- Code Organization: Static methods help group functions that are related to a class together, improving code organization and readability.
Example: Static Method for Validation
class UserValidator:
    @staticmethod
    def is_valid_email(email):
        return "@" in email and "." in email

# Validate an email address using the static method
print(UserValidator.is_valid_email("user@example.com"))  # Output: True
print(UserValidator.is_valid_email("userexample.com"))    # Output: False
Key Differences from Class and Instance Methods
- No
selforcls: Unlike instance methods and class methods, static methods do not have access toselforcls. They do not operate on instance or class data. - Purpose: Static methods are best suited for operations that are related to the class but do not require interaction with instance or class-specific data.
Best Practices
- Use for Helper Functions: Use static methods for helper functions that logically belong to a class but do not need to interact with class or instance attributes.
- Avoid Side Effects: Ensure static methods do not modify global or external state, as they should remain self-contained.
- Maintain Readability: Use static methods to improve code readability and organization by keeping related functionality within the class namespace.
Classes
In Python, a class is a template, a prototype, a blueprint that defines the structure and behavior (attributes and methods) of objects.

So, we can say that classes are used to create objects. To create an object from a class, we need to give the object a name, set it equal to the name of the class, and then the parentheses.
computer = MyComputerClass()
Key Concepts of Classes in Python
- Class Definition: A class is defined using the class keyword followed by the class name and a colon. Class names are typically written in Pascal Case1.
class MyClass: # this is how a class is defined
- Attributes and Methods: Attributes are variables that belong to the class. Methods are functions that belong to the class.
class MyClass:
    def my_method(self):
        message = "Hello, World!" # this is an attribute
        print(message) # this is a method
-
The init Method: It is a special method called constructor that is automatically called when a new instance of the class is created; it is used to initialize the attributes of the class.
-
Self Parameter: The first parameter of every method in a class, usually named self, which refers to the instance calling the method.
class MyClass:
    def __init__(self): # this is the constructor
        self.my_attribute = "Hello, World!"
        print(self.my_attribute)
- Creating an Instance: An instance is created by calling the class using its name and passing any required arguments.
my_instance = MyClass()
- Inheritance: A mechanism to create a new class using details of an existing class without modifying it. The new class (child class) inherits attributes and methods from the existing class (parent class).
Pascal Case: Pascal case is similar to camel case (e.g. "camelCase"), but unlike camel case, the first letter of each word is capitalized, such as: "PascalCase".
Classes: code example
Definition of the SoftwareDeveloper class
class SoftwareDeveloper:
The constructor method (init) initializes the attributes of the class
    def __init__(self, name, experience, languages):
        self.name = name  # Attribute: name of the developer
        self.experience = experience  # Attribute: years of experience
        self.languages = languages  # Attribute: list of programming languages the developer knows
    # Method to add a new programming language to the developer's skill set
    def add_language(self, new_language):
        self.languages.append(new_language)  # Adds the new language to the list of known languages
        print(f"{self.name} has learned {new_language}.")
    # Method to get the developer's details as a formatted string
    def get_details(self):
        # Returns the developer's details
        return f"Name: {self.name}, Experience: {self.experience} years, Languages: {', '.join(self.languages)}"
    # Method to update the developer's experience
    def update_experience(self, new_experience):
        self.experience = new_experience  # Updates the experience attribute
        print(f"{self.name}'s experience updated to {self.experience} years.")
Creating an instance of the SoftwareDeveloper class
dev1 = SoftwareDeveloper("Alice", 5, ["Python", "JavaScript"])
Accessing attributes and methods
print(dev1.get_details()) # Output: Name: Alice, Experience: 5 years, Languages: Python, JavaScript
Adding a new language
dev1.add_language("Java") # Output: Alice has learned Java.
Updating experience
dev1.update_experience(6) # Output: Alice's experience updated to 6 years.
Printing updated details
print(dev1.get_details()) # Output: Name: Alice, Experience: 6 years, Languages: Python, JavaScript, Java
Inheritance example: creating a subclass of SoftwareDeveloper
class SeniorDeveloper(SoftwareDeveloper):
    def __init__(self, name, experience, languages, mentoring_experience):
        # Calling the parent class constructor to initialize inherited attributes
        super().__init__(name, experience, languages)
        self.mentoring_experience = mentoring_experience  # New attribute specific to SeniorDeveloper
    # Method to get the senior developer's details including mentoring experience
    def get_details(self):
        base_details = super().get_details()  # Get details from the parent class
        return f"{base_details}, Mentoring Experience: {self.mentoring_experience} years"
Creating an instance of the SeniorDeveloper class
senior_dev = SeniorDeveloper("Bob", 10, ["Python", "Java", "C++"], 4)
Accessing attributes and methods from both the parent and child classes
print(senior_dev.get_details()) # Output: Name: Bob, Experience: 10 years, Languages: Python, Java, C++, Mentoring Experience: 4 years
Inheritance
Inheritance is an object-oriented programming concept that allows a class (child or subclass) to inherit attributes and methods from another class (parent or superclass). It promotes code reuse and establishes a hierarchical relationship between classes.
Types of Inheritance
-
Single Inheritance: A class inherits from a single parent class.
class Animal: def speak(self): return "Animal sound" class Dog(Animal): def bark(self): return "Woof" dog = Dog() print(dog.speak()) # Output: Animal sound print(dog.bark()) # Output: Woof -
Multiple Inheritance: A class inherits from more than one parent class.
class A: def method_a(self): return "Method A" class B: def method_b(self): return "Method B" class C(A, B): pass c = C() print(c.method_a()) # Output: Method A print(c.method_b()) # Output: Method B -
Multilevel Inheritance: A class inherits from a class that is itself inherited from another class.
class Animal: def eat(self): return "Eating" class Mammal(Animal): def walk(self): return "Walking" class Dog(Mammal): def bark(self): return "Woof" dog = Dog() print(dog.eat()) # Output: Eating print(dog.walk()) # Output: Walking print(dog.bark()) # Output: Woof -
Hierarchical Inheritance: Multiple classes inherit from a single parent class.
class Vehicle:
    def start(self):
        return "Vehicle started"

class Car(Vehicle):
    def drive(self):
        return "Driving car"

class Bike(Vehicle):
    def ride(self):
        return "Riding bike"

car = Car()
bike = Bike()
print(car.start())  # Output: Vehicle started
print(car.drive())  # Output: Driving car
print(bike.start()) # Output: Vehicle started
print(bike.ride())  # Output: Riding bike
The super() Function
The super() function is used to call methods from a parent class from within a child class. This is useful for extending the functionality of inherited methods.
class Parent:
    def greet(self):
        return "Hello from Parent"

class Child(Parent):
    def greet(self):
        return super().greet() + " and Child"

child = Child()
print(child.greet())  # Output: Hello from Parent and Child
Key Points
- Code Reuse: Inheritance promotes reuse by allowing a child class to use methods and attributes from a parent class.
- Hierarchical Relationships: It establishes a hierarchical relationship between classes.
- Extensibility: Child classes can extend or modify the behavior of parent classes.
Best Practices
- Favor Composition over Inheritance: Use composition to combine functionalities where possible, and use inheritance for clear hierarchical relationships.
- Keep Hierarchies Simple: Avoid deep inheritance hierarchies that can make the codebase complex and difficult to manage.
- Document Inheritance: Clearly document the parent-child relationships and overridden methods to enhance code readability and maintainability.
Polymorphism
Polymorphism is a core concept in object-oriented programming (OOP) that allows objects of different classes to be treated as objects of a common superclass. It is derived from Greek, meaning "many shapes."
Types of Polymorphism
-
Method Overriding: This occurs when a subclass provides a specific implementation of a method that is already defined in its superclass. The method in the subclass overrides the method in the superclass.
class Animal: def speak(self): return "Animal speaks" class Dog(Animal): def speak(self): return "Dog barks" def make_animal_speak(animal): print(animal.speak()) my_dog = Dog() make_animal_speak(my_dog) # Output: Dog barks -
Method Overloading: Python does not support method overloading by default as some other languages do. Instead, you can use default arguments or variable-length arguments to achieve similar results.
class Example: def greet(self, name=None): if name: return f"Hello, {name}!" return "Hello!" obj = Example() print(obj.greet()) # Output: Hello! print(obj.greet("Alice")) # Output: Hello, Alice! -
Operator Overloading: Python allows operators to be overloaded to provide custom behavior for user-defined classes.
class Vector:
    def __init__(self, x, y):
        self.x = x
        self.y = y

    def __add__(self, other):
        return Vector(self.x + other.x, self.y + other.y)

    def __repr__(self):
        return f"Vector({self.x}, {self.y})"

v1 = Vector(2, 3)
v2 = Vector(4, 5)
v3 = v1 + v2
print(v3)  # Output: Vector(6, 8)
Benefits of Polymorphism
- Flexibility: Allows for the use of a single interface to represent different underlying forms (data types).
- Reusability: Enhances code reusability by allowing the same function or method to operate on different types of data.
- Maintainability: Simplifies code maintenance and modification by reducing the need for multiple function names and promoting code uniformity.
Encapsulation
Encapsulation is an OOP concept that involves bundling data (attributes) and methods (functions) that operate on the data into a single unit or class. It restricts direct access to some of an object's components, which can help prevent accidental interference and misuse.
Principles of Encapsulation
-
Private Attributes and Methods: By marking attributes and methods as private, you restrict their access from outside the class. This is done by prefixing the attribute or method name with an underscore (
_) or double underscore (__).class Car: def __init__(self, make, model): self._make = make # Protected attribute self.__model = model # Private attribute def get_model(self): return self.__model def set_model(self, model): self.__model = model my_car = Car("Toyota", "Corolla") print(my_car.get_model()) # Output: Corolla # print(my_car.__model) # Raises AttributeError -
Public Methods: Public methods provide controlled access to the private attributes. They are used to get or set the values of private attributes, thereby providing an interface to interact with the data in a controlled manner.
class Account:
    def __init__(self, balance):
        self.__balance = balance

    def deposit(self, amount):
        if amount > 0:
            self.__balance += amount

    def withdraw(self, amount):
        if 0 < amount <= self.__balance:
            self.__balance -= amount

    def get_balance(self):
        return self.__balance

my_account = Account(100)
my_account.deposit(50)
print(my_account.get_balance())  # Output: 150
my_account.withdraw(30)
print(my_account.get_balance())  # Output: 120
Benefits of Encapsulation
- Control: Encapsulation allows control over how the data in a class is accessed and modified, ensuring that the data is used in a consistent and predictable manner.
- Flexibility and Maintenance: It provides the ability to change the internal implementation of the class without affecting the external code that uses the class.
- Increased Security: Protects the internal state of the object from unintended or harmful changes by restricting access to private attributes and methods.
Abstract Classes
An abstract class is a class that cannot be instantiated on its own and is intended to be subclassed. It provides a common interface for its subclasses and may include abstract methods that must be implemented by any subclass.
Characteristics
-
Abstract Methods: Methods declared in an abstract class that do not have an implementation. Subclasses must override these methods to provide specific functionality.
from abc import ABC, abstractmethod class Shape(ABC): @abstractmethod def area(self): pass @abstractmethod def perimeter(self): pass class Circle(Shape): def __init__(self, radius): self.radius = radius def area(self): return 3.14 * self.radius ** 2 def perimeter(self): return 2 * 3.14 * self.radius my_circle = Circle(5) print(my_circle.area()) # Output: 78.5 print(my_circle.perimeter()) # Output: 31.400000000000002 -
Concrete Methods: Methods in an abstract class that have an implementation. Subclasses can use these methods directly or override them if needed.
class Shape(ABC):
    @abstractmethod
    def area(self):
        pass

    @abstractmethod
    def perimeter(self):
        pass

    def description(self):
        return "This is a geometric shape."

class Rectangle(Shape):
    def __init__(self, width, height):
        self.width = width
        self.height = height

    def area(self):
        return self.width * self.height

    def perimeter(self):
        return 2 * (self.width + self.height)

my_rectangle = Rectangle(4, 6)
print(my_rectangle.description())  # Output: This is a geometric shape.
Benefits of Abstract Classes
- Design Blueprint: Provides a template for other classes to follow, ensuring that a certain set of methods are implemented in subclasses.
- Code Reusability: Allows for the reuse of common code and functionality in concrete subclasses.
- Enforces Structure: Ensures that all subclasses adhere to a certain interface and implement necessary methods, promoting consistency.
Objects
An object is an abstraction for a data structure; everything in Python is an object.

In Object Oriented Programming, we are trying to model real life objects, and these objects have things (attributes, usually modeled by variables) and they also can do things (methods, usually modeled by functions).
In other words, an object is a way of combining some piece of data and some functionality, all together.
For example, a function can be an object, but a class, a list, a variable can be objects too, and so on. Everything in Python can be defined as an object.
We can also affirm that an object is an instance of a class. In this case, the word instance means an example, an occurrence of a class.
Objects encapsulate data and functions (methods) which operate on that data. An object could be seen as a container of data, characterized by these three essential peculiarities:
- An identifier (ID): A unique name or reference that distinguishes one object from another.
- A type: The class or data type of the object which defines the object's behavior and properties.
- A value: The data or state contained within the object.
Key Concepts of Objects in Python
-
Object Identity: Every object has a unique identity, which can be obtained using the
id()function. This identity remains constant during the object’s lifetime.print(id(my_car)) # Outputs a unique identifier for the object -
Object Type: The type of an object can be determined using the
type()function. This returns the class to which the object belongs.print(type(my_car)) # Output: <class '__main__.Car'> -
Object Value: The value of an object is the actual data stored in the object’s attributes. This value can be manipulated and queried through methods and attributes.
print(my_car.make) # Output: Toyota -
Mutability: Objects can be mutable (e.g., lists, dictionaries) or immutable (e.g., integers, strings, tuples). Mutable objects can be changed after they are created, while immutable objects cannot.
mutable_list = [1, 2, 3] immutable_tuple = (1, 2, 3) mutable_list.append(4) # The list can be modified # immutable_tuple.append(4) # This would raise an AttributeError -
Object Lifespan: The lifespan of an object begins when it is created and ends when it is no longer referenced and is garbage collected by Python.
del my_car # Removes the reference to the object; it may be garbage collected
Namespaces
A namespace is a system that ensures the unique identification of names within a program. It acts as a container that holds a set of identifiers (names) and their associated objects, avoiding name conflicts and allowing for the organization of code.

Types of Namespaces in Python
-
Local Namespace: The local namespace is created within a function when it is called. It contains names defined in that function, including parameters and variables. These names are accessible only within that function.
def my_function(): local_var = 5 # local_var is in the local namespace print(local_var) my_function() # Output: 5 # print(local_var) # Raises a NameError because local_var is not accessible outside the function -
Global Namespace: The global namespace refers to the scope of the module or script. Names defined at the top level of a module or script are part of the global namespace. These names are accessible throughout the module.
global_var = "Hello, World!" # global_var is in the global namespace def print_global(): print(global_var) # Accessing a global variable from within a function print_global() # Output: Hello, World! -
Built-in Namespace: The built-in namespace contains names that are predefined in Python and available in any module. This includes built-in functions and exceptions, such as
len(),range(), andException.print(len("Python")) # Output: 6 print(range(5)) # Output: range(0, 5)
Namespace Lookup Order
When accessing a name, Python follows the LEGB rule to look it up:
-
Local: Searches the local namespace (current function or scope).
-
Enclosing: Searches any enclosing functions or scopes.
-
Global: Searches the global namespace (module-level).
-
Built-in: Searches the built-in namespace.
def outer_function(): outer_var = "outer" def inner_function(): inner_var = "inner" print(inner_var) # Local to inner_function print(outer_var) # Enclosing scope inner_function() outer_function() # Output: # inner # outer
Modifying Namespaces
You can modify the global namespace using the global keyword inside a function, which allows you to assign values to global variables.
global_var = "Original"
def modify_global():
global global_var
global_var = "Modified" # Modifying the global variable
modify_global()
print(global_var) # Output: Modified
Scopes
A scope is the textual region of a Python program where a namespace is directly accessible. In other words, a scope defines the areas of a program where variables can be accessed or modified.

Key Concepts of Scopes in Python
-
Local Scope: Variables defined inside a function have a local scope. These variables are accessible only within that function.
def my_function(): local_var = "I am local" # Local scope print(local_var) # Output: I am local -
Global Scope: Variables defined outside of any function or class have a global scope. These variables are accessible from anywhere in the module after their definition.
global_var = "I am global" # Global scope def my_function(): print(global_var) # Output: I am global -
Enclosing Scope: Variables defined in a containing (enclosing) function's scope are accessible in nested functions but not vice versa.
def outer_function(): enclosing_var = "I am enclosing" def inner_function(): print(enclosing_var) # Accesses the variable from the enclosing scope inner_function() -
Built-in Scope: This is the scope of Python's built-in functions and exceptions. It is the broadest scope and is accessible anywhere in the code.
print(len("example")) # len() is a built-in function -
Global Keyword: The
globalkeyword allows you to modify a global variable inside a function.counter = 0 def increment(): global counter counter += 1 -
Nonlocal Keyword: The
nonlocalkeyword allows you to modify a variable in an enclosing (non-global) scope.def outer_function(): count = 0 def inner_function(): nonlocal count count += 1 inner_function() return count -
Namespace: A namespace is a mapping from names to objects. Different scopes correspond to different namespaces.
x = 10 # Global namespace def my_function(): x = 5 # Local namespace print(x) # Output: 5 -
Scope Resolution (LEGB Rule): Python uses the LEGB rule to resolve variable names:
- Local: The innermost scope (local function scope).
- Enclosing: The scope of any enclosing functions.
- Global: The top-level scope of the module.
- Built-in: The built-in scope.
x = 10 # Global scope def outer(): x = 5 # Enclosing scope def inner(): x = 2 # Local scope print(x) # Output: 2 inner() print(x) # Output: 5 outer() print(x) # Output: 10
The LEGB Rule
Python uses the LEGB rule to define the scope of variables. LEGB stands for Local, Enclosing, Global, and Built-in.
Infact, there are different types of scopes in Python:
- Local Scope
Variables defined within a function are in the local scope. They are accessible only within that function. Local variables are created when the function is called and are destroyed when the function terminates.
def my_function():
local_var = 10 # Local scope
print(local_var)
my_function() # Outputs: 10
print(local_var) # Raises NameError: name 'local_var' is not defined
- Enclosing (or Nonlocal) Scope
This scope refers to variables in the enclosing function, which is the function that contains another function.
If a nested function modifies a variable in the enclosing function, the nonlocal keyword is used.
def outer_function():
enclosing_var = 20
print(enclosing_var) # Outputs: 20
def inner_function():
nonlocal enclosing_var
enclosing_var = 30
print(enclosing_var) # Outputs: 30
inner_function()
print(enclosing_var) # Outputs: 30
outer_function()
- Global Scope
Variables defined at the top level of a script or module are in the global scope. They are accessible from any part of the code after they are defined.
To modify a global variable within a function, the global keyword is used.
global_var = 40 # Global scope
def my_function():
global global_var
global_var = 50
print(global_var) # Outputs: 50
my_function()
print(global_var) # Outputs: 50
- Built-in Scope
This is the scope that contains names that are preassigned in Python. These names are always available and include functions like print(), len(), etc.
print(len("hello")) # 'print' and 'len' are built-in functions
When Python encounters a variable, it searches for it in the following order:
- Local: The innermost scope, which is the local scope.
- Enclosing: Any enclosing functions' scopes, from inner to outer.
- Global: The next-to-last scope, which is the module's global scope.
- Built-in: The outermost scope, which is the built-in names.
Example:
x = "global"
def outer():
x = "enclosing"
def inner():
x = "local"
print(x)
inner() # Outputs: "local"
print(x) # Outputs: "enclosing"
outer() # Outputs: "global"
print(x) # Outputs: "global"
Summary
- Local Scope: Variables defined within a function.
- Enclosing Scope: Variables in the local scope of enclosing functions.
- Global Scope: Variables defined at the top level of a script/module.
- Built-in Scope: Predefined names in Python.
Operations with Numbers

In Python, various operators are used to perform mathematical operations on numbers. Here’s a breakdown of the common operators and their usage:
| Operator | Meaning | Example | Output |
|---|---|---|---|
+ | Addition | 1 + 1 | 2 |
- | Subtraction | 1 - 1 | 0 |
* | Multiplication | 1 * 1 | 1 |
/ | True Division (returns a float) | 9 / 5 | 1.8 |
// | Floor Division (integer division) | 9 // 5 | 1 |
** | Exponentiation (power) | 2 ** 3 | 8 |
% | Modulo (remainder of division) | 10 % 3 | 1 |
Key Concepts of Number Operations in Python
-
Addition (
+): Adds two numbers together and returns the sum.result = 5 + 3 # Output: 8 -
Subtraction (
-): Subtracts the second number from the first and returns the difference.result = 10 - 4 # Output: 6 -
Multiplication (
*): Multiplies two numbers and returns the product.result = 7 * 6 # Output: 42 -
True Division (
/): Divides the first number by the second, always returning a float.result = 9 / 4 # Output: 2.25 -
Floor Division (
//): Divides the first number by the second and returns the largest integer less than or equal to the result.result = 9 // 4 # Output: 2 -
Exponentiation (
**): Raises the first number to the power of the second number and returns the result.result = 3 ** 4 # Output: 81 -
Modulo (
%): Returns the remainder of the division of the first number by the second number.result = 10 % 3 # Output: 1 -
Combination of Operations: Python supports combining multiple operations in a single expression, with standard precedence rules.
result = (2 + 3) * (5 ** 2) / 4 # Output: 31.25 -
Order of Operations: Python follows the standard order of operations (PEMDAS/BODMAS) where Parentheses/Brackets, Exponents/Orders, Multiplication and Division, and Addition and Subtraction are performed in that order.
result = 3 + 2 * (8 / 4) ** 2 # Output: 11.0 -
Type Conversion: Operations between different numeric types (e.g., integer and float) result in a float. Explicit type conversion can be performed using
int(),float(), etc.int_result = int(7 / 3) # Output: 2 float_result = float(7 // 3) # Output: 2.0
Comparison Operations
Comparison operations are used to compare two values and determine their relationship. They return a boolean value (True or False) based on the result of the comparison.
Common Comparison Operators
-
Equal to (
==): Checks if two values are equal.a = 5 b = 5 result = (a == b) # True print(result) # Output: True -
Not equal to (
!=): Checks if two values are not equal.a = 5 b = 3 result = (a != b) # True print(result) # Output: True -
Greater than (
>): Checks if the left value is greater than the right value.a = 7 b = 5 result = (a > b) # True print(result) # Output: True -
Less than (
<): Checks if the left value is less than the right value.a = 3 b = 5 result = (a < b) # True print(result) # Output: True -
Greater than or equal to (
>=): Checks if the left value is greater than or equal to the right value.a = 5 b = 5 result = (a >= b) # True print(result) # Output: True -
Less than or equal to (
<=): Checks if the left value is less than or equal to the right value.a = 4 b = 5 result = (a <= b) # True print(result) # Output: True
Conclusion
Comparison operations are essential for decision-making in programming. They enable you to compare values and control the flow of your code based on conditions, facilitating logical reasoning and branching.
Logical Operations
Logical operations are used to combine or negate boolean values, facilitating complex conditional logic in programming.
Common Logical Operators
-
AND (
and): ReturnsTrueif both operands areTrue; otherwise, returnsFalse.a = True b = False result = a and b # False print(result) # Output: False -
OR (
or): ReturnsTrueif at least one operand isTrue; returnsFalseif both areFalse.a = True b = False result = a or b # True print(result) # Output: True -
NOT (
not): Negates the boolean value of the operand. ReturnsTrueif the operand isFalse, andFalseif the operand isTrue.a = True result = not a # False print(result) # Output: False
Combining Logical Operators
Logical operators can be combined to form more complex conditions:
a = True
b = False
c = True
result = (a and b) or c # True
print(result) # Output: True
Short-Circuit Evaluation
Logical operators use short-circuit evaluation to optimize performance:
-
AND (
and): If the first operand isFalse, the second operand is not evaluated. -
OR (
or): If the first operand isTrue, the second operand is not evaluated.def expensive_operation(): print("Operation performed") return True result = False and expensive_operation() # "Operation performed" is not printed print(result) # Output: False
Conclusion
Logical operations are fundamental for building conditions and control flow in programming. They enable complex decision-making and efficient code execution through short-circuit evaluation.
Bitwise Operations
Bitwise operations perform operations on the binary representations of integers. These operations are useful for low-level programming and manipulating data at the bit level.
Common Bitwise Operators
-
AND (
&): Performs a bitwise AND. Results in a bit being set if it is set in both operands.a = 12 # 1100 in binary b = 7 # 0111 in binary result = a & b # 0100 in binary, which is 4 print(result) # Output: 4 -
OR (
|): Performs a bitwise OR. Results in a bit being set if it is set in either operand.a = 12 # 1100 in binary b = 7 # 0111 in binary result = a | b # 1111 in binary, which is 15 print(result) # Output: 15 -
XOR (
^): Performs a bitwise XOR. Results in a bit being set if it is set in one operand but not both.a = 12 # 1100 in binary b = 7 # 0111 in binary result = a ^ b # 1011 in binary, which is 11 print(result) # Output: 11 -
NOT (
~): Performs a bitwise NOT. Inverts all bits of the operand (one's complement).a = 12 # 1100 in binary result = ~a # Inverts bits: 0011 in binary, which is -13 (in two's complement) print(result) # Output: -13 -
Left Shift (
<<): Shifts bits to the left by a specified number of positions. Fills with zeros on the right.a = 3 # 0011 in binary result = a << 2 # 1100 in binary, which is 12 print(result) # Output: 12 -
Right Shift (
>>): Shifts bits to the right by a specified number of positions. For positive numbers, fills with zeros on the left.a = 12 # 1100 in binary result = a >> 2 # 0011 in binary, which is 3 print(result) # Output: 3
Conclusion
Bitwise operations are used to manipulate individual bits of integers. Understanding these operations is essential for tasks that require direct control over binary data and performance optimization at the bit level.
Assignment Operations
Basic Assignment
-
Simple Assignment (
=): Assigns a value to a variable.x = 10
Compound Assignment Operators
-
Addition (
+=): Adds and assigns.x = 5 x += 3 # x = x + 3 -
Subtraction (
-=): Subtracts and assigns.x = 10 x -= 4 # x = x - 4 -
Multiplication (
*=): Multiplies and assigns.x = 7 x *= 2 # x = x * 2 -
Division (
/=): Divides and assigns.x = 20 x /= 4 # x = x / 4 -
Floor Division (
//=): Floor divides and assigns.x = 17 x //= 3 # x = x // 3 -
Modulus (
%=): Applies modulus and assigns.x = 14 x %= 5 # x = x % 5 -
Exponentiation (
**=): Exponentiates and assigns.x = 2 x **= 3 # x = x ** 3 -
Bitwise Operations:
- AND (
&=): Applies bitwise AND. - OR (
|=): Applies bitwise OR. - XOR (
^=): Applies bitwise XOR. - Left Shift (
<<=): Shifts bits left. - Right Shift (
>>=): Shifts bits right.
x = 8 x &= 3 # x = x & 3 - AND (
Conclusion
Assignment operations simplify updating variables through arithmetic, bitwise, and compound operations, improving code conciseness and readability.
Try-Except Blocks
Try-except blocks handle exceptions and errors that occur during program execution, allowing you to manage unexpected situations and ensure that your program can recover gracefully.
Basic Structure
-
Try Block: Contains code that might raise an exception.
try: # Code that may raise an exception result = 10 / 0 -
Except Block: Contains code that executes if an exception occurs in the try block.
except ZeroDivisionError: # Code to handle the exception print("Cannot divide by zero.")
Example
try:
number = int(input("Enter a number: "))
result = 10 / number
except ValueError:
print("Invalid input; please enter an integer.")
except ZeroDivisionError:
print("Cannot divide by zero.")
except Exception as e:
print(f"An unexpected error occurred: {e}")
Multiple Except Blocks
Handle different types of exceptions with multiple except blocks.
try:
# Code that may raise multiple exceptions
value = int("not a number")
except ValueError:
print("ValueError: Invalid input.")
except TypeError:
print("TypeError: Incorrect type.")
Finally Block
(Optional) Executes code regardless of whether an exception occurred or not, often used for cleanup.
try:
file = open("file.txt", "r")
# Code to read file
except FileNotFoundError:
print("File not found.")
finally:
file.close() # Ensure file is closed
Else Block
(Optional) Executes code if no exception occurs in the try block.
try:
result = 10 / 2
except ZeroDivisionError:
print("Cannot divide by zero.")
else:
print(f"Division successful, result is {result}.")
Conclusion
Try-except blocks are crucial for robust error handling in Python. They help manage exceptions gracefully, ensuring that your program can handle errors without crashing and perform necessary cleanup or alternative actions.
Custom Exceptions
Custom exceptions allow you to define your own error types to represent specific error conditions in your program. They help make error handling more precise and meaningful.
Creating Custom Exceptions
-
Define a Custom Exception Class: Inherit from the built-in
Exceptionclass or one of its subclasses.class MyCustomError(Exception): def __init__(self, message): super().__init__(message) self.message = message -
Raise a Custom Exception: Use the
raisekeyword to trigger the custom exception in your code.def divide(x, y): if y == 0: raise MyCustomError("Cannot divide by zero.") return x / y try: result = divide(10, 0) except MyCustomError as e: print(f"Error: {e.message}")
Adding Additional Functionality
You can extend custom exceptions with additional attributes or methods to provide more context.
class DetailedError(Exception):
def __init__(self, message, error_code):
super().__init__(message)
self.message = message
self.error_code = error_code
def process_data(data):
if not data:
raise DetailedError("No data provided.", 404)
try:
process_data(None)
except DetailedError as e:
print(f"Error: {e.message}, Code: {e.error_code}")
Best Practices
- Inherit from
Exception: Ensure your custom exception inherits fromExceptionor a more specific built-in exception. - Provide Meaningful Messages: Use descriptive messages to make the exception informative.
- Document Custom Exceptions: Clearly document when and why to use each custom exception.
Conclusion
Custom exceptions enhance error handling by allowing you to define and manage specific error conditions in a more controlled and descriptive manner. They provide better context for errors and make your codebase more maintainable.
File Handling

File handling in Python involves working with files on the disk to read, write, or manipulate data. Python provides built-in functions and methods that make file handling easy and straightforward.
File Operations
Python provides several built-in functions to perform basic file operations, such as opening, reading, writing, and closing files.
-
Opening a File:
- Use the
open()function to open a file. Theopen()function returns a file object, which allows you to interact with the file. - Syntax:
file_object = open("filename", "mode") - Common modes include:
'r': Read (default mode)'w': Write (creates a new file or truncates an existing file)'a': Append (writes to the end of the file without truncating)'b': Binary mode (used with other modes for binary files)
- Use the
-
Reading a File:
read(): Reads the entire file content as a string.readline(): Reads a single line from the file.readlines(): Reads all lines and returns them as a list.- Example:
file = open("example.txt", "r") content = file.read() # Reads entire file first_line = file.readline() # Reads first line all_lines = file.readlines() # Reads all lines as a list file.close()
-
Writing to a File:
write(): Writes a string to the file.writelines(): Writes a list of strings to the file.- Example:
file = open("example.txt", "w") file.write("Hello, World!\n") lines = ["Line 1\n", "Line 2\n", "Line 3\n"] file.writelines(lines) file.close()
-
Appending to a File:
- Use
'a'mode to append content to the end of the file without truncating it. - Example:
file = open("example.txt", "a") file.write("This line is appended.\n") file.close()
- Use
-
Closing a File:
- Always close the file after performing operations to free system resources.
- Example:
file = open("example.txt", "r") # Perform operations file.close()
File Handling Using with Statement
Using the with statement is the preferred way to handle files in Python. It ensures that the file is properly closed after its suite finishes, even if an exception occurs.
- Example:
with open("example.txt", "r") as file: content = file.read() # The file is automatically closed after the block
Working with Binary Files
To work with binary files, use the 'b' mode along with the other modes. This is essential for non-text files like images, videos, and executables.
- Example:
with open("image.png", "rb") as binary_file: binary_data = binary_file.read()
File Positioning
You can control the file's current position using seek() and check it with tell().
seek(offset, whence): Moves the file pointer to a specific position.offset: Number of bytes to move.whence: Starting point (0 = start, 1 = current position, 2 = end).- Example:
file = open("example.txt", "r") file.seek(0) # Move to the start of the file
tell(): Returns the current file position.- Example:
position = file.tell() # Get current file position
- Example:
Handling File Exceptions
File handling can raise exceptions, such as FileNotFoundError or IOError. It's important to handle these exceptions to prevent the program from crashing.
- Example:
try: file = open("nonexistent.txt", "r") except FileNotFoundError: print("File not found.") finally: file.close()
Decorators

Decorators in Python are a powerful and flexible tool that allow you to modify the behavior of functions or methods without changing their actual code. They are often used to add functionality such as logging, access control, memoization, or instrumentation to existing functions in a clean, readable, and reusable way.
Basic Syntax
A decorator is a function that wraps another function. The basic syntax is:
def decorator_function(original_function):
def wrapper_function(*args, **kwargs):
# Code before the function call
result = original_function(*args, **kwargs)
# Code after the function call
return result
return wrapper_function
original_function: The function being decorated.wrapper_function: The function that wraps around the original function, adding additional behavior before and after it.
Applying a Decorator
You can apply a decorator to a function using the @ symbol before the function definition.
- Example:
def my_decorator(func): def wrapper(): print("Something before the function.") func() print("Something after the function.") return wrapper @my_decorator def say_hello(): print("Hello!") say_hello() # Output: # Something before the function. # Hello! # Something after the function.
Decorators with Arguments
Decorators can also accept arguments, allowing you to customize their behavior.
- Example:
def repeat(num_times): def decorator_repeat(func): def wrapper(*args, **kwargs): for _ in range(num_times): result = func(*args, **kwargs) return result return wrapper return decorator_repeat @repeat(num_times=3) def greet(name): print(f"Hello, {name}!") greet("Alice") # Output: # Hello, Alice! # Hello, Alice! # Hello, Alice!
Common Use Cases
-
Logging:
- Automatically log information about function calls.
def log_function_call(func): def wrapper(*args, **kwargs): print(f"Calling {func.__name__} with {args} and {kwargs}") return func(*args, **kwargs) return wrapper @log_function_call def add(x, y): return x + y result = add(3, 5) # Output: Calling add with (3, 5) and {} -
Access Control/Authentication:
- Control access to certain functions based on user permissions.
def require_permission(permission): def decorator(func): def wrapper(*args, **kwargs): if not user_has_permission(permission): raise PermissionError(f"User lacks {permission} permission") return func(*args, **kwargs) return wrapper return decorator @require_permission("admin") def delete_user(user_id): print(f"User {user_id} deleted.") -
Memoization:
- Cache the results of expensive function calls to improve performance.
def memoize(func): cache = {} def wrapper(*args): if args not in cache: cache[args] = func(*args) return cache[args] return wrapper @memoize def fibonacci(n): if n in [0, 1
Generators

Generators in Python are a special type of iterator that allow you to iterate over a sequence of values lazily, meaning that values are generated on-the-fly and not stored in memory. This makes generators memory-efficient and particularly useful for working with large datasets or streams of data.
Creating Generators
Generators can be created in two primary ways: using generator functions and generator expressions.
Generator Functions
A generator function is defined like a normal function but uses the yield statement instead of return. The yield statement pauses the function, saving its state, and resumes it when the next value is requested.
- Example:
def count_up_to(max_value): count = 1 while count <= max_value: yield count count += 1 counter = count_up_to(5) for number in counter: print(number) # Output: 1, 2, 3, 4, 5
Generator Expressions
Generator expressions are similar to list comprehensions but use parentheses () instead of square brackets []. They provide a concise way to create generators.
- Example:
squared_numbers = (x**2 for x in range(5)) for num in squared_numbers: print(num) # Output: 0, 1, 4, 9, 16
Advantages of Generators
-
Memory Efficiency:
- Generators only produce one item at a time, so they use much less memory than lists, especially when working with large data sets.
- Example:
large_gen = (x for x in range(10**6)) - A generator for a million numbers uses almost no memory compared to a list.
-
Lazy Evaluation:
- Generators evaluate values on demand, which can lead to performance improvements in certain scenarios.
-
Pipelining Generators:
- Generators can be chained together to form data processing pipelines.
- Example:
gen1 = (x*2 for x in range(5)) gen2 = (x + 1 for x in gen1) for value in gen2: print(value) # Output: 1, 3, 5, 7, 9
Generator Methods
Generators come with built-in methods to control their behavior:
-
next():- Retrieves the next value from the generator.
- Example:
gen = count_up_to(3) print(next(gen)) # Output: 1 print(next(gen)) # Output: 2
-
send(value):- Sends a value to the generator, resuming its execution and optionally modifying its state.
- Example:
def generator(): value = yield "Start" yield value gen = generator() print(next(gen)) # Output: "Start" print(gen.send(10)) # Output: 10
-
throw(type, value=None, traceback=None):- Raises an exception inside the generator at the point where it was paused.
- Example:
def generator(): try: yield "Running" except Exception as e: yield str(e) gen = generator() print(next(gen)) # Output: "Running" print(gen.throw(Exception, "Error occurred")) # Output: "Error occurred"
-
close():- Stops the generator by raising a
GeneratorExitexception at the point where it was paused. - Example:
def generator(): yield "Start" yield "Running" gen = generator() print(next(gen)) # Output: "Start" gen.close() print(next(gen)) # Raises StopIteration
- Stops the generator by raising a
Use Cases for Generators
-
Processing Large Files:
- Generators are ideal for reading large files line by line without loading the entire file into memory.
- Example:
def read_large_file(file_path): with open(file_path, 'r') as file: for line in file: yield line.strip() for line in read_large_file("large_file.txt"): process(line)
-
Infinite Sequences:
- Generators can represent infinite sequences, which are impossible with lists.
- Example:
def infinite_sequence(): num = 0 while True: yield num num += 1 inf_seq = infinite_sequence() for _ in range(5): print(next(inf_seq)) # Output: 0, 1, 2, 3, 4
Conclusion
Generators are a powerful feature in Python that offer a way to write efficient, lazy, and memory-conscious code. They are especially useful in scenarios where memory efficiency and performance are critical, such as processing large datasets or streaming data.
Context Managers

Context managers in Python are used to manage resources such as files, network connections, or locks. They ensure that resources are properly acquired and released, even if errors occur during their use. The with statement is commonly used to work with context managers, automatically handling setup and teardown tasks.
The with Statement
The with statement simplifies resource management by ensuring that the resource is automatically cleaned up after use. This is particularly useful for managing file I/O, database connections, and more.
-
Basic Syntax:
with context_manager as resource: # Use the resource # Resource is automatically cleaned up here -
Example:
with open("example.txt", "r") as file: content = file.read() # File is automatically closed after this block
Creating Custom Context Managers
You can create custom context managers by defining a class with __enter__() and __exit__() methods or by using the contextlib module.
-
Using a Class:
- Define
__enter__()to acquire the resource and__exit__()to release it. - Example:
class MyContextManager: def __enter__(self): print("Entering context") return self def __exit__(self, exc_type, exc_value, traceback): print("Exiting context") with MyContextManager() as manager: print("Inside the context") # Output: # Entering context # Inside the context # Exiting context
- Define
-
Using the
contextlibModule:- The
contextlibmodule provides a decorator to create context managers using generator functions. - Example:
from contextlib import contextmanager @contextmanager def my_context(): print("Entering context") yield print("Exiting context") with my_context(): print("Inside the context") # Output: # Entering context # Inside the context # Exiting context
- The
Practical Examples
-
File Handling with Context Manager:
- Automatically handles file closing.
- Example:
with open("example.txt", "w") as file: file.write("Hello, World!") # No need to explicitly close the file
-
Managing Database Connections:
- Ensures that the database connection is closed after use.
- Example:
import sqlite3 with sqlite3.connect("database.db") as conn: cursor = conn.cursor() cursor.execute("SELECT * FROM table_name") results = cursor.fetchall() # Connection is automatically closed
-
Thread Locks:
- Simplifies lock management in multithreading.
- Example:
from threading import Lock lock = Lock() with lock: # Critical section of code print("Lock is acquired") # Lock is released here
Handling Exceptions in Context Managers
Context managers can handle exceptions that occur within the with block using the __exit__() method.
- Example:
class MyContextManager: def __enter__(self): print("Entering context") return self def __exit__(self, exc_type, exc_value, traceback): if exc_type: print(f"An exception occurred: {exc_value}") print("Exiting context") with MyContextManager(): raise ValueError("Something went wrong") # Output: # Entering context # An exception occurred: Something went wrong # Exiting context
Conclusion
Context managers are a powerful feature in Python that help manage resources efficiently and safely. By using the with statement or creating custom context managers, you can ensure that resources are properly handled, reducing the risk of resource leaks and improving the reliability of your code.
Concurrency

Concurrency in Python refers to the ability to perform multiple tasks or operations simultaneously, improving the efficiency and performance of a program. Python provides several ways to handle concurrency, including threading, multiprocessing, and asynchronous programming. Each method is suited to different types of tasks, and understanding when to use each is key to writing efficient concurrent programs.
Threading
Threading allows a program to run multiple threads (smaller units of a process) concurrently within the same process. It's useful for I/O-bound tasks where waiting for external resources (like file reading or network requests) can be overlapped with other tasks.
-
Basic Threading Example:
import threading def print_numbers(): for i in range(5): print(i) thread = threading.Thread(target=print_numbers) thread.start() thread.join() # Wait for the thread to finish -
Considerations:
- Global Interpreter Lock (GIL): Python's GIL allows only one thread to execute Python bytecode at a time, which can limit the effectiveness of threading for CPU-bound tasks.
- Use Cases: Threading is ideal for I/O-bound tasks, such as file operations, network requests, or user interface updates.
Multiprocessing
Multiprocessing involves running multiple processes concurrently, each with its own Python interpreter and memory space. This is particularly useful for CPU-bound tasks where you want to fully utilize multiple CPU cores.
-
Basic Multiprocessing Example:
from multiprocessing import Process def print_numbers(): for i in range(5): print(i) process = Process(target=print_numbers) process.start() process.join() # Wait for the process to finish -
Considerations:
- No GIL: Since each process has its own Python interpreter, the GIL does not affect multiprocessing, making it suitable for CPU-bound tasks.
- Communication: Processes do not share memory, so you need inter-process communication (IPC) mechanisms like queues or pipes to share data between processes.
- Use Cases: Multiprocessing is best suited for CPU-intensive tasks like data processing, mathematical computations, and simulations.
Asynchronous Programming
Asynchronous programming allows you to write non-blocking code using the asyncio library, which is ideal for I/O-bound tasks where you need to handle many connections or requests concurrently.
-
Basic Asynchronous Example:
import asyncio async def print_numbers(): for i in range(5): print(i) await asyncio.sleep(1) # Simulate a non-blocking I/O operation asyncio.run(print_numbers()) -
Key Concepts:
asyncandawait: These keywords are used to define asynchronous functions and to pause their execution until the awaited operation completes.- Event Loop: The event loop manages and schedules the execution of asynchronous tasks.
- Use Cases: Asynchronous programming is ideal for handling a large number of I/O-bound operations, such as web servers, web scraping, or network services.
Comparing Concurrency Models
-
Threading:
- Pros: Simple to use, good for I/O-bound tasks.
- Cons: Limited by GIL for CPU-bound tasks, potential for race conditions.
- Best for: I/O-bound tasks with shared memory requirements.
-
Multiprocessing:
- Pros: No GIL limitations, fully utilizes multiple CPU cores.
- Cons: Higher memory usage, inter-process communication complexity.
- Best for: CPU-bound tasks that require parallel execution.
-
Asynchronous Programming:
- Pros: Efficient handling of I/O-bound tasks, low overhead.
- Cons: Steeper learning curve, not suitable for CPU-bound tasks.
- Best for: I/O-bound tasks with high concurrency requirements (e.g., web servers).
Conclusion
Concurrency in Python can significantly improve the efficiency and performance of your programs, especially when dealing with I/O-bound or CPU-bound tasks. Understanding the differences between threading, multiprocessing, and asynchronous programming allows you to choose the right tool for the job, ensuring that your applications can handle multiple operations effectively and efficiently.
Threads
Threads are a lightweight way to achieve concurrency within a single process in Python. They allow multiple operations to run concurrently, making them useful for tasks that involve waiting, such as I/O operations, without blocking the entire program. Threads share the same memory space, which allows them to easily communicate but also introduces challenges such as race conditions.
Basics of Threading
-
Thread: A thread is the smallest unit of execution within a process. Multiple threads within the same process share the same memory space and can run concurrently.
-
Creating a Thread:
- The
threadingmodule provides theThreadclass, which can be used to create and manage threads. - Example:
import threading def print_numbers(): for i in range(5): print(i) thread = threading.Thread(target=print_numbers) thread.start() thread.join() # Waits for the thread to complete
- The
Thread Lifecycle
- Creation: A thread is created but not yet running.
- Start: The thread starts running after calling
start(). - Running: The thread's target function is being executed.
- Blocked: The thread is waiting for a resource or another thread.
- Termination: The thread completes its execution or is terminated by an exception.
Key Methods
start(): Starts the thread's activity.join(): Waits for the thread to finish.is_alive(): Checks if the thread is still running.daemon: A daemon thread runs in the background and does not prevent the program from exiting.
Daemon vs. Non-Daemon Threads
-
Daemon Threads: Run in the background and automatically terminate when the main program exits. They are useful for background tasks that should not block program termination.
- Example:
thread = threading.Thread(target=print_numbers, daemon=True) thread.start() # Program can exit even if thread is still running
- Example:
-
Non-Daemon Threads: Prevent the program from exiting until they have completed execution.
Synchronization and Thread Safety
When multiple threads access shared data or resources, there is a risk of race conditions, where the outcome depends on the timing of threads. Python provides mechanisms like locks to ensure that only one thread can access a resource at a time.
- Locks:
- A lock is a synchronization primitive that prevents multiple threads from executing certain sections of code simultaneously.
- Example:
import threading lock = threading.Lock() counter = 0 def increment_counter(): global counter with lock: # Ensure exclusive access to the counter counter += 1 threads = [threading.Thread(target=increment_counter) for _ in range(10)] for thread in threads: thread.start() for thread in threads: thread.join()
Global Interpreter Lock (GIL)
- The Global Interpreter Lock (GIL) is a mutex that protects access to Python objects, preventing multiple native threads from executing Python bytecode simultaneously. This means that even in a multi-threaded Python program, only one thread executes Python code at a time.
- Implication: The GIL can limit the performance benefits of threading for CPU-bound tasks, as threads cannot fully utilize multiple CPU cores simultaneously.
Use Cases for Threads
- I/O-Bound Tasks: Threads are particularly useful for tasks that involve waiting for I/O operations, such as reading from a file, fetching data from a network, or interacting with a database.
- Background Tasks: Running tasks that should not interfere with the main program flow, like updating a UI, monitoring resources, or handling background logging.
Example: Multi-threaded Web Scraping
- Threads can be used to speed up tasks like web scraping by fetching multiple URLs concurrently.
- Example:
import threading import requests def fetch_url(url): response = requests.get(url) print(f"Fetched {url} with status {response.status_code}") urls = ["https://example.com", "https://python.org", "https://github.com"] threads = [threading.Thread(target=fetch_url, args=(url,)) for url in urls] for thread in threads: thread.start() for thread in threads: thread.join() # Wait for all threads to complete
Conclusion
Threads provide a simple and effective way to achieve concurrency in Python, particularly for I/O-bound tasks. While they are easy to use, developers must be cautious about thread safety and the limitations imposed by the GIL. Understanding how to properly use threads, including synchronization mechanisms like locks, is essential for writing robust concurrent programs.
Asynchronous Programming
Asynchronous programming in Python allows for the efficient execution of I/O-bound tasks by enabling the program to continue executing other tasks while waiting for an operation to complete. It is particularly useful in scenarios where a program needs to handle many I/O operations concurrently, such as network requests, file I/O, or user interactions.
Key Concepts
- Event Loop: The core of asynchronous programming. The event loop runs asynchronous tasks and callbacks, performs network IO operations, and runs subprocesses.
asyncandawait: Keywords used to define asynchronous functions and to pause their execution until the awaited operation completes.
Basic Syntax
-
Defining an Asynchronous Function:
async def my_function(): print("Hello") await asyncio.sleep(1) # Simulates a non-blocking I/O operation print("World") -
Running an Asynchronous Function:
- The
asyncio.run()function is used to run the top-level asynchronous function. - Example:
import asyncio async def greet(): print("Hello") await asyncio.sleep(1) print("World") asyncio.run(greet())
- The
Concurrency with asyncio
-
Creating Multiple Tasks:
- You can create multiple tasks that run concurrently using
asyncio.create_task(). - Example:
import asyncio async def say_hello(): await asyncio.sleep(1) print("Hello") async def say_world(): await asyncio.sleep(2) print("World") async def main(): task1 = asyncio.create_task(say_hello()) task2 = asyncio.create_task(say_world()) await task1 await task2 asyncio.run(main())
- You can create multiple tasks that run concurrently using
-
Gathering Tasks:
- The
asyncio.gather()function allows you to run multiple asynchronous tasks concurrently and wait for all of them to complete. - Example:
import asyncio async def fetch_data(delay, data): await asyncio.sleep(delay) return data async def main(): result1 = await asyncio.gather( fetch_data(1, "Data 1"), fetch_data(2, "Data 2"), fetch_data(3, "Data 3") ) print(result1) asyncio.run(main())
- The
Asynchronous I/O with aiohttp
- Using
aiohttpfor Asynchronous HTTP Requests:- The
aiohttplibrary allows you to perform HTTP requests asynchronously, making it a powerful tool for web scraping or interacting with web APIs. - Example:
import aiohttp import asyncio async def fetch_url(url): async with aiohttp.ClientSession() as session: async with session.get(url) as response: return await response.text() async def main(): urls = ["https://example.com", "https://python.org", "https://github.com"] tasks = [fetch_url(url) for url in urls] results = await asyncio.gather(*tasks) for result in results: print(result[:100]) # Print the first 100 characters of each response asyncio.run(main())
- The
Handling Exceptions
- Catching Exceptions in Asynchronous Code:
- Exceptions in asynchronous functions are caught and handled like in synchronous code, using
tryandexceptblocks. - Example:
async def faulty_function(): raise ValueError("An error occurred") async def main(): try: await faulty_function() except ValueError as e: print(f"Caught an exception: {e}") asyncio.run(main())
- Exceptions in asynchronous functions are caught and handled like in synchronous code, using
When to Use Asynchronous Programming
- I/O-Bound Tasks: Ideal for tasks that involve waiting for external resources (e.g., web requests, file I/O), where the program can perform other tasks while waiting.
- High-Concurrency Requirements: Useful when a program needs to handle many connections or tasks concurrently, such as in web servers or chat applications.
- Not for CPU-Bound Tasks: Asynchronous programming does not speed up CPU-bound tasks, which should instead be handled by threading or multiprocessing.
Limitations and Considerations
- Complexity: Asynchronous programming can be more complex to understand and debug than synchronous code.
- Libraries: Not all Python libraries support asynchronous operations, so you might need to find alternatives or adapt your approach.
- Event Loop Blocking: Be careful not to block the event loop with long-running synchronous operations, as this can negate the benefits of asynchronous programming.
Conclusion
Asynchronous programming in Python, enabled by asyncio and libraries like aiohttp, is a powerful tool for handling I/O-bound tasks efficiently. By understanding how to work with the event loop, tasks, and asynchronous functions, you can write programs that are both responsive and scalable, making the most of Python's capabilities in high-concurrency scenarios.
Memory Management

Memory management in Python involves the allocation, deallocation, and organization of memory in a way that ensures efficient program execution. Python handles most memory management tasks automatically, thanks to its built-in garbage collector. However, understanding how Python manages memory can help you write more efficient and optimized code.
Key Concepts
- Memory Allocation: When a new object is created, Python allocates memory to store the object. This memory is managed by Python’s memory manager.
- Reference Counting: Python uses reference counting to keep track of the number of references to an object. When the reference count drops to zero, the memory occupied by the object can be deallocated.
- Garbage Collection: Python has a garbage collector that reclaims memory by cleaning up objects that are no longer in use, specifically objects involved in reference cycles.
Memory Allocation
- Heap Memory: Python objects and data structures are stored in the heap, which is managed by Python's memory manager.
- Stack Memory: Function calls, including local variables, are stored in the stack.
Reference Counting
-
Every object in Python has a reference count. This count increases when an object is referenced and decreases when the reference is removed.
- Example:
x = [1, 2, 3] # Reference count for list increases y = x # Reference count increases again del x # Reference count decreases del y # Reference count decreases to 0, memory can be reclaimed
- Example:
-
Checking Reference Count:
- You can use the
sys.getrefcount()function to check the reference count of an object.import sys a = [1, 2, 3] print(sys.getrefcount(a)) # Shows the reference count of 'a'
- You can use the
Garbage Collection
-
Automatic Garbage Collection:
- Python automatically runs garbage collection to free memory by removing objects that are no longer reachable, especially those involved in reference cycles.
- Example of a Reference Cycle:
class Node: def __init__(self, value): self.value = value self.next = None node1 = Node(1) node2 = Node(2) node1.next = node2 node2.next = node1 # Creates a reference cycle del node1 del node2 # Both nodes remain in memory until garbage collection
-
Manual Garbage Collection:
- You can manually trigger garbage collection using the
gcmodule.import gc gc.collect() # Manually triggers garbage collection
- You can manually trigger garbage collection using the
Memory Leaks
-
Memory Leak: Occurs when memory that is no longer needed is not released. In Python, memory leaks can happen if objects are kept alive by reference cycles that the garbage collector fails to clean up in a timely manner.
-
Avoiding Memory Leaks:
- Use weak references (
weakrefmodule) to avoid reference cycles.import weakref class Node: def __init__(self, value): self.value = value self.next = None node1 = Node(1) node2 = Node(2) node1.next = weakref.ref(node2) # Use a weak reference
- Use weak references (
Memory Optimization Techniques
-
Use Generators: Generators use less memory than lists because they generate items on the fly rather than storing them in memory.
def large_numbers(): for i in range(10**6): yield i for number in large_numbers(): print(number) -
Use
__slots__: When defining classes, you can use__slots__to restrict the attributes an object can have, saving memory.class MyClass: __slots__ = ['attribute1', 'attribute2'] def __init__(self, attr1, attr2): self.attribute1 = attr1 self.attribute2 = attr2 -
Object Pooling: Reuse objects instead of creating new ones to save memory. For instance, Python automatically pools small integers and some strings.
Memory Profiling
- Memory Profiling Tools:
- Use tools like
memory_profilerto monitor memory usage.from memory_profiler import profile @profile def my_function(): a = [1] * 10**6 return a my_function()
- Use tools like
Conclusion
Understanding memory management in Python is crucial for writing efficient, high-performance applications. By being aware of how Python handles memory allocation, garbage collection, and potential memory leaks, you can optimize your code to use memory more effectively. Implementing memory management best practices, such as using generators, avoiding unnecessary object creation, and profiling memory usage, will lead to more robust and scalable applications.
Profiling and Optimization

Profiling and optimization are essential practices in software development for identifying performance bottlenecks and improving the efficiency of your code. Profiling helps you understand where time and memory are being spent in your application, and optimization involves making targeted improvements to reduce resource consumption and execution time.
Profiling Basics
- Profiling: The process of measuring the performance of your code, typically in terms of execution time and memory usage. Profiling helps identify the parts of your program that consume the most resources.
Types of Profiling
- CPU Profiling: Measures the time spent by the CPU to execute different parts of the code.
- Memory Profiling: Measures the memory consumption of your code.
- Line-by-Line Profiling: Analyzes the performance of each line of code individually.
Tools for Profiling
1. cProfile
-
Overview:
cProfileis a built-in Python module for profiling that provides a detailed report of how much time was spent on each function. -
Basic Usage:
import cProfile def my_function(): total = 0 for i in range(10**6): total += i return total cProfile.run('my_function()') -
Saving the Profile Data:
- You can save the profile data to a file for later analysis using the
pstatsmodule.import cProfile import pstats cProfile.run('my_function()', 'output.prof') p = pstats.Stats('output.prof') p.sort_stats('cumulative').print_stats(10)
- You can save the profile data to a file for later analysis using the
2. timeit
- Overview: The
timeitmodule is used to measure the execution time of small code snippets. - Basic Usage:
import timeit setup_code = "numbers = range(10**6)" test_code = "sum(numbers)" execution_time = timeit.timeit(test_code, setup=setup_code, number=100) print(f"Execution time: {execution_time} seconds")
3. memory_profiler
- Overview: A tool to measure memory usage line by line in your code.
- Basic Usage:
from memory_profiler import profile @profile def my_function(): a = [i for i in range(10**6)] return a if __name__ == '__main__': my_function()
4. line_profiler
- Overview: A tool that provides line-by-line profiling of the execution time of your code.
- Basic Usage:
- Install with
pip install line_profiler. - Decorate the function you want to profile with
@profileand then run the profiler.@profile def my_function(): total = 0 for i in range(10**6): total += i return total
- Install with
Optimization Techniques
-
Avoid Premature Optimization: Optimize only after identifying bottlenecks through profiling. Focus on optimizing the parts of your code that have the most significant impact on performance.
-
Algorithm Optimization:
- Choosing the right algorithm can significantly reduce the time complexity of your code.
- Example: Use a dictionary for faster lookups instead of a list.
data = {"key1": "value1", "key2": "value2"} value = data.get("key1")
-
Data Structure Optimization:
- Choosing the right data structure can lead to more efficient code.
- Example: Use
setfor membership tests instead of a list.elements = set([1, 2, 3, 4, 5]) if 3 in elements: print("Found")
-
Reduce Function Calls:
- Function calls in Python are relatively expensive. Inline code where possible or use built-in functions which are generally faster.
# Instead of def add(a, b): return a + b result = add(2, 3) # Use result = 2 + 3
- Function calls in Python are relatively expensive. Inline code where possible or use built-in functions which are generally faster.
-
Memory Optimization:
-
Use Generators: Generators are more memory-efficient than lists as they generate items on-the-fly.
def generate_numbers(n): for i in range(n): yield i numbers = generate_numbers(10**6) -
Avoid Large Object Duplication: Copying large objects consumes a lot of memory. Work with references where possible.
# Instead of large_list = [i for i in range(10**6)] copy_list = large_list[:] # Use large_list = [i for i in range(10**6)] ref_list = large_list
-
-
I/O Optimization:
- Minimize I/O operations and use efficient methods for reading and writing data.
- Example: Use buffered I/O for reading large files.
with open("large_file.txt", "r") as file: data = file.read()
Conclusion
Profiling and optimization are crucial steps in developing efficient and performant Python applications. By using the appropriate tools like cProfile, memory_profiler, and timeit, you can identify performance bottlenecks and apply targeted optimizations. Remember to optimize based on profiling data to ensure your efforts are focused on the most impactful areas of your code.
APIs
APIs (Application Programming Interfaces) are sets of rules that allow software applications to communicate with each other. They define the methods and data formats that applications use to request and exchange information. APIs are crucial for integrating different systems and enabling them to work together seamlessly.

Key Concepts
-
API Endpoint:
- An endpoint is a specific URL where an API can be accessed by a client application. It represents a resource or a collection of resources.
- Example:
https://api.example.com/v1/users
-
HTTP Methods:
- APIs typically use HTTP methods to perform actions on resources.
- GET: Retrieve information.
- POST: Create a new resource.
- PUT: Update an existing resource.
- DELETE: Remove a resource.
- APIs typically use HTTP methods to perform actions on resources.
-
Request and Response:
- Request: A client sends a request to an API endpoint, specifying the desired action.
- Response: The API server processes the request and sends back a response, usually in JSON format.
Interacting with APIs in Python
Python provides several libraries to interact with APIs, with requests being one of the most popular.
- Install
requests:pip install requests
Common Use Cases
-
Fetching Weather Data:
import requests api_key = 'YOUR_API_KEY' city = 'London' url = f'http://api.openweathermap.org/data/2.5/weather?q={city}&appid={api_key}' response = requests.get(url) if response.status_code == 200: weather_data = response.json() print(weather_data) else: print('Failed to retrieve weather data', response.status_code) -
Interacting with a REST API:
import requests base_url = 'https://jsonplaceholder.typicode.com' def get_posts(): response = requests.get(f'{base_url}/posts') return response.json() def create_post(title, body, user_id): payload = {'title': title, 'body': body, 'userId': user_id} response = requests.post(f'{base_url}/posts', json=payload) return response.json() posts = get_posts() print(posts) new_post = create_post('New Post', 'This is a new post.', 1) print(new_post)
Requests Library in Python
The requests library is one of the most popular libraries in Python for making HTTP requests. It abstracts the complexities of making requests behind a simple API, allowing you to send HTTP requests with minimal effort.
Installation
To install the requests library, you can use pip:
pip install requests
Basic Usage
Sending a GET Request
To send a GET request to a specified URL and fetch the response:
import requests
response = requests.get('https://api.example.com/data')
print(response.status_code)
print(response.json())
Sending a POST Request
To send a POST request with a payload:
import requests
url = 'https://api.example.com/data'
payload = {'key1': 'value1', 'key2': 'value2'}
response = requests.post(url, json=payload)
print(response.status_code)
print(response.json())
HTTP Methods
GET
The GET method is used to request data from a specified resource.
response = requests.get('https://api.example.com/data')
print(response.json())
POST
The POST method is used to send data to a server to create/update a resource.
payload = {'key1': 'value1', 'key2': 'value2'}
response = requests.post('https://api.example.com/data', json=payload)
print(response.json())
PUT
The PUT method is used to update a current resource with new data.
payload = {'key1': 'new_value1'}
response = requests.put('https://api.example.com/data/1', json=payload)
print(response.json())
DELETE
The DELETE method is used to delete a specified resource.
response = requests.delete('https://api.example.com/data/1')
print(response.status_code)
Handling Responses
Checking Status Codes
You can check the status code of a response to determine if the request was successful.
response = requests.get('https://api.example.com/data')
if response.status_code == 200:
print('Success!')
else:
print('Failed with status code:', response.status_code)
Accessing JSON Data
If the response contains JSON data, you can access it using the .json() method.
response = requests.get('https://api.example.com/data')
data = response.json()
print(data)
Custom Headers
You can send custom headers with your request.
headers = {'Authorization': 'Bearer YOUR_ACCESS_TOKEN'}
response = requests.get('https://api.example.com/data', headers=headers)
print(response.json())
Timeout and Error Handling
Setting a Timeout
You can set a timeout for your request to prevent it from hanging indefinitely.
try:
response = requests.get('https://api.example.com/data', timeout=5)
print(response.json())
except requests.Timeout:
print('The request timed out')
Handling Exceptions
You can handle different types of exceptions using a try-except block.
try:
response = requests.get('https://api.example.com/data')
response.raise_for_status() # Raise an HTTPError for bad responses
print(response.json())
except requests.HTTPError as err:
print('HTTP error occurred:', err)
except requests.RequestException as err:
print('Error occurred:', err)
Environment Variables
Environment variables are used to store configuration settings and other information that applications need to function. They provide a way to separate code from configuration, making applications more flexible and secure.

Key Concepts
-
Environment Variable:
- A variable that is set outside the application, typically in the operating system or a configuration file.
- Example:
API_KEY=12345abcde
-
Sensitive Information:
- Environment variables are often used to store sensitive information such as API keys, tokens, and database credentials to keep them out of the source code.
- Example:
DB_PASSWORD=mysecretpassword
Using Environment Variables in Python
Python provides several ways to access environment variables, with the os module being the most common.
Setting Environment Variables
-
Setting in the Operating System:
export API_KEY=12345abcde -
Setting in a
.envFile: Create a.envfile in your project directory:API_KEY=12345abcde
Accessing Environment Variables
- Using
osModule:import os api_key = os.getenv('API_KEY') print(api_key)
Using python-dotenv to Load .env Files
-
Install
python-dotenv:pip install python-dotenv -
Load Environment Variables from
.envFile:from dotenv import load_dotenv import os load_dotenv() # Load environment variables from .env file api_key = os.getenv('API_KEY') print(api_key)
Hiding Sensitive Variables
- Keep
.envFile Out of Version Control: Add.envto your.gitignorefile to prevent it from being committed to version control.# .gitignore .env
Example: Using Environment Variables in a Python Application
-
Create
.envFile:API_KEY=12345abcde DB_PASSWORD=mysecretpassword -
Load and Use Environment Variables:
from dotenv import load_dotenv import os load_dotenv() # Load environment variables from .env file api_key = os.getenv('API_KEY') db_password = os.getenv('DB_PASSWORD') print(f'API Key: {api_key}') print(f'Database Password: {db_password}')
Common Use Cases
-
Accessing API Keys:
import os import requests from dotenv import load_dotenv load_dotenv() # Load environment variables api_key = os.getenv('API_KEY') url = f'https://api.example.com/data?api_key={api_key}' response = requests.get(url) print(response.json()) -
Connecting to a Database:
import os import psycopg2 from dotenv import load_dotenv load_dotenv() # Load environment variables db_password = os.getenv('DB_PASSWORD') connection = psycopg2.connect( database="mydatabase", user="myuser", password=db_password, host="localhost", port="5432" ) cursor = connection.cursor() cursor.execute("SELECT version();") record = cursor.fetchone() print(f"You are connected to - {record}\n") cursor.close() connection.close()
Web Scraping in Python
Web scraping is the process of extracting data from websites. Python provides various libraries to facilitate web scraping, such as BeautifulSoup, requests, and Selenium.

Key Libraries
-
requests:
- Used to send HTTP requests.
- Install:
pip install requests
-
BeautifulSoup:
- Used for parsing HTML and XML documents.
- Install:
pip install beautifulsoup4
-
Selenium:
- Used for automating web browser interaction.
- Install:
pip install selenium
Basic Workflow
- Send an HTTP request to the target website.
- Parse the HTML content.
- Extract the required data.
- (Optional) Interact with JavaScript elements using Selenium.
Example: Scraping Static Web Pages
-
Fetching HTML Content:
import requests url = 'https://example.com' response = requests.get(url) if response.status_code == 200: html_content = response.text else: print('Failed to retrieve the webpage', response.status_code) -
Parsing HTML Content with BeautifulSoup:
from bs4 import BeautifulSoup soup = BeautifulSoup(html_content, 'html.parser') title = soup.title.string print('Page Title:', title) # Extracting specific elements paragraphs = soup.find_all('p') for p in paragraphs: print(p.text)
Example: Scraping Dynamic Web Pages with Selenium
-
Setting Up Selenium:
from selenium import webdriver driver = webdriver.Chrome(executable_path='/path/to/chromedriver') driver.get('https://example.com') -
Interacting with Web Elements:
search_box = driver.find_element_by_name('q') search_box.send_keys('Python') search_box.submit() results = driver.find_elements_by_css_selector('h3') for result in results: print(result.text) driver.quit()
Best Practices
-
Respect Robots.txt:
- Always check the
robots.txtfile of the website to understand the allowed scraping policies.
- Always check the
-
Rate Limiting:
- Implement delays between requests to avoid overloading the server.
import time time.sleep(1) # Sleep for 1 second -
Error Handling:
- Handle HTTP errors and exceptions gracefully.
try: response = requests.get(url) response.raise_for_status() except requests.exceptions.HTTPError as err: print(f'HTTP error occurred: {err}') except Exception as err: print(f'An error occurred: {err}')
Standard Library

The Python Standard Library is a collection of modules and packages included with Python, providing a wide range of functionalities, from basic data types and structures to advanced modules for file handling, networking, and data manipulation. Understanding and utilizing the standard library can significantly enhance your productivity and efficiency as a Python developer.
Key Modules and Packages
1. sys: System-Specific Parameters and Functions
- Provides access to some variables used or maintained by the interpreter and to functions that interact with the interpreter.
- Example:
import sys print(sys.version) # Outputs the Python version print(sys.platform) # Outputs the platform identifier sys.exit(0) # Exits the program
2. os: Operating System Interface
- Provides a way of using operating system-dependent functionality like reading or writing to the file system.
- Example:
import os current_directory = os.getcwd() # Gets the current working directory os.mkdir('new_folder') # Creates a new directory os.remove('file.txt') # Deletes a file
3. time: Time Access and Conversion
- Functions for working with time, including getting the current time, sleeping, and measuring execution time.
- Example:
import time start_time = time.time() time.sleep(2) # Pauses execution for 2 seconds elapsed_time = time.time() - start_time print(f"Elapsed time: {elapsed_time} seconds")
4. datetime: Date and Time Manipulation
- Classes for manipulating dates and times.
- Example:
from datetime import datetime, timedelta now = datetime.now() print(now) # Outputs the current date and time tomorrow = now + timedelta(days=1) print(tomorrow) # Outputs the date and time for the next day
5. collections: High-Performance Container Data Types
- Provides specialized container datatypes such as
namedtuple,deque,Counter, anddefaultdict. - Example:
from collections import Counter data = ['apple', 'banana', 'apple', 'orange', 'banana', 'apple'] counter = Counter(data) print(counter) # Outputs Counter({'apple': 3, 'banana': 2, 'orange': 1})
6. itertools: Functions Creating Iterators for Efficient Looping
- A set of fast, memory-efficient tools that are useful by themselves or in combination to form iterator algebra.
- Example:
from itertools import permutations perm = permutations([1, 2, 3]) for p in perm: print(p) # Outputs all permutations of [1, 2, 3]
7. functools: Higher-Order Functions and Operations on Callables
- Functions for higher-order operations on functions, like partial application and memoization.
- Example:
from functools import lru_cache @lru_cache(maxsize=100) def fibonacci(n): if n < 2: return n return fibonacci(n-1) + fibonacci(n-2) print(fibonacci(10)) # Outputs the 10th Fibonacci number
8. re: Regular Expressions
- Provides tools for matching strings against patterns.
- Example:
import re pattern = r'\d+' text = 'There are 42 apples and 35 oranges' matches = re.findall(pattern, text) print(matches) # Outputs ['42', '35']
9. json: JSON (JavaScript Object Notation) Encoder and Decoder
- Tools for parsing and generating JSON.
- Example:
import json data = {'name': 'Alice', 'age': 30} json_str = json.dumps(data) print(json_str) # Outputs a JSON string parsed_data = json.loads(json_str) print(parsed_data) # Outputs a Python dictionary
10. http.client: HTTP Protocol Client
- A module for sending HTTP requests to a server.
- Example:
import http.client conn = http.client.HTTPSConnection("www.example.com") conn.request("GET", "/") response = conn.getresponse() print(response.status, response.reason) data = response.read() print(data) conn.close()
Best Practices for Using the Standard Library
- Know What’s Available: Familiarize yourself with the modules in the standard library to avoid reinventing the wheel.
- Use Built-in Functions: Prefer using standard library functions over custom implementations for better performance and readability.
- Check Compatibility: Ensure that the modules you use are compatible with the Python version you are targeting.
Conclusion
The Python Standard Library is a powerful resource that can significantly accelerate your development process. By leveraging its rich set of modules and packages, you can handle a wide range of tasks efficiently without the need for external libraries. Understanding the capabilities of the standard library is crucial for writing robust, efficient, and maintainable Python code.
Popular Libraries

Python's ecosystem is vast, with a wealth of third-party libraries that extend its capabilities in various domains, from web development and data science to machine learning and automation. Understanding and utilizing these popular libraries can greatly enhance your productivity and broaden the scope of your Python projects.
Web Development
1. Django
- Overview: A high-level web framework that encourages rapid development and clean, pragmatic design.
- Key Features:
- ORM (Object-Relational Mapping) for database interactions.
- Built-in admin interface.
- URL routing, authentication, and middleware support.
- Installation:
pip install django - Example:
django-admin startproject myproject
2. Flask
- Overview: A lightweight WSGI web application framework designed to make getting started quick and easy.
- Key Features:
- Minimalistic and flexible.
- Jinja2 templating.
- Built-in development server and debugger.
- Installation:
pip install flask - Example:
from flask import Flask app = Flask(__name__) @app.route("/") def hello(): return "Hello, World!" if __name__ == "__main__": app.run()
Data Science
1. NumPy
- Overview: The fundamental package for numerical computing with Python.
- Key Features:
- Support for large, multi-dimensional arrays and matrices.
- Mathematical functions to operate on these arrays.
- Installation:
pip install numpy - Example:
import numpy as np array = np.array([1, 2, 3, 4]) print(array.mean()) # Outputs the mean of the array
2. Pandas
- Overview: A powerful data analysis and manipulation library for Python.
- Key Features:
- DataFrame object for data manipulation with integrated indexing.
- Tools for reading and writing data between in-memory data structures and different formats.
- Installation:
pip install pandas - Example:
import pandas as pd df = pd.DataFrame({ "A": [1, 2, 3], "B": [4, 5, 6] }) print(df.head()) # Displays the first few rows of the DataFrame
3. Matplotlib
- Overview: A plotting library for creating static, animated, and interactive visualizations.
- Key Features:
- Wide variety of plots: line, bar, scatter, histogram, etc.
- Highly customizable.
- Installation:
pip install matplotlib - Example:
import matplotlib.pyplot as plt plt.plot([1, 2, 3], [4, 5, 6]) plt.show()
Machine Learning
1. Scikit-learn
- Overview: A library for machine learning, built on NumPy, SciPy, and Matplotlib.
- Key Features:
- Simple and efficient tools for data mining and data analysis.
- Accessible to both beginners and experts.
- Installation:
pip install scikit-learn - Example:
from sklearn.linear_model import LinearRegression model = LinearRegression() model.fit([[1], [2], [3]], [1, 2, 3]) print(model.predict([[4]])) # Predicts the output for the input 4
2. TensorFlow
- Overview: An open-source library for numerical computation and large-scale machine learning.
- Key Features:
- Flexibility to build and train models.
- Strong support for deep learning architectures.
- Installation:
pip install tensorflow - Example:
import tensorflow as tf model = tf.keras.models.Sequential([ tf.keras.layers.Dense(128, activation='relu'), tf.keras.layers.Dense(10, activation='softmax') ])
Automation and Web Scraping
1. Selenium
- Overview: A library for automating web browsers.
- Key Features:
- Control browsers through programs and perform browser automation.
- Support for different browsers.
- Installation:
pip install selenium - Example:
from selenium import webdriver driver = webdriver.Chrome() driver.get("https://www.example.com") driver.quit()
2. Beautiful Soup
- Overview: A library for parsing HTML and XML documents and extracting data from them.
- Key Features:
- Handles different parsers and broken HTML.
- Facilitates searching and navigating the parse tree.
- Installation:
pip install beautifulsoup4 - Example:
from bs4 import BeautifulSoup html_doc = "<html><body><p>Hello, World!</p></body></html>" soup = BeautifulSoup(html_doc, 'html.parser') print(soup.p.string) # Outputs "Hello, World!"
Networking
1. Requests
- Overview: A simple and elegant HTTP library for Python, built for human beings.
- Key Features:
- Easy to use for sending HTTP requests.
- Supports methods like GET, POST, PUT, DELETE.
- Installation:
pip install requests - Example:
import requests response = requests.get("https://www.example.com") print(response.text) # Outputs the content of the response
2. Socket
- Overview: Provides a low-level networking interface.
- Key Features:
- Core module for network connections using sockets.
- Supports TCP, UDP, and more.
- Example:
import socket # Create a socket object s = socket.socket(socket.AF_INET, socket.SOCK_STREAM) # Define the host and port host = "www.example.com" port = 80 # Connect to the server s.connect((host, port)) # Send an HTTP GET request request = "GET / HTTP/1.1\r\nHost: {}\r\nConnection: close\r\n\r\n".format(host) s.sendall(request.encode('utf-8')) # Receive the response from the server response = b"" while True: data = s.recv(4096) if not data: break response += data # Close the socket s.close() # Print the response print(response.decode('utf-8'))
Pandas Library
Pandas is a powerful and flexible data analysis and manipulation library for Python. It provides data structures and functions needed to work seamlessly with structured data, making it essential for data science, engineering, and various analytical tasks.
Key Concepts
1. DataFrame
- Overview: The primary data structure in Pandas, akin to a table in a relational database or an Excel spreadsheet.
- Features:
- Two-dimensional, size-mutable, and potentially heterogeneous tabular data.
- Labeled axes (rows and columns).
- Indexing, selection, and filtering capabilities.
- Example:
import pandas as pd data = { 'Name': ['Michele', 'Eleonora', 'Isabel', 'Simone'], 'Age': [8, 6, 7, 5] } students_df = pd.DataFrame(data) print(students_df) # output: Name Age # 0 Michele 8 # 1 Eleonora 6 # 2 Isabel 7 # 3 Simone 5
You can loop through a dataframe in the same way you loop through a dictionary.
Loop through columns:
for (key, value) in students_df.items():
print(key)
# Output: Name
# Age
print(value)
# This will print the data in each of the columns,
# but it is pretty useless
Loop through rows: Pandas has a built-in loop called "iterrows":
students_df = pd.DataFrame(data)
for (index, row) in students_df.iterrows():
print(row)
# It prints out every row, and eack row is a pandas' series
2. Series
- Overview: A one-dimensional labeled array capable of holding any data type.
- Features:
- Acts as a single column in a DataFrame.
- Supports various operations like mathematical operations, filtering, and alignment.
- Example:
import pandas as pd s = pd.Series([1, 2, 3, 4, 5]) print(s) # It outputs evry index with the corresponding item on a new line
3. Indexing and Selection
- Overview: Accessing data in DataFrames or Series using labels, indices, or conditions.
- Features:
.loc[]: Label-based indexing..iloc[]: Integer-based indexing.- Conditional selection using Boolean arrays.
- Example:
import pandas as pd df = pd.DataFrame({ 'A': [1, 2, 3], 'B': [4, 5, 6], 'C': [7, 8, 9] }) # Select column 'A' print(df['A']) # Select row where A > 1 print(df[df['A'] > 1])
4. Data Manipulation
- Overview: Functions and methods to manipulate data in DataFrames and Series.
- Features:
- Adding/Removing Columns: Easily add or remove columns.
- Missing Data Handling: Detect and handle missing data using methods like
.isnull()and.fillna(). - Aggregation: Summarize data using
.groupby(),.agg(), etc.
- Example:
import pandas as pd df = pd.DataFrame({ 'A': [1, 2, None], 'B': [4, None, 6], 'C': [7, 8, 9] }) # Fill missing values with 0 df_filled = df.fillna(0) print(df_filled) # Group by column 'A' and compute sum grouped = df.groupby('A').sum() print(grouped)
5. Data Input/Output
- Overview: Pandas provides robust tools for reading from and writing to various file formats.
- Supported Formats:
- CSV:
pd.read_csv(),df.to_csv() - Excel:
pd.read_excel(),df.to_excel() - JSON:
pd.read_json(),df.to_json() - SQL:
pd.read_sql(),df.to_sql()
- CSV:
- Example:
import pandas as pd # Reading data from a CSV file df = pd.read_csv('data.csv') print(df.head()) # Writing data to an Excel file df.to_excel('output.xlsx', index=False)
Tkinter Library
Tkinter is the standard Python library for creating graphical user interfaces (GUIs). It provides a set of tools to develop desktop applications with widgets like buttons, labels, text boxes, and more.
Key Concepts
1. Main Window
- Overview: The root window is the main container for any Tkinter application.
- Features:
- Acts as the primary window for the application.
- Can be customized with size, title, and more.
- Example:
import tkinter as tk root = tk.Tk() root.title("My Application") root.geometry("400x300") root.mainloop()
2. Widgets
- Overview: Building blocks for the GUI, such as buttons, labels, entries, etc.
- Features:
- Each widget has methods for customization, placement, and event handling.
- Widgets are placed using layout managers:
.pack(),.grid(), and.place().
- Example:
import tkinter as tk root = tk.Tk() label = tk.Label(root, text="Hello, Tkinter!") label.pack() button = tk.Button(root, text="Click Me", command=lambda: print("Button Clicked")) button.pack() root.mainloop()
3. Event Handling
- Overview: Binding actions to user interactions like clicks, keypresses, etc.
- Features:
- Use the
.bind()method to attach events to widgets. - Common events include
<Button-1>,<KeyPress>, etc.
- Use the
- Example:
import tkinter as tk def on_key(event): print(f"Key pressed: {event.char}") root = tk.Tk() root.bind("<KeyPress>", on_key) root.mainloop()
4. Layout Management
- Overview: Positioning widgets within the main window.
- Features:
- Pack: Stacks widgets vertically or horizontally.
- Grid: Places widgets in a 2D grid.
- Place: Absolute positioning using x and y coordinates.
- Example:
import tkinter as tk root = tk.Tk() # Pack example label1 = tk.Label(root, text="Label 1") label1.pack(side="top") # Grid example label2 = tk.Label(root, text="Label 2") label2.grid(row=0, column=0) # Place example label3 = tk.Label(root, text="Label 3") label3.place(x=100, y=100) root.mainloop()
5. Dialogs
- Overview: Built-in pop-up dialogs for file selection, messages, and more.
- Features:
- Common dialogs include
messagebox,filedialog, etc.
- Common dialogs include
- Example:
import tkinter as tk from tkinter import messagebox, filedialog root = tk.Tk() # Messagebox example messagebox.showinfo("Info", "This is a messagebox") # File dialog example file_path = filedialog.askopenfilename() print(f"Selected file: {file_path}") root.mainloop()
6. Canvas
- Overview: A versatile widget for drawing shapes, creating images, and other custom graphics.
- Features:
- Supports shapes like rectangles, lines, ovals, and more.
- Allows embedding other widgets and images.
- Example:
import tkinter as tk root = tk.Tk() canvas = tk.Canvas(root, width=200, height=200) canvas.pack() # Drawing shapes canvas.create_rectangle(50, 50, 150, 150, fill="blue") canvas.create_line(0, 0, 200, 200, fill="red", width=5) root.mainloop()
Tkinter Demo
Here are some other useful widgets, and examples of usage.
import tkinter as tk
from tkinter import messagebox
# Create a new window and configure it
window = tk.Tk()
window.title("Widget Examples")
window.minsize(width=600, height=600)
# Labels
label = tk.Label(window, text="This is new text", font=("Arial", 14))
label.pack(pady=10)
# Buttons
def action():
print("Button Clicked")
button = tk.Button(window, text="Click Me", command=action)
button.pack(pady=10)
# Entries
entry = tk.Entry(window, width=30)
entry.insert(tk.END, string="Some text to begin with.")
entry.pack(pady=10)
# Text
text = tk.Text(window, height=5, width=30)
text.focus()
text.insert(tk.END, "Example of multi-line text entry.")
text.pack(pady=10)
# Spinbox
def spinbox_used():
print(spinbox.get())
spinbox = tk.Spinbox(window, from_=0, to=10, width=5, command=spinbox_used)
spinbox.pack(pady=10)
# Scale
def scale_used(value):
print(value)
scale = tk.Scale(window, from_=0, to=100, command=scale_used)
scale.pack(pady=10)
# Checkbutton
def checkbutton_used():
print(checked_state.get())
checked_state = tk.IntVar()
checkbutton = tk.Checkbutton(window, text="Is On?", variable=checked_state, command=checkbutton_used)
checkbutton.pack(pady=10)
# Radiobutton
def radio_used():
print(radio_state.get())
radio_state = tk.IntVar()
radiobutton1 = tk.Radiobutton(window, text="Option1", value=1, variable=radio_state, command=radio_used)
radiobutton2 = tk.Radiobutton(window, text="Option2", value=2, variable=radio_state, command=radio_used)
radiobutton1.pack(pady=5)
radiobutton2.pack(pady=5)
# Listbox
def listbox_used(event):
print(listbox.get(listbox.curselection()))
listbox = tk.Listbox(window, height=4)
fruits = ["Apple", "Pear", "Orange", "Banana"]
for item in fruits:
listbox.insert(tk.END, item)
listbox.bind("<<ListboxSelect>>", listbox_used)
listbox.pack(pady=10)
# Canvas
canvas = tk.Canvas(window, width=200, height=100)
canvas.create_line(0, 0, 200, 100)
canvas.create_rectangle(50, 20, 150, 80, fill="blue")
canvas.pack(pady=10)
# Frame
frame = tk.Frame(window, borderwidth=2, relief="sunken")
frame.pack(pady=10, fill="x")
frame_label = tk.Label(frame, text="Frame Example")
frame_label.pack()
# Menu
def show_info():
messagebox.showinfo("Information", "This is a Tkinter application")
menu = tk.Menu(window)
window.config(menu=menu)
file_menu = tk.Menu(menu, tearoff=0)
menu.add_cascade(label="File", menu=file_menu)
file_menu.add_command(label="Open", command=show_info)
file_menu.add_command(label="Save", command=show_info)
file_menu.add_separator()
file_menu.add_command(label="Exit", command=window.quit)
help_menu = tk.Menu(menu, tearoff=0)
menu.add_cascade(label="Help", menu=help_menu)
help_menu.add_command(label="About", command=show_info)
window.mainloop()
JSON Library
The JSON library in Python provides methods for parsing JSON strings and converting Python objects to JSON strings. This is useful for data interchange between a server and a web application or between different parts of a software system.
Key Concepts
1. Loading JSON Data
- Overview: Convert JSON strings into Python objects.
- Features:
- Supports parsing from a string or file.
- Converts JSON arrays to Python lists and JSON objects to Python dictionaries.
- Example:
import json json_data = '{"name": "John", "age": 30, "city": "New York"}' data = json.loads(json_data) print(data["name"]) # Output: John
2. Dumping JSON Data
- Overview: Convert Python objects into JSON strings.
- Features:
- Supports serialization of Python lists, dictionaries, and more.
- Can write JSON data to a file.
- Example:
import json data = { "name": "John", "age": 30, "city": "New York" } json_data = json.dumps(data) print(json_data) # Output: {"name": "John", "age": 30, "city": "New York"}
3. Working with Files
- Overview: Reading from and writing to JSON files.
- Features:
- Use
json.load()to read from a file. - Use
json.dump()to write to a file.
- Use
- Example:
import json # Writing to a JSON file data = { "name": "John", "age": 30, "city": "New York" } with open("data.json", "w") as file: json.dump(data, file) # Reading from a JSON file with open("data.json", "r") as file: data = json.load(file) print(data["name"]) # Output: John
4. Handling Complex Data Types
- Overview: Serializing and deserializing custom objects.
- Features:
- Implement custom encoding and decoding functions.
- Handle non-standard data types like datetime.
- Example:
import json from datetime import datetime class CustomEncoder(json.JSONEncoder): def default(self, obj): if isinstance(obj, datetime): return obj.isoformat() return json.JSONEncoder.default(self, obj) data = { "name": "John", "birthdate": datetime(1990, 5, 17) } json_data = json.dumps(data, cls=CustomEncoder) print(json_data) # Output: {"name": "John", "birthdate": "1990-05-17T00:00:00"}
5. Pretty Printing JSON
- Overview: Producing human-readable JSON strings.
- Features:
- Use the
indentparameter injson.dumps()for formatting. - Improve readability of JSON data.
- Use the
- Example:
import json data = { "name": "John", "age": 30, "city": "New York" } json_data = json.dumps(data, indent=4) print(json_data) # Output: # { # "name": "John", # "age": 30, # "city": "New York" # }
6. Error Handling
- Overview: Managing exceptions during JSON operations.
- Features:
- Catch and handle
JSONDecodeErrorfor invalid JSON data. - Ensure robust data processing.
- Catch and handle
- Example:
import json invalid_json_data = '{"name": "John", "age": 30, "city": "New York"' try: data = json.loads(invalid_json_data) except json.JSONDecodeError as e: print(f"Error decoding JSON: {e}")
Frameworks

Frameworks are essential tools that provide a structured foundation for building applications, allowing developers to focus on application-specific logic rather than on low-level details. In Python, frameworks are available for various domains such as web development, data science, machine learning, and more. Understanding and selecting the right framework can greatly enhance productivity and maintainability.
Key Frameworks in Python
1. Django: Web Development
-
Overview: Django is a high-level web framework that encourages rapid development and clean, pragmatic design. It includes many built-in features like an ORM (Object-Relational Mapping), an admin interface, and authentication.
-
Key Features:
- Batteries-included approach with a vast number of built-in features.
- Secure by default, with built-in protection against common security issues.
- Scalable, suitable for both small projects and large-scale applications.
-
Basic Usage:
# Install Django pip install django # Create a new Django project django-admin startproject myproject # Start the development server python manage.py runserver
2. Flask: Lightweight Web Development
-
Overview: Flask is a micro web framework designed for simplicity and flexibility. It provides the essentials to build web applications while allowing developers to choose additional components as needed.
-
Key Features:
- Minimalistic and flexible, allowing you to choose your components.
- Extensible through a wide range of plugins.
- Well-suited for small to medium-sized applications or APIs.
-
Basic Usage:
# Install Flask pip install flask # Create a simple Flask app from flask import Flask app = Flask(__name__) @app.route('/') def hello_world(): return 'Hello, World!' if __name__ == '__main__': app.run(debug=True)
3. FastAPI: Modern Web APIs
-
Overview: FastAPI is a modern, fast (high-performance), web framework for building APIs with Python 3.7+ based on standard Python type hints. It is particularly known for its speed and support for asynchronous programming.
-
Key Features:
- Asynchronous support out of the box.
- Automatic generation of interactive API documentation.
- High performance, comparable to Node.js and Go.
-
Basic Usage:
# Install FastAPI and Uvicorn (an ASGI server) pip install fastapi uvicorn # Create a FastAPI app from fastapi import FastAPI app = FastAPI() @app.get('/') async def read_root(): return {"Hello": "World"} if __name__ == '__main__': import uvicorn uvicorn.run(app, host="127.0.0.1", port=8000)
4. NumPy: Numerical Computing
-
Overview: NumPy is the fundamental package for numerical computing in Python. It provides support for arrays, matrices, and a wide array of mathematical functions.
-
Key Features:
- Efficient handling of large datasets.
- Supports a variety of mathematical operations on arrays and matrices.
- Backbone of many other scientific computing libraries.
-
Basic Usage:
# Install NumPy pip install numpy # Using NumPy import numpy as np # Create an array arr = np.array([1, 2, 3, 4]) # Perform operations arr = arr * 2 print(arr) # Outputs [2, 4, 6, 8]
5. TensorFlow: Machine Learning
-
Overview: TensorFlow is an open-source platform for machine learning. It offers a comprehensive ecosystem of tools, libraries, and community resources that let researchers push the state-of-the-art in ML, and developers easily build and deploy ML-powered applications.
-
Key Features:
- Support for deep learning and neural networks.
- Scalable across different environments: cloud, on-premise, mobile.
- Extensive community and ecosystem support.
-
Basic Usage:
# Install TensorFlow pip install tensorflow # Using TensorFlow import tensorflow as tf # Create a simple computational graph a = tf.constant(2) b = tf.constant(3) c = a + b # Run the graph print(c.numpy()) # Outputs 5
6. Scrapy: Web Scraping
-
Overview: Scrapy is a fast high-level web crawling and web scraping framework, used to extract the data from websites and process it as needed.
-
Key Features:
- Built-in support for handling requests, following links, and parsing data.
- Extensible with custom middleware and pipelines.
- Ideal for large-scale web scraping projects.
-
Basic Usage:
# Install Scrapy pip install scrapy # Create a new Scrapy project scrapy startproject myproject # Define a spider import scrapy class MySpider(scrapy.Spider): name = 'myspider' start_urls = ['http://example.com'] def parse(self, response): title = response.css('title::text').get() yield {'title': title}
Choosing the Right Framework
-
Project Requirements: Choose a framework based on the specific needs of your project. For example, Django is ideal for complex web applications, while Flask might be better suited for a simple API.
-
Community and Support: Consider the community size and the availability of resources and documentation. Larger communities often mean better support and more plugins or extensions.
-
Performance: Evaluate the performance characteristics of the framework, especially if your application will have high traffic or require high concurrency.
Version Control

Version control is a system that records changes to files over time so that you can recall specific versions later. It is an essential tool in modern software development, allowing multiple developers to collaborate on a project efficiently, track changes, and manage different versions of code.
Key Concepts in Version Control
1. Repository
- A repository (or "repo") is a storage space where your project files and their histories are stored. A repository can be local (on your computer) or remote (on a server like GitHub or GitLab).
2. Commit
-
A commit is a snapshot of your project at a specific point in time. Each commit includes a message that describes the changes made. Commits allow you to track the evolution of your project.
-
Example of committing changes:
git commit -m "Added user authentication feature"
3. Branch
-
A branch is a separate line of development, allowing you to work on features or fixes independently of the main codebase. The default branch in most projects is called
mainormaster. -
Example of creating a new branch:
git checkout -b feature/authentication
4. Merge
-
Merging is the process of combining the changes from one branch into another. It is often done after a feature or fix has been completed and is ready to be integrated into the main branch.
-
Example of merging a branch:
git checkout main git merge feature/authentication
5. Pull and Push
-
Pull: Fetches updates from a remote repository and integrates them into your local repository.
-
Push: Sends your committed changes to a remote repository, making them available to others.
-
Example of pulling and pushing:
git pull origin main git push origin main
Popular Version Control Systems
1. Git
-
Overview: Git is a distributed version control system, meaning every developer has a complete copy of the repository. It is the most widely used version control system in the world.
-
Key Features:
- Distributed architecture for offline work.
- Branching and merging capabilities.
- Strong support for collaboration with services like GitHub, GitLab, and Bitbucket.
-
Basic Git Commands:
git init # Initialize a new Git repository git clone <url> # Clone an existing repository git add <file> # Stage changes for the next commit git status # Check the status of your working directory git log # View the commit history
2. Subversion (SVN)
-
Overview: Subversion is a centralized version control system, where the repository is hosted on a central server, and developers check out working copies from this central location.
-
Key Features:
- Centralized model suitable for large teams.
- Strong support for binary files.
- Comprehensive access control.
-
Basic SVN Commands:
svn checkout <url> # Check out a working copy from a repository svn commit -m "Message" # Commit changes to the repository svn update # Update your working copy with changes from the repository svn log # View the commit history
Best Practices for Version Control
-
Commit Often: Make small, frequent commits with descriptive messages. This makes it easier to track changes and revert if necessary.
-
Use Branches: Use branches to isolate features, bug fixes, or experiments from the main codebase. This keeps the main branch stable and clean.
-
Pull Regularly: Regularly pull changes from the remote repository to keep your local copy up to date and to minimize merge conflicts.
-
Review Before Pushing: Review your changes before pushing them to the remote repository to ensure quality and consistency.
-
Resolve Conflicts Promptly: When merge conflicts occur, resolve them as soon as possible to avoid complications.
Conclusion
Version control is a critical component of modern software development. By providing a structured way to manage changes, collaborate with others, and track the history of a project, version control systems like Git and Subversion help developers maintain the integrity and progress of their work. Mastering version control is essential for any developer aiming to work effectively in a team and on complex projects.
Integrated Development Environments (IDEs)

Integrated Development Environments (IDEs) are software applications that provide comprehensive facilities to programmers for software development. They typically include a code editor, compiler or interpreter, debugger, and other tools that streamline the development process. IDEs help manage the complexity of coding and improve productivity by providing a unified interface for various development tasks.
Key Features of IDEs
1. Code Editor
-
Overview: A powerful text editor tailored for writing and editing code. Features often include syntax highlighting, code completion, and linting.
-
Example:
- Syntax highlighting for different programming languages.
- Autocompletion to speed up coding.
- Code snippets for common tasks.
2. Compiler/Interpreter
-
Overview: Tools to convert code into executable programs (compiler) or to execute code directly (interpreter). IDEs often include these tools integrated into the environment.
-
Example:
- Compilation errors and warnings are shown directly in the editor.
- Direct execution of scripts and viewing of output.
3. Debugger
-
Overview: A tool for identifying and fixing bugs in code. IDEs provide features like breakpoints, step execution, and variable inspection.
-
Example:
- Set breakpoints to pause execution at specific lines.
- Step through code to monitor execution flow.
- Inspect variable values and call stacks.
4. Version Control Integration
-
Overview: Integration with version control systems (e.g., Git) allows you to manage code changes, commits, and branches from within the IDE.
-
Example:
- Commit changes and view diffs without leaving the IDE.
- Resolve merge conflicts with visual tools.
5. Project Management
-
Overview: Tools for organizing project files and resources, managing dependencies, and building projects.
-
Example:
- File explorer to navigate project directories.
- Build automation tools and task runners.
6. Code Navigation
-
Overview: Features that help you quickly navigate and understand large codebases, such as go-to-definition, find references, and search functionality.
-
Example:
- Jump to the definition of a function or class.
- Find all references to a variable or function.
Popular IDEs
1. PyCharm
-
Overview: A popular IDE specifically for Python development, created by JetBrains. It offers advanced features such as a powerful code editor, integrated debugger, and version control support.
-
Key Features:
- Intelligent code completion and code analysis.
- Integrated Python console and Jupyter notebook support.
- Excellent support for web frameworks like Django and Flask.
-
Basic Usage:
# Install PyCharm from the official website # Create a new project and configure a Python interpreter # Start coding with features like code completion and refactoring tools
2. Visual Studio Code (VS Code)
-
Overview: A lightweight, open-source editor developed by Microsoft, which can be extended into a full-fledged IDE with plugins and extensions. It supports multiple languages and development environments.
-
Key Features:
- Rich ecosystem of extensions for various languages and tools.
- Integrated terminal and version control.
- Debugging support for multiple languages.
-
Basic Usage:
# Install VS Code from the official website # Install Python extension for code completion and linting # Use the integrated terminal and debugger for development
3. Eclipse
-
Overview: An open-source IDE primarily used for Java development, but it supports various other languages through plugins. It is known for its extensibility and robust feature set.
-
Key Features:
- Comprehensive support for Java development.
- Powerful debugging and testing tools.
- Extensible with a wide range of plugins.
-
Basic Usage:
# Install Eclipse from the official website # Configure a workspace and install relevant plugins # Develop and debug Java (or other language) projects
4. NetBeans
-
Overview: An open-source IDE with support for various programming languages, including Java, C++, and PHP. It offers a modular structure with a variety of built-in tools and extensions.
-
Key Features:
- Support for multiple languages and project types.
- Integrated profiler and debugger.
- Project management and build automation tools.
-
Basic Usage:
# Install NetBeans from the official website # Create and manage projects using the built-in tools # Use the IDE’s features for coding, debugging, and building
5. Jupyter Notebook
-
Overview: An open-source web application that allows you to create and share documents with live code, equations, visualizations, and narrative text. Widely used in data science and research.
-
Key Features:
- Interactive computing with support for many languages via kernels.
- Rich display capabilities including plots and charts.
- Integration with data science libraries like Pandas and Matplotlib.
-
Basic Usage:
# Install Jupyter Notebook using pip pip install notebook # Start the Jupyter Notebook server jupyter notebook
Choosing the Right IDE
-
Project Requirements: Select an IDE based on the specific needs of your project. For example, PyCharm for Python development, VS Code for a versatile editor, or Eclipse for Java.
-
Personal Preferences: Consider the features you value most, such as a lightweight interface, powerful debugging tools, or extensive plugin support.
-
Community and Support: Look at the community support and available documentation for the IDE to ensure you have access to resources and help when needed.
Conclusion
IDEs are crucial tools in software development, providing a range of features that facilitate coding, debugging, and project management. By leveraging the capabilities of an IDE, developers can streamline their workflows, enhance productivity, and maintain high-quality code. Choosing the right IDE for your needs can significantly impact your development experience and efficiency.
Build Tools

Build tools automate the process of creating executable applications from source code. They manage tasks such as compilation, packaging, and deployment, helping to ensure consistency and efficiency in software development. Understanding and using build tools effectively can streamline the development process and reduce errors.
Key Build Tools in Python
1. Setuptools
-
Overview: Setuptools is a package development and distribution tool. It helps with packaging Python projects, handling dependencies, and installing packages.
-
Key Features:
- Easily create distributable packages (e.g., wheels, source distributions).
- Define project metadata and dependencies.
- Supports custom build steps.
-
Basic Usage:
# Setup script for a Python project from setuptools import setup, find_packages setup( name='my_project', version='0.1', packages=find_packages(), install_requires=[ 'requests', ], entry_points={ 'console_scripts': [ 'my_command=my_project.module:main_function', ], }, )
2. Distutils
-
Overview: Distutils is the standard library tool for building and installing Python packages. It is less feature-rich than Setuptools but provides essential functionalities for simple projects.
-
Key Features:
- Basic package creation and installation.
- Includes support for extensions written in C or C++.
-
Basic Usage:
# Setup script for a Python project from distutils.core import setup setup( name='my_project', version='0.1', packages=['my_project'], install_requires=[ 'numpy', ], )
3. Poetry
-
Overview: Poetry is a dependency management and packaging tool for Python. It aims to simplify the setup of Python projects and manage dependencies.
-
Key Features:
- Simplified dependency management with
pyproject.toml. - Integrated package publishing and versioning.
- Virtual environment management.
- Simplified dependency management with
-
Basic Usage:
# Install Poetry pip install poetry # Create a new project poetry new my_project # Install dependencies poetry add requests # Run the project poetry run python my_project/main.py
4. Pipenv
-
Overview: Pipenv is a tool that aims to bring the best of all packaging worlds to the Python world: Pip, Pipfile, and virtualenv.
-
Key Features:
- Manages project dependencies with
PipfileandPipfile.lock. - Combines
pipandvirtualenvfunctionalities. - Simplified dependency resolution and environment management.
- Manages project dependencies with
-
Basic Usage:
# Install Pipenv pip install pipenv # Install dependencies pipenv install requests # Activate the virtual environment pipenv shell # Run a Python script pipenv run python my_project/main.py
5. Build
-
Overview: Build is a simple build system that focuses on the Python build process. It is used to build source distributions and wheels.
-
Key Features:
- Provides a straightforward interface for building packages.
- Compatible with PEP 517 and PEP 518 standards.
-
Basic Usage:
# Install Build pip install build # Build a package python -m build
Best Practices for Using Build Tools
-
Choose the Right Tool: Select a build tool based on the needs of your project and team. For simple projects,
setuptoolsordistutilsmight suffice, whilePoetryandPipenvoffer more advanced features. -
Automate Repetitive Tasks: Use build tools to automate tasks such as packaging, testing, and deployment to reduce manual errors and increase efficiency.
-
Manage Dependencies Carefully: Ensure that all dependencies are properly specified and locked to avoid conflicts and ensure reproducibility.
-
Keep Build Scripts Versioned: Version control your build configuration files (
setup.py,pyproject.toml, etc.) to keep track of changes and maintain consistency.
Conclusion
Build tools play a crucial role in modern Python development by automating the process of creating, packaging, and managing Python projects. Tools like Setuptools, Poetry, and Pipenv offer different features and functionalities that cater to various needs, from simple packaging to comprehensive dependency management. Understanding and utilizing these tools effectively will streamline your development workflow and enhance productivity.
Code Review
Code review is the process of systematically examining another developer's code to identify mistakes, ensure adherence to coding standards, and enhance code quality. It is a crucial practice in modern software development that helps improve the reliability, readability, and maintainability of code.

Objectives of Code Review
-
Improve Code Quality
- Detect and fix bugs or issues before the code is merged.
- Ensure adherence to coding standards and best practices.
-
Share Knowledge
- Facilitate knowledge sharing among team members.
- Help new developers understand the codebase.
-
Enhance Collaboration
- Foster communication and collaboration within the team.
- Promote collective ownership of the code.
-
Ensure Consistency
- Maintain consistent coding style and practices across the codebase.
Code Review Process
1. Preparation
- Choose Reviewers: Select reviewers with relevant expertise and knowledge about the project.
- Prepare the Code: Ensure the code is well-documented, tested, and includes relevant information (e.g., issue tracker links, documentation).
2. Conducting the Review
-
Review for Correctness: Verify that the code works as intended and fixes the relevant issues.
-
Check for Adherence to Standards: Ensure the code follows coding standards and best practices.
-
Assess Readability: Evaluate the clarity of the code, including naming conventions, comments, and structure.
-
Identify Potential Improvements: Suggest optimizations or enhancements.
-
Example of a review checklist:
- Does the code solve the problem?
- Are there any potential security vulnerabilities?
- Is the code easily understandable?
- Are there any performance issues?
3. Feedback
- Provide Constructive Feedback: Offer clear, actionable suggestions for improvement. Focus on the code, not the coder.
- Encourage Dialogue: Discuss feedback with the author and clarify any doubts or disagreements.
- Request Changes: Ask for necessary changes or improvements based on the review findings.
4. Follow-Up
- Re-review: Review the updated code after changes are made.
- Approve or Request Further Changes: Approve the code if it meets all requirements or request further modifications if needed.
Best Practices for Code Review
- Be Respectful and Professional: Provide feedback in a constructive and respectful manner.
- Review Smaller Changes: Smaller, incremental reviews are more manageable and effective.
- Use Automated Tools: Leverage automated tools for style checks and linting to complement manual reviews.
- Document the Process: Keep records of reviews, feedback, and decisions for future reference.
- Set Clear Guidelines: Establish and communicate review guidelines and expectations within the team.
Tools for Code Review
- GitHub Pull Requests: Provides a platform for code review within GitHub. Includes inline comments and discussions.
- GitLab Merge Requests: Offers code review features within GitLab, including code comments and discussions.
- Bitbucket Pull Requests: Supports code review and collaboration within Bitbucket.
- Crucible: A dedicated code review tool that integrates with various version control systems.
Conclusion
Code review is an essential practice for maintaining high-quality code and fostering team collaboration. By systematically examining and discussing code changes, teams can identify and address issues early, share knowledge, and ensure consistency across the codebase. Implementing an effective code review process helps in delivering robust, maintainable, and high-quality software.
Continuous Integration and Deployment

Continuous Integration (CI) and Continuous Deployment (CD) are practices that automate the process of integrating code changes and deploying applications. They help ensure that software is developed and released in a consistent, reliable manner, reducing the risk of errors and improving development efficiency.
Continuous Integration (CI)
Overview
- Continuous Integration is the practice of automatically integrating code changes from multiple contributors into a shared repository multiple times a day. Each integration is verified by automated builds and tests to detect integration errors as quickly as possible.
Key Concepts
-
Automated Builds: Automatically compile and build the application from the latest codebase.
-
Automated Tests: Run unit tests, integration tests, and other quality checks to ensure code changes do not introduce defects.
-
Feedback Loop: Provide immediate feedback to developers if the integration fails, allowing for quick fixes and iterative development.
Example Workflow
- Code Commit: Developers commit code changes to the version control system.
- Trigger CI Pipeline: The CI system detects the commit and triggers an automated build and test process.
- Build and Test: The CI system builds the application and runs tests.
- Report Results: The CI system reports the results back to the developers, highlighting any issues.
Popular CI Tools
- Jenkins: An open-source automation server with plugins for building, deploying, and automating software.
- Travis CI: A cloud-based CI service that integrates with GitHub repositories.
- CircleCI: A CI/CD platform that supports fast and reliable software development processes.
Continuous Deployment (CD)
Overview
- Continuous Deployment extends CI by automatically deploying code changes to a production environment after passing automated tests. This practice ensures that the latest version of the application is always available to users.
Key Concepts
-
Automated Deployment: Automatically deploy the application to production environments once it passes all tests.
-
Rollback Mechanism: Implement mechanisms to roll back to previous versions in case of deployment issues.
-
Monitoring and Alerts: Monitor the deployed application for issues and provide alerts to detect and address problems quickly.
Example Workflow
- CI Success: The CI pipeline successfully builds and tests the application.
- Trigger Deployment: The CD system automatically deploys the new version to the production environment.
- Monitor Deployment: Monitor the application for performance and stability.
- Rollback (if needed): Revert to the previous version if issues are detected.
Popular CD Tools
- GitLab CI/CD: Provides integrated CI/CD features within GitLab, supporting automatic deployments and pipeline management.
- Azure DevOps: A suite of development tools that includes CI/CD capabilities for managing deployments.
- AWS CodePipeline: A fully managed continuous delivery service that automates the build, test, and deploy phases.
Benefits of CI/CD
- Early Detection of Issues: Frequent integration and automated testing help catch defects early in the development cycle.
- Faster Releases: Automating the build and deployment processes accelerates the release cycle, allowing for faster delivery of features and fixes.
- Improved Collaboration: CI/CD fosters collaboration among team members by ensuring that changes are integrated and tested continuously.
- Reduced Risk: Automated testing and deployment reduce the risk of human error and deployment issues.
Best Practices
- Automate Everything: Automate the build, test, and deployment processes to ensure consistency and reliability.
- Keep Pipelines Fast: Ensure that CI/CD pipelines run quickly to provide timely feedback and maintain developer productivity.
- Monitor and Review: Continuously monitor deployments and review pipeline configurations to ensure they meet the needs of your development and deployment processes.
- Secure Your Pipeline: Implement security practices in your CI/CD pipeline to protect against vulnerabilities and ensure the integrity of your deployments.
Conclusion
Continuous Integration and Continuous Deployment are crucial practices in modern software development, enabling teams to deliver high-quality applications quickly and reliably. By automating integration and deployment processes, CI/CD practices help ensure that software remains stable, functional, and up-to-date, ultimately leading to a more efficient development workflow and improved user satisfaction.
Good Architecture
The hallmarks of a good architecture include:
- Modularity: The system is divided into smaller, manageable modules or components, each with a specific responsibility.
- Separation of Concerns: Different concerns or aspects of the application are separated, making it easier to manage and evolve the system: breaking your architecture into distinct tiers.
- Loose Coupling: Weak knowledge associations between components, designed to be independent, minimizing dependencies and allowing for easier changes and replacements.
- Law of Demeter: Components should only communicate with their immediate neighbors, reducing the risk of cascading changes and making the system more robust.
Single Responsibility Principle
”The single responsibility principle states that every module or class should have responsibility over a single part of the functionality provided by the software, and that responsibility should be entirely encapsulated by the class, module or function. All its services should be narrowly aligned with that responsibility." (Wikipedia)
”A class should have only one reason to change.” (Robert C. Martin, Agile Software Development)
The Single Responsibility Principle (SRP) is one of the five principles of object-oriented design known as S.O.L.I.D.
It states that a class should have only one reason to change, meaning it should only have one central job or responsibility. This principle helps in creating more maintainable and understandable code.
”We want to design components that are self-contained: independent, and with a single, well-defined purpose ([...] cohesion). When components are isolated from one another, you know that you can change one without having to worry about the rest.” (Andrew Hunt, David Thomas, The Pragmatic Programmer)
Prefer cohesive software entities. Everything that does not strictly belong together, should be separated
Example:
The wrong way:
class ToDoList:
def __init__(self):
self.tasks = []
def add_task(self, task: str):
self.tasks.append(task)
def delete_task(self, task: str):
self.tasks.remove(task)
def get_tasks(self):
return self.tasks
def input_tasks(self):
tasks = input("Enter a task: ")
self.add_task(tasks)
def remove_task(self):
tasks = input("Enter a task to remove: ")
self.delete_task(tasks)
# the ToDoList class handles multiple responsibilities:
# managing tasks, handling user input, and displaying tasks.
# This violates the SRP, which states that a class should have only
# one reason to change.
The right way:
class TaskManager:
def __init__(self):
self.tasks = []
def add_task(self, task: str):
self.tasks.append(task)
def delete_task(self, task: str):
self.tasks.remove(task)
class TaskInput:
@staticmethod
def input_tasks():
return input("Enter a task: ")
@staticmethod
def remove_task():
return input("Enter a task to remove: ")
class TaskPresenter:
@staticmethod
def display_tasks(tasks):
for task in tasks:
print(f"Task: {task}")
Open/Closed Principle
”Software artifacts (classes, modules, functions, etc.) should be open for extension, but closed for modification.” (Bertrand Meyer, Object-Oriented Software Construction)
The Open/Closed Principle (OCP) is another key principle of object-oriented design within the S. O. L. I. D framework.
It encourages developers to design systems that can be easily extended to accommodate new functionality without altering existing code.
This can be achieved through the use of interfaces, abstract classes, and polymorphism.
Example
The wrong way:
class AreaCalculator:
def calculate_area(self, shape):
if isinstance(shape, Rectangle):
return shape.width * shape.height
elif isinstance(shape, Circle):
return 3.14* (shape.radius **2)
# If we want to add a new shape, we have to modify this method
# which violates the Open/Closed Principle
class Rectangle:
def __init__(self, width, height):
self.width = width
self.height = height
class Circle:
def __init__(self, radius):
self.radius = radius
from abc import ABC, abstractmethod
# The Shape class is open for extension as we can add new shapes (e.g., Triangle)
class Shape(ABC):
@abstractmethod
def area(self):
pass
# by implementing the area method, but it is closed for modification since
# we don't have to change existing code (like the Rectangle or Circle classes)
# to accommodate new shapes.
class Rectangle(Shape):
def __init__(self, width, height):
self.width = width
self.height = height
def area(self):
return self.width * self.height
class Circle(Shape):
def __init__(self, radius):
self.radius = radius
def area(self):
return 3.14159 * (self.radius**2)
def calculate_area(shapes):
return sum(shape.area() for shape in shapes)
# Example usage
shapes = [Rectangle(2, 3), Circle(5)]
print(calculate_area(shapes)) # Output: 36.14
Liskov Substitution Principle
”What is wanted here is something like the following substitution property: If for each object o1 of type S there is an object o2 of type T such that for all programs P defined in terms of T, the behavior of P is unchanged when o1 is substituted for o2 then S is a subtype of T.” (Barbara Liskov, Data Abstraction and Hierarchy)
Or in simplified form: ”Subtypes must be substitutable for their base types.”
The Liskov Substitution Principle (LSP) is a fundamental principle of object-oriented design within the S.O.L.I.D framework.
It states that objects of a superclass should be replaceable with objects of a subclass without affecting the correctness of the program.
This principle ensures that a derived class can stand in for its base class, promoting code reusability and robustness.
Examples:
- Here is a simple example demonstrating LSP:
class Bird:
def fly(self):
print("Flying")
class Sparrow(Bird):
def chirp(self):
print("Chirping")
def make_bird_fly(bird: Bird):
bird.fly() # This works for any object that is a Bird
if isinstance(bird, Sparrow):
bird.chirp() # This works for Sparrows specifically
The wrong way:
```python
class Bird:
def fly(self):
print("Flying")
class Penguin(Bird):
def fly(self):
raise Exception("I cannot fly")
- If we were to use the Penguin class in a context where a Bird is expected, we might get unexpected behavior due to the overridden fly() method. This can lead to errors and inconsistencies in the code.
The right way:
class Bird:
def fly(self):
pass
class FlyingBird(Bird):
def fly(self):
print("Flying")
class NonFlyingBird(Bird):
def fly(self):
print("I cannot fly")
class Sparrow(FlyingBird):
def chirp(self):
print("Chirping")
class Penguin(NonFlyingBird):
def swim(self):
print("Swimming")
CONCLUSION:
Make sure that inheritance is about behavior, not about data. Make sure that the contract of base types is adhered to. Make sure to adhere to the required concepts.
Interface Segregation Principle
”Clients should not be forced to depend on methods that they do not use.” (Robert C. Martin, Agile Software Development)
This principle encourages the creation of smaller, more specific interfaces rather than a large, general-purpose one.
Many client specific interfaces are better than one general-purpose interface.
Example
Consider a large interface for a printer:
class IPrinter:
def print_document(self):
pass
def scan_document(self):
pass
def fax_document(self):
pass
A multi-function printer implements all methods, but a simple printer only needs the print_document method. This forces the simple printer to implement unnecessary methods.
Solution
Split the large interface into smaller ones:
class IPrinter:
def print_document(self):
pass
class Scanner:
def scan_document(self):
pass
class IFax:
def fax_document(self):
pass
class Printer:
def print_document(IPrinter):
print("Printing...")
class Scanner:
def scan_document(IScanner):
print("Scannining...")
class Fax:
def fax_document(IFax):
print("Faxing...")
Now, each device can implement only the interfaces it needs, adhering to the Interface Segregation Principle.
CONCLUSION
Make sure interfaces don’t induce unnecessary dependencies.
Dependency Inversion Principle
”The Dependency Inversion Principle (DIP) tells us that the most flexible systems are those in which source code dependencies refer only to abstractions, not to concretions.” (Robert C. Martin, Clean Architecture)
”a. High-level modules should not depend on low-level modules. Both should depend on abstractions. b. Abstractions should not depend on details. Details should depend on abstractions.” (Robert C. Martin, Agile Software Development)
CONCLUSION
Prefer to depend on abstractions (i.e. abstract classes or concepts) instead of concrete types.
PRACTICAL EXAMPLE
Wrong way:
class EmailService:
def send_email(self, to: str, message: str, receiver: str) -> None:
print(f"Sending email: {message} to {receiver}")
class SmsSwervice:
def send_sms(self, to: str, message: str, receiver: str) -> None:
print(f"Sending SMS: {message} to {receiver}")
class NotificationService:
def __init__(self) -> None:
self.email_service = EmailService()
self.sms_service = SmsSwervice()
def send_notification(
self, to: str,
message: str,
receiver: str,
method: str
) -> None:
if method == "email":
self.email_service.send_email(to, message, receiver)
elif method == "sms":
self.sms_service.send_sms(to, message, receiver)
In this code, the NotificationService class directly depends on the concrete classes EmailService and SmsService. This violates the DIP, which states that high-level modules should not depend on low-level modules;both should depend on abstractions.
The direct dependency on concrete classes makes the NotificationService less flexible and harder to change or extend, as it's tightly coupled to specific implementations of the email and SMS services.
Right way:
class MessageService:
def send(self, to: str, message: str, receiver: str) -> None:
pass
class EmailService(MessageService):
def send(self, to: str, message: str, receiver: str) -> None:
print(f"Sending email: {message} to {receiver}")
class SmsService(MessageService):
def send(self, to: str, message: str, receiver: str) -> None:
print(f"Sending SMS: {message} to {receiver}")
class NotificationService:
def __init__(self, message_service: MessageService) -> None:
self.message_service = message_service
def send_notification(
self, to: str,
message: str,
receiver: str
) -> None:
self.message_service.send(to, message, receiver)
In the refactored solution, we introduce an abstract class with an IMessageService abstract method send(). Both EmailService and SmsService now implement the IMessageService interface. The NotificationService class now depends on the abstraction IMessageService rather than the concrete classes Email Service and SmsService. This adheres to the DIP because both high-level and low-level classes depend on abstractions rather than concrete implementations, making the code more flexible and easier to change or extend.
Gang of Four (GoF) Patterns
The Gang of Four (GoF) patterns are a set of 23 design patterns that were introduced in the book "Design Patterns: Elements of Reusable Object-Oriented Software" by Erich Gamma, Richard Helm, Ralph Johnson, and John Vlissides.
These patterns are categorized into three main types: Creational, Structural, and Behavioral patterns.
They provide solutions to common design problems and help improve code maintainability, flexibility, and reusability.
They are widely used in software development and have become a standard reference for design patterns in object-oriented programming.
Creational Patterns
Creational design patterns are concerned with the way of creating objects.
They provide various object creation mechanisms, which increase flexibility and reuse of existing code.
They are particularly useful in situations where the system needs to be independent of how its objects are created, composed, and represented.
The most common Creational design patterns are:
- Singleton: Ensures a class has only one instance and provides a global point of access to it.
- Factory Method: Defines an interface for creating an object, but lets subclasses alter the type of objects that will be created.
- Abstract Factory: Provides an interface for creating families of related or dependent objects without specifying their concrete classes.
- Builder: Separates the construction of a complex object from its representation, allowing the same construction process to create different representations.
- Prototype: Specifies the kinds of objects to create using a prototypical instance, and creates new objects by copying this prototype.
These patterns help in managing the complexity of object creation, promoting code reuse, and enhancing the maintainability of the codebase.
Singleton Pattern
Singleton ensures that a class has only one instance and provides an easy global access to that instance. The pattern does not stipulate what to do with a Singleton. This is where you can be creative.
The main tenets of this pattern are:
- Ensure that the class has only a single instance.
- Provide easy global access to this instance.
- Control how it is instantiated.
- Any critical region must be entered serially.
When to use:
When you want to control access to a shared resource.
When not to use:
Use the Singleton pattern with restraint and do not let it degenerate into just a global access for everything. Global access hides dependencies and might make it harder to read such code, so make sure that you have a good reason to use this pattern.11548768
The main question you should ask is: do you violate the SRP (Single Responsibility Principle?) If YES then reconsider using it.
If your singleton is doing too much, it might be a sign that you need to refactor your code.
Consider breaking it down into smaller, more focused classes that adhere to the Single Responsibility Principle.
When designing a Singleton, consider lazy construction which means that the class instance should only be created when it is first needed. In some cases we might consider eager loading if, for example, we need the singleton to be always ready and loaded fast.
Thread-Safety needs to be considered in languages that allow multi-threaded access to ensure that access is properly controlled and locked, so that the state of the singleton (if it has one) is always deterministic. a. Because Python does support multi-threaded programming we will need to take special care when creating multi-threaded singletons. We will need to lock the Critical Section.
The Singleton Pattern can be implemented in a number of different ways in python. Some possible methods include:
- Base class.
- Decorator.
- Metaclass. From those, the metaclass is best suited for this purpose since with it we can manipulate and control the task of class creation itself.
Quick note on some general Python function overrides:
- new : This is a static method that is responsible for creating and returning a new instance of a class. It is the first step in the object instantiation process. It is typically overridden when you need to control the object creation process
- init : This is an instance method that is responsible for initializing an object's attributes after it has been created by new. The init method does not return a value and is called automatically after the object is created. This method is typically overridden to define custom attribute initialization for the class.
- call : This is an instance method that allows a class's instances to be called as if they were functions.
Example of Singleton
LAZY INSTANTIATION
class Logger(Singleton):
def __init__(self):
if not hasattr(self, 'initialized'): # prevent re-initialization
self.initialized = True
self.logs = []
def log(self, message):
self.logs.append(message)
print(f"Log: {message}")
def get_logs(self):
return self.logs
# Usage
if __name__ == "__main__":
logger1 = Logger()
logger2 = Logger()
logger1.log("First log entry.")
logger2.log("Second log entry.")
# Both logger1 and logger2 should be the same instance
print(logger1 is logger2) # Outputs: True
print(logger1.get_logs()) # Outputs: ['First log entry.', 'Second log entry.']
class Singleton:
# class-level variable to store the single instance of the class
_instance = None
# override the method to control how new objects are created
def __new__(cls, *args, **kwargs):
# check if instance of the class has been created before.
if not cls._instance:
# create new instance of the class and store it in instance
cls._instance = super().__new__(cls, *args, **kwargs)
# return the single instance of the class
# newly created one or existing one
return cls._instance
if not cls._instance:
# create new instance of the class
# and store it in instance
cls._instance = super().__new__(cls)
# return the single instance of the class
# newly created one or existing one
return cls._instance
Best Python Implementation:
Using the metaclass is probably the best way to create a Singleton in Python. A metaclass in Python is a class that defines the behavior and rules for creating other classes.
In other words, metaclasses are the "classes of classes." By default, all Python classes implicitly inherit from the type built-in class, which is itself a metaclass.
Metaclasses allow us to customize the class creation process and modify class attributes, methods, or other properties before the class is actually created. They provide a way to apply certain behaviors consistently across multiple classes.
class SingletonMeta (type) :
# Dictionary stores single instance of the class for
# each subclass of the SingletonMeta metaclass
instances = {}
def __call__(cls, *args, **kwargs):
# Single instance of the class already been created?
if cls not in cls.instances:
# Create the instance by calling the method of the parent's class.
instance = super().__call__(*args, **kwargs)
cls.instances[cls] = instance
return cls.instances[cls]
# our actual Singleton class
class Singleton (metaclass=SingletonMeta) :
def some_business_logic(self):
pass
EAGER LOADING
- Allows for data preload and caching.
- Allows for connectivity pre-caching.
- Important when access is frequent and needs to be fast.
- We initialize and load the instance before we need it.
Python does not provide an out-of-the-box solution for eager loading, but we can use metaclasses to implement it.
class EagerSingletonMeta(type):
# Dictionary stores single instance of the class for
# each subclass of the SingletonMeta metaclass
_instances = {}
# override: called during creation of sub-types
def __init__(cls, name, bases, attrs):
super().__init__(name, bases, attrs)
# eager loading of the class instance
cls._instances[cls] = super().__call__()
# return the single instance of the class
def __call__(cls, *args, **kwargs):
return cls._instances[cls]
# returns the single instance of the class
def get_instance(cls):
return cls._instances[cls]
# actual Singleton class
class EagerSingleton(metaclass=EagerSingletonMeta):
def __init__(self):
self.state = "Initial State"
def some_logic(self):
print(f"EagerSingleton: {self.state}")
Factory Method
Normally, we create objects directly using class constructors.
However, in some scenarios, we might want to delegate the instantiation logic to subclasses. This is where the Factory Method pattern comes into play.
This approach has a major architectural disadvantage: • You have to know the exact class type you want to instantiate.
Why is this bad?
Think of this: what if we wanted to create an app that used different types of classes that we have not even thought of yet?
The main problem with this approach is that your code is unnecessarily aware of the type of objects that it creates and thus it is strongly coupled with the type.
The Factory Method pattern defines an interface for creating an object but allows subclasses to alter the type of objects that will be created.
A good rule
Define an interface for creating an object, but let subclasses decide which class to instantiate.
Factory Method lets a class defer instantiation to subclasses.
This pattern is often used with the following GoF patterns:
Strategy and Iterator design patterns are often used with Factory Method pattern to let collection subclasses return different types of iterators that are compatible with the collections.
PROS
- It allows sub-classes to choose the type of objects to create.
- Simple to implement (simpler than Builder pattern).
- Promotes loose-coupling by eliminating the need to bind application-specific classes into the code. That means the code interacts only with the resultant interface or abstract class.
- Single Responsibility Principle. You can move the creation code into one place in the program, making the code easier to support.
- Open/Closed Principle. You can introduce new subtypes into the program without breaking existing client code. This results in Clean code.
CONS
- One disadvantage of the Factory Method pattern is that it can expand the total number of classes in a system. Every concrete class also requires a concrete Creator class. Note: the Parameterized Factory Method avoids this downside.
- Another potential downside is that the Creator classes may become overly complex if they are responsible for creating many different types of products. In such cases, it may be better to use a different creational pattern, such as the Abstract Factory or Builder pattern.
Design Considerations:
- When you have many objects of a common type (like for example a Shape) a. Make all such object types (like for example IShape) follow the same interface or extend the same abstract class. This interface should declare methods that make sense in every Shape but in a generalized way.
- Create a Factory with a static creation method which always returns the same common interface reference (for example IShape) Let the Factory know which instance you want, through some sort of a constant id for the specific object type. a. This can be accomplished through an enum or a list of constants which could be integers or strings.
There are two main variants of the pattern:
- The very popular Simple Factory Method variant (also called Parameterized Factory Method pattern).

- The classic (or original) GoF Factory Method variant.

For every concrete instance of the implementation of the common interface.
Factory Method Example
from abc import ABC, abstractmethod
from enum import Enum
from typing import Type
class ShipsEnum(Enum):
MILLENIUM_FALCON = "MilleniumFalcon"
UNSC_INFINITY = "UNSCInfinity"
USS_ENTERPRISE = "USSEnterprise"
SERENITY = "Serenity"
class SpaceShipFactory:
_registry: dict[ShipsEnum, Type["SpaceShip"]] = {}
@classmethod
def register(cls, ship_type: ShipsEnum, ship_class: Type["SpaceShip"]):
cls._registry[ship_type] = ship_class
@classmethod
def create_ship(
cls,
ship_type: ShipsEnum,
position: tuple[int, int],
size: tuple[int, int],
display_name: str,
speed: int = 0,
) -> "SpaceShip":
try:
ship_class = cls._registry[ship_type]
return ship_class(position, size, display_name, speed)
except KeyError:
raise ValueError(f"Unknown ship type: {ship_type}")
class SpaceShip(ABC):
def __init__(
self,
position: tuple[int, int],
size: tuple[int, int],
display_name: str,
speed: int = 0,
):
self.position = position
self.size = size
self.display_name = display_name
self.speed = speed
@abstractmethod
def fly(self) -> str:
pass
@abstractmethod
def shoot(self) -> str:
pass
class MilleniumFalcon(SpaceShip):
def fly(self):
return "The Millenium Falcon is flying through hyperspace!"
def shoot(self):
return "The Millenium Falcon fires its blasters!"
SpaceShipFactory.register(ShipsEnum.MILLENIUM_FALCON, MilleniumFalcon)
class UNSCInfinity(SpaceShip):
def fly(self):
return "The UNSC Infinity is cruising through space!"
def shoot(self):
return "The UNSC Infinity launches its MAC rounds!"
SpaceShipFactory.register(ShipsEnum.UNSC_INFINITY, UNSCInfinity)
class USSEnterprise(SpaceShip):
def fly(self):
return "The USS Enterprise is exploring the galaxy!"
def shoot(self):
return "The USS Enterprise fires its phasers!"
SpaceShipFactory.register(ShipsEnum.USS_ENTERPRISE, USSEnterprise)
class Serenity(SpaceShip):
def fly(self):
return "The Serenity is gliding through the 'verse!"
def shoot(self):
return "The Serenity fires its pulse cannons!"
SpaceShipFactory.register(ShipsEnum.SERENITY, Serenity)
Brief explaination
Why Using a Registry Is Better Than Using Many if/elif Conditions
A conditional factory looks like this:
if ship_type == ShipsEnum.MILLENIUM_FALCON:
return MilleniumFalcon(...)
elif ship_type == ShipsEnum.UNSC_INFINITY:
return UNSCInfinity(...)
elif ship_type == ShipsEnum.USS_ENTERPRISE:
return USSEnterprise(...)
...
This works, but it has a big problem: every time you add a new ship, you must edit the factory and add a new elif.
This makes the factory grow endlessly and violates the Open/Closed Principle (your code should be open for extension, but closed for modification).
Infact, the conditional factory must be modified every time you add a ship.
The Registry Pattern Fixes the Problem: instead of writing conditionals, we store ship classes inside a dictionary:
_registry = {
ShipsEnum.MILLENIUM_FALCON: MilleniumFalcon,
ShipsEnum.UNSC_INFINITY: UNSCInfinity,
ShipsEnum.USS_ENTERPRISE: USSEnterprise,
ShipsEnum.SERENITY: Serenity,
}
Now the factory becomes much simpler:
ship_class = cls._registry[ship_type]
return ship_class(position, size, display_name, speed)
Why is this better?
Because you no longer modify the factory logic: you only update the registry, not the function that creates objects.
This keeps the factory small, clean, and scalable.
The Core Idea
The factory no longer needs to know anything about the ships.
It just:
-
Looks up the class
-
Instantiates the object
The creation logic never changes.
Adding a New Ship Using a Registry
With the old method, you needed to modify 3 places.
With a registry, you only add this:
SpaceShipFactory._registry[ShipsEnum.NEW_SHIP] = NewShipClass
No conditions. No modifications to the factory logic.
Auto-Registration
You can let ships register themselves:
class SpaceShipFactory:
registry = {}
@classmethod
def register(cls, enum, ship_class):
cls.registry[enum] = ship_class
Then each ship registers itself:
class MilleniumFalcon(SpaceShip):
...
SpaceShipFactory.register(ShipsEnum.MILLENIUM_FALCON, MilleniumFalcon)
Builder Pattern
Overview
The Builder Pattern is a creational design pattern that allows for the encapsulation of the reusable logic involved in constructing complex objects.
What Constitutes a Complex Object?
Complex objects typically have the following characteristics:
- Composition of Distinct Parts: These objects are composed of multiple, distinct components that contribute to their overall structure and functionality.
- Defined Relationships: There exists a well-defined relationship between the various components, dictating how they interrelate and contribute to the whole object.
Key Principles of the Builder Pattern
The Builder Pattern is grounded in several core principles:
-
Separation of Construction and Representation: This principle emphasizes the decoupling of the construction process of an object from the representation of that object, allowing developers to focus on each aspect independently.
-
Flexibility in Construction Process: The design should be structured such that the same construction process can yield different representations of the object. This is particularly useful for creating variations of the same type of object based on differing requirements or contexts.
Additional Information
-
Use Cases: The Builder Pattern is particularly useful in scenarios where a class needs to be instantiated with a large number of parameters. It helps manage the complexity by allowing step-by-step construction.
-
Implementations: In practice, the Builder Pattern typically involves a
Builderclass which constructs the complex object and aDirectorclass that governs the construction process. The client interacts with the Builder to create specific representations of the complex object. -
Advantages:
- Enhances code readability and maintainability.
- Reduces the likelihood of errors during object creation by enforcing a step-by-step approach.
- Makes it easier to add new configurations without affecting existing code.
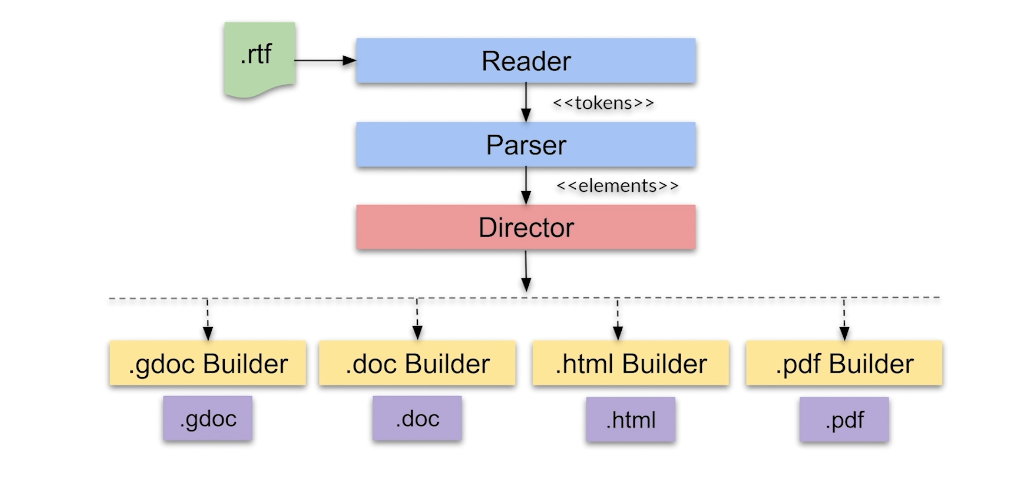
When to Use the Builder Pattern
The Builder Pattern is particularly beneficial in the following scenarios:
-
Complex Classes with Multiple Constructors:
- When you have a complex class that requires many constructors, the Builder Pattern provides a more manageable approach, allowing you to construct objects in a step-by-step manner. This flexibility enables you to skip unnecessary steps.
-
Complex Composite Tree Structures:
- If you need to build complex composite tree objects, the Builder Pattern is an ideal choice. It allows you to build these objects hierarchically and configure them piece by piece, ensuring each part is correctly established before moving on.
-
Different Representations of a Complex Object:
- When you want to create various representations of the same complex object while still adhering to a consistent construction process, the Builder Pattern facilitates this by separating the representation from the construction, allowing for diverse configurations without redundancy.
When Not to Use the Builder Pattern
While the Builder Pattern is powerful, it is not always necessary. Here are situations where its use may be unwarranted:
-
Simple Objects:
- The Builder Pattern is not suitable for simple objects that do not require significant configuration. For cases with straightforward instantiation where only a few parameters are involved, using a Factory Method may be more efficient and appropriate.
-
Performance Constraints:
- In performance-critical applications, the overhead associated with constructing objects via the Builder Pattern may introduce latency that is unacceptable. In such cases, direct instantiation may be preferable.
-
Increased Complexity for Simple Scenarios:
- If the scenario does not genuinely benefit from the additional structure provided by the Builder Pattern, applying it might complicate the design unnecessarily. For simple constructs, it is often better to use simpler design patterns.
Advantages of the Builder Pattern
-
Clear Separation of Concerns: The Builder Pattern provides a distinct separation between the construction and representation of an object. This enables developers to focus on how the object is built independently from how it is used.
-
Fine-Grained Control: It allows for finer control over the steps of the construction process, enabling the creation of complex objects step-by-step and allowing parts to be configured as needed.
-
Flexibility in Object Representation: The Builder Pattern supports changes to the internal representation of objects without altering the code that uses the constructed objects. This makes it easier to maintain and adapt your code over time.
-
Stepwise Construction: It enables the stepwise construction of objects, making it simpler to understand the creation process and test individual components.
-
Enhanced Readability: The use of a builder increases the readability of the code, as it clearly outlines the construction process, facilitating collaboration among developers.
Disadvantages of the Builder Pattern
-
Require a Distinct Builder for Each Object: A distinct Concrete Builder must be created for each type of object, which can lead to a proliferation of builder classes, increasing boilerplate code.
-
Mutability of Builder Classes: Builder classes must be mutable, which can lead to issues in multithreaded environments if not designed properly.
-
Complexity in Dependency Injection: The Builder Pattern may complicate dependency injection scenarios, as it introduces additional components that need to be managed within the application's architecture.
-
Overhead for Simple Objects: For simple objects that do not require complex construction logic, the Builder Pattern may introduce unnecessary overhead, making it less efficient.
-
Learning Curve: There may be a learning curve associated with understanding and implementing the Builder Pattern correctly, especially for developers new to design patterns.

Conclusion
The Builder Pattern offers a robust solution for constructing complex objects in a flexible and organized manner, ensuring clarity and maintainability in your codebase.
Builder Pattern Examples
Example 1
Consider the following scenario: Imagine that you are coding the process of building a house for a video game. A house can be a complex object with numerous attributes, which may include:
1. Walls
2. Windows
3. Floors
4. Garage
5. Swimming Pool
6. Doors
7. Backyard
8. Garden
9. Basement
10. Roof
This structure reflects a hierarchy of components that make up the house, each contributing to its overall functionality and appearance.
To design this object in a way that adheres to the Builder Pattern principles, you might create a House class along with a HouseBuilder to simplify the construction process. Instead of having a long and complex constructor for the House class, you could implement something like this:
from __future__ import annotations
class House:
def __init__(
self,
walls: int,
windows: int,
floors: int,
garage: bool,
swimming_pool: bool,
doors: int,
backyard: bool,
garden: bool,
basement: bool,
roof: bool,
) -> None:
self.walls = walls
self.windows = windows
self.floors = floors
self.garage = garage
self.swimming_pool = swimming_pool
self.doors = doors
self.backyard = backyard
self.garden = garden
self.basement = basement
self.roof = roof
class HouseBuilder:
def __init__(self) -> None:
self.walls: int = 0
self.windows: int = 0
self.floors: int = 0
self.garage: bool = False
self.swimming_pool: bool = False
self.doors: int = 0
self.backyard: bool = False
self.garden: bool = False
self.basement: bool = False
self.roof: bool = False
def set_walls(self, walls: int) -> HouseBuilder:
self.walls = walls
return self
def set_windows(self, windows: int) -> HouseBuilder:
self.windows = windows
return self
def set_floors(self, floors: int) -> HouseBuilder:
self.floors = floors
return self
def add_garage(self) -> HouseBuilder:
self.garage = True
return self
def add_swimming_pool(self) -> HouseBuilder:
self.swimming_pool = True
return self
def set_doors(self, doors: int) -> HouseBuilder:
self.doors = doors
return self
def add_backyard(self) -> HouseBuilder:
self.backyard = True
return self
def add_garden(self) -> HouseBuilder:
self.garden = True
return self
def add_basement(self) -> HouseBuilder:
self.basement = True
return self
def add_roof(self) -> HouseBuilder:
self.roof = True
return self
def build(self) -> House:
return House(
self.walls,
self.windows,
self.floors,
self.garage,
self.swimming_pool,
self.doors,
self.backyard,
self.garden,
self.basement,
self.roof,
)
builder: HouseBuilder = HouseBuilder()
my_house: House = (
builder.set_walls(4)
.set_windows(10)
.set_floors(2)
.add_garage()
.add_swimming_pool()
.set_doors(3)
.add_backyard()
.add_garden()
.add_basement()
.add_roof()
.build()
)
Example 2
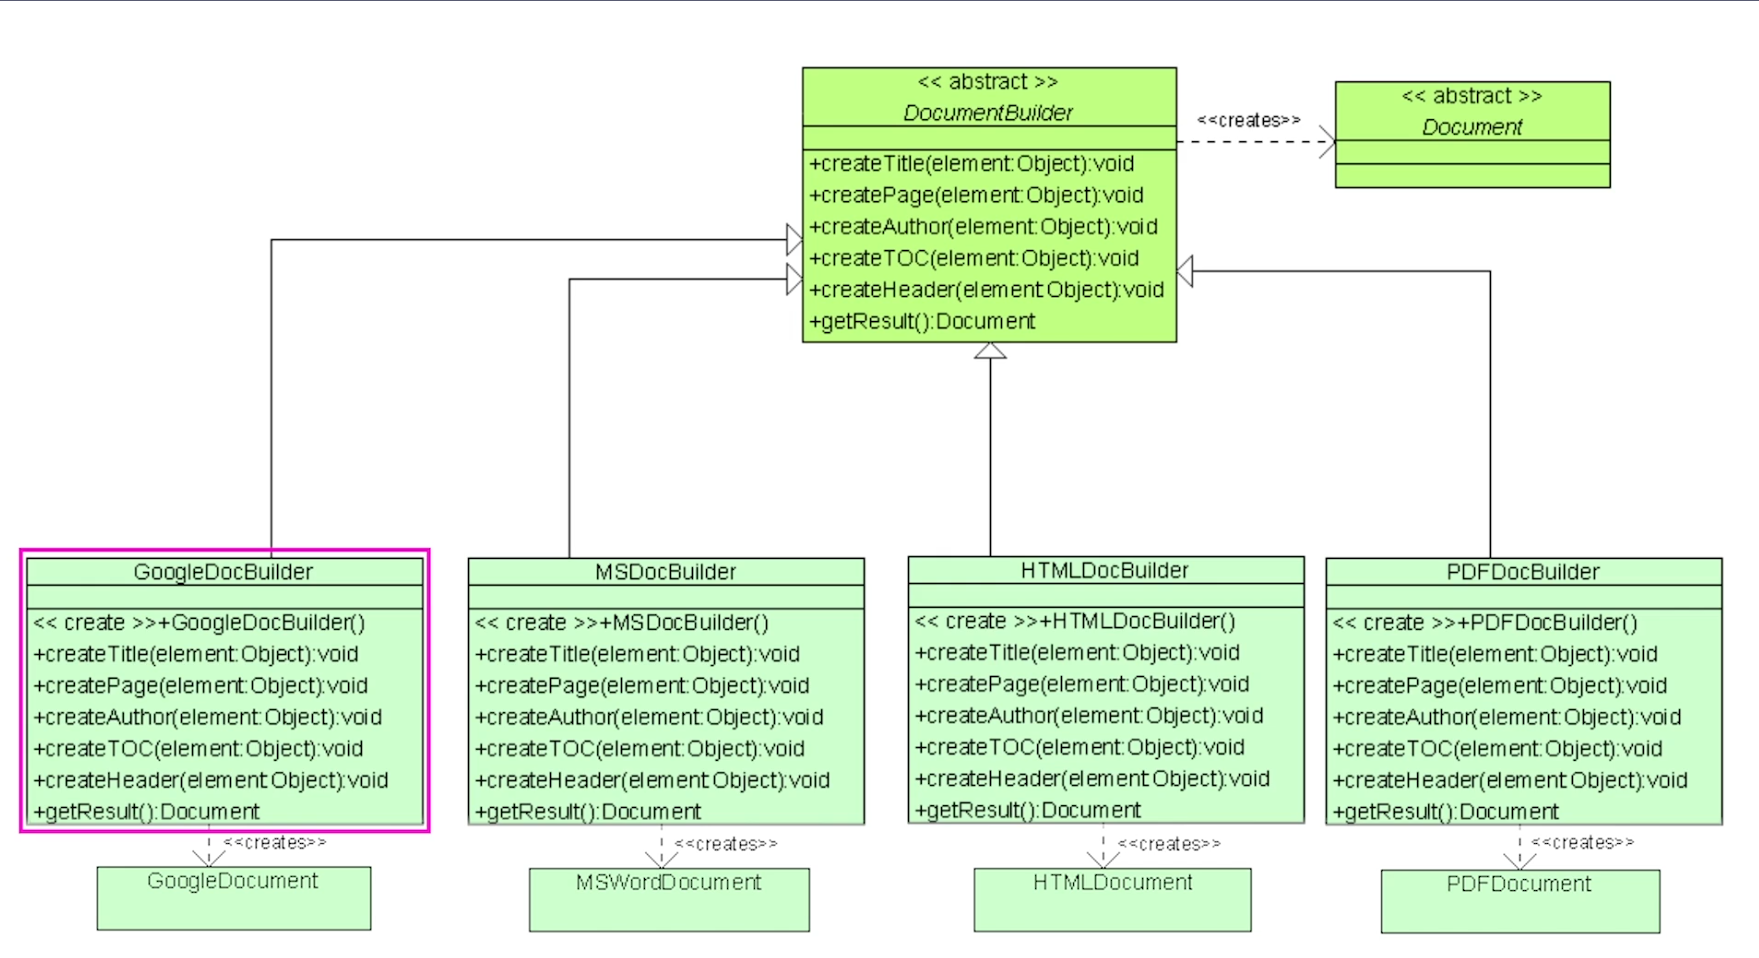
Structural Patterns
Adapter Pattern

Adapter is a structural design pattern which is used to convert the interface contract of one class to be compatible with another.
This 'conversion' can take two different elements into account 1.Adapter can convert source data into formats that the client can understand.
2.Adapter can also help objects with different (or incompatible) interfaces collaborate.
It converts the interface of a class into another interface that clients expect.
Adapter lets classes work together that couldn't otherwise because of incompatible interfaces.
When to use:
- Use the Adapter pattern when you have an existing class or contract that you would like to reuse, but its interface isn't compatible with the rest of your code.
When not to use:
- When your system is very time-sensitive since 'wrapping' the Adaptee creates a bit of an overhead as it creates an extra call layer.
Pros:
- You can separate data conversion code from the main business logic of your application. This follows the Single Responsibility Principle.
- You can introduce Adapters into your code without breaking any existing client code. This follows the Open/Closed Principle. Cons:
- The Adapter pattern can increase the overall complexity of your code since you introduce a set of new interfaces and classes.
Implementation Steps
- Identify the service (i.e. Adaptee) class that you want to create an adapter for.
- Declare the client interface and define how clients will communicate with the service.
- Define the Adapter class by implementing the client interface. Leave all the methods stubbed (i.e. empty for the time being.)
- Add a private field to the adapter class to store a reference to the Adaptee object.
- Implement each of the methods of the client interface in the Adapter class. The adapter should delegate most of the actual work to the service (i.e. Adaptee) object, handling only the interface or data format conversion.
- Clients must use the Adapter via the client interface. This will let you maintain the Adapter code without affecting the client code.
from abc import ABC, abstractmethod
from typing import List
import xml.etree.ElementTree as ET
import json
# Contact data container class
class Contact:
def __init__(self, full_name, email, phone_number, is_friend):
self.full_name = full_name
self.email = email
self.phone_number = phone_number
self.is_friend = is_friend
def __str__(self):
return f"{self.full_name} ({self.email}) - {self.phone_number} {'(Friend)' if self.is_friend else ''}"
# Our base class for reading file data
class FileReader(ABC) :
def __init__(self, file_name):
self.file_name = file_name
abstractmethod
def read(self) -> str:
pass
# Abstract base class for all Contact Data Adapters
class ContactsAdapter(ABC):
def __init__(self, data_source: FileReader):
self.data_source = data_source
abstractmethod
def get_contacts(self) -> List[Contact]:
pass
# Specific implementation of the adapter to read XML Source data
class XMLContactsAdapter(ContactsAdapter):
def get_contacts(self):
# Parse XML data into an ElementTree object
root = ET.fromstring(self.data_source.read()) # Read XML data from a file
# Extract contact information from the XML and create Contact objects
contacts = []
for elem in root.iter():
if elem.tag == 'contact':
full_name = elem.find('full_name').text
email = elem.find('email').text
phone_number = elem.find('phone_number').text
is_friend = elem.find('is_friend').text.lower() == 'true'
contact = Contact(full_name, email, phone_number, is_friend)
contacts.append(contact)
return contacts
# Specific implementation of the adapter to read JSON Source data
class JSONContactsAdapter(ContactsAdapter):
def get_contacts(self):
# Parse JSON data into a dictionary
data_dict = json.loads(self.data_source.read()) # Read JSON data from a file
# Extract contact information from the dictionary and create Contact objects
contacts = []
for contact_data in data_dict['contacts']:
full_name = contact_data['full_name']
email = contact_data['email']
phone_number = contact_data['phone_number']
is_friend = contact_data['is_friend']
contact = Contact(full_name, email, phone_number, is_friend)
contacts.append(contact)
return contacts
# Specific implementation of the file reader to be used with XML Files
class XMLReader(FileReader):
def read(self):
# Read the contents of the XML file and return as a string
with open(self.file_name, 'r') as f:
return f.read()
# Specific implementation of the file reader to be used with JSON files
class JSONReader(FileReader):
def read(self):
# Read the contents of the JSON file and return as a string
with open(self.file_name, 'r') as f:
return f.read()
# Simple display routine to display Contact data to the console
def print_contact_data(contacts_source : ContactsAdapter):
# Print the Contact objects
for contact in contacts_source.get_contacts():
print(contact)
# Example usage
xml_reader = XMLReader('contacts.xml')
# Create an XML adapter and convert the data to a list of Contact objects
xml_adapter = XMLContactsAdapter(xml_reader)
# Print the Contact objects
print_contact_data(xml_adapter)
json_reader = JSONReader('contacts.json')
# Create a JSON adapter and convert the data to a list of Contact objects
json_adapter = JSONContactsAdapter(json_reader)
# Print the Contact objects
print_contact_data(json_adapter)
Behavioral Patterns
Observer Pattern
The Observer Pattern is a very interesting, useful, and dynamic pattern.
Overview
- The main intent of the pattern is to create an event notification mechanism between objects.
- Think of the relationship between a publisher and a subscriber:
- A Subscriber subscribes to a Publisher of events.
- When an event happens the Publisher notifies all the Subscribers in its list that the event has happened

This pattern perfectly suits any process where data arrives from some input that is not available at a predefined moment, but instead arrives "at random" (for example HTTP requests, user input from peripherals, distributed databases and blockchains, etc.)
The Observer Pattern is also a key part in the well known and utilized Model-View-Controller (MVC) architectural pattern.
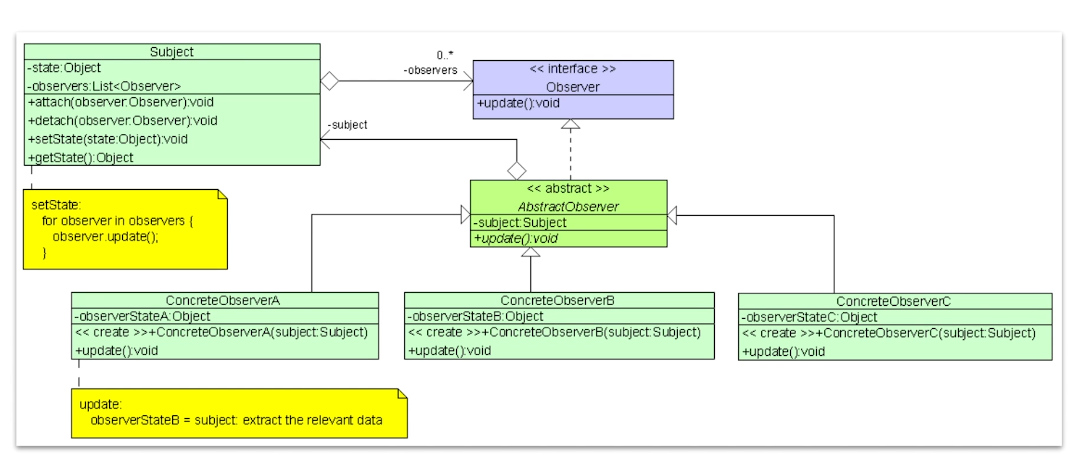
Motivation
The Observer pattern is one of the most useful design patterns.
Here is the motivation of the pattern as stated by GoF:
Define a one-to-many dependency between objects so that when one object changes state, all its dependents are notified and updated automatically.
Related Patterns
Chain of Responsibility, Command, Mediator and Observer all address different ways of connecting senders and receivers of requests:
-
Chain of Responsibility is used to pass a request sequentially along a chain of receivers until one of them handles it.
-
Command is used to establish a unidirectional responsibility between a sender and a receiver.
-
Mediator (also known as Controller) removes direct connections between senders and receivers, forcing them to communicate indirectly via a mediator/controller object.
When to use
- Use the Observer pattern when changes to the state of one object need to be 'known' by other objects. Especially when the actual set of the other objects is either unknown initially or changes dynamically throughout the lifecycle of the application.
- Use it when an object or a set of objects need to 'observe' changes in other objects and need to be notified in real-time about those changes.
When not to use
- Because the order of notifications is potentially random, be careful about your requirements if order of notifications is important.
Pros:
- You can introduce new subscriber implementations without having to change the publisher's code. This is compatible with the Open/Closed Principle (OCP).
- It supports the principle of Loose Coupling between objects that interact with each other.
- You can establish relationships between objects dynamically at runtime.
- If you think about it, the Observer pattern is the key to reactive behaviour.
Cons:
- The order in which observers/subscribers are notified is potentially random.
- Debugging notifications can be difficult given the random nature of notifications.
Design Considerations:
- Look for elements in your business logic that need to be aware of state data changes.
- Break it down into two parts: a. The controller/receiver of the events. This will be your Publisher. b. The components that need to be aware of those changes. These will be the Subscribers.
- Declare the Subscriber interface which should at least have a single update or notify method.
- Declare the Publisher interface and define the contract for adding and removing subscribers.
- Create an abstract Publisher implementation with a mechanism for subscriber management and notification.
- Identify the state data that will need to be 'observed' and create a concrete Publisher implementation for that state. Define a way for subscribers to get access to that state.
- Create specific implementation of subscribers that you need.
Observer Pattern Example
from abc import ABC, abstractmethod
import pygame
import random
# Observer interface
class Observer(ABC):
abstractmethod
def update(self, subject):
pass
# Concrete observer class
class Rectangle(Observer):
def __init__(self, x, y, width, height, color):
self.x = x
self.y = y
self.width = width
self.height = height
self.color = color
def draw(self, screen):
pygame.draw.rect(screen, self.color, (self.x, self.y, self.width, self.height))
def update(self, subject):
self.color = (random.randint(0, 255), random.randint(0, 255), random.randint(0, 255))
# Subject class
class Circle:
def __init__(self, x, y, radius, color):
self.x = x
self.y = y
self.radius = radius
self.color = color
self.observers = []
def draw(self, screen):
pygame.draw.circle(screen, self.color, (self.x, self.y), self.radius)
def attach(self, observer):
self.observers.append(observer)
def notify(self):
for observer in self.observers:
observer.update(self)
def move(self, x, y):
self.x = x
self.y = y
self.notify()
def main():
pygame.init()
screen = pygame.display.set_mode((800, 600))
pygame.display.set_caption("Observer Design Pattern with Pygame")
running = True
clock = pygame.time.Clock()
# Instance of our Publisher
circle = Circle(400, 300, 50, (255, 255, 255))
# Three instances of our subscriber/observer classes.
rectangles = [
Rectangle(100, 100, 50, 50, (255, 0, 0)),
Rectangle(200, 200, 50, 50, (0, 255, 0)),
Rectangle(300, 300, 50, 50, (0, 0, 255)),
]
# Add the three rectangles as our Subsribers to the Circle class
for rect in rectangles:
circle.attach(rect)
# Start the game loop
while running:
# refrsh and clear the screen with black background
screen.fill((0, 0, 0))
# listen for any in-game events
for event in pygame.event.get():
if event.type == pygame.QUIT:
running = False
# draw the circle at its current position
circle.draw(screen)
# draw each of the rectangles
for rect in rectangles:
rect.draw(screen)
# get the current mouse position/location
mouse_pos = pygame.mouse.get_pos()
# check if the mouse button is pressed
if pygame.mouse.get_pressed()[0]:
circle.move(*mouse_pos) # drag the circle
# display the screen buffer (i.e. screen contents)
pygame.display.flip()
# generate 60 frames per second
clock.tick(60)
pygame.quit()
if __name__ == "__main__":
main()
Strategy Pattern
The Strategy Pattern is a behavioral design pattern that enables selecting an algorithm's behavior at runtime.
The main idea of the Strategy Design Pattern is to extract related algorithms (or any piece of code) into separate classes and define a common interface for them.
It defines a family of algorithms, encapsulates each one, and makes them interchangeable. This pattern allows the algorithm to vary independently from clients that use it.
In other words, it is a very dynamic design pattern that allows your code to be flexible depending on the run-time dynamic.
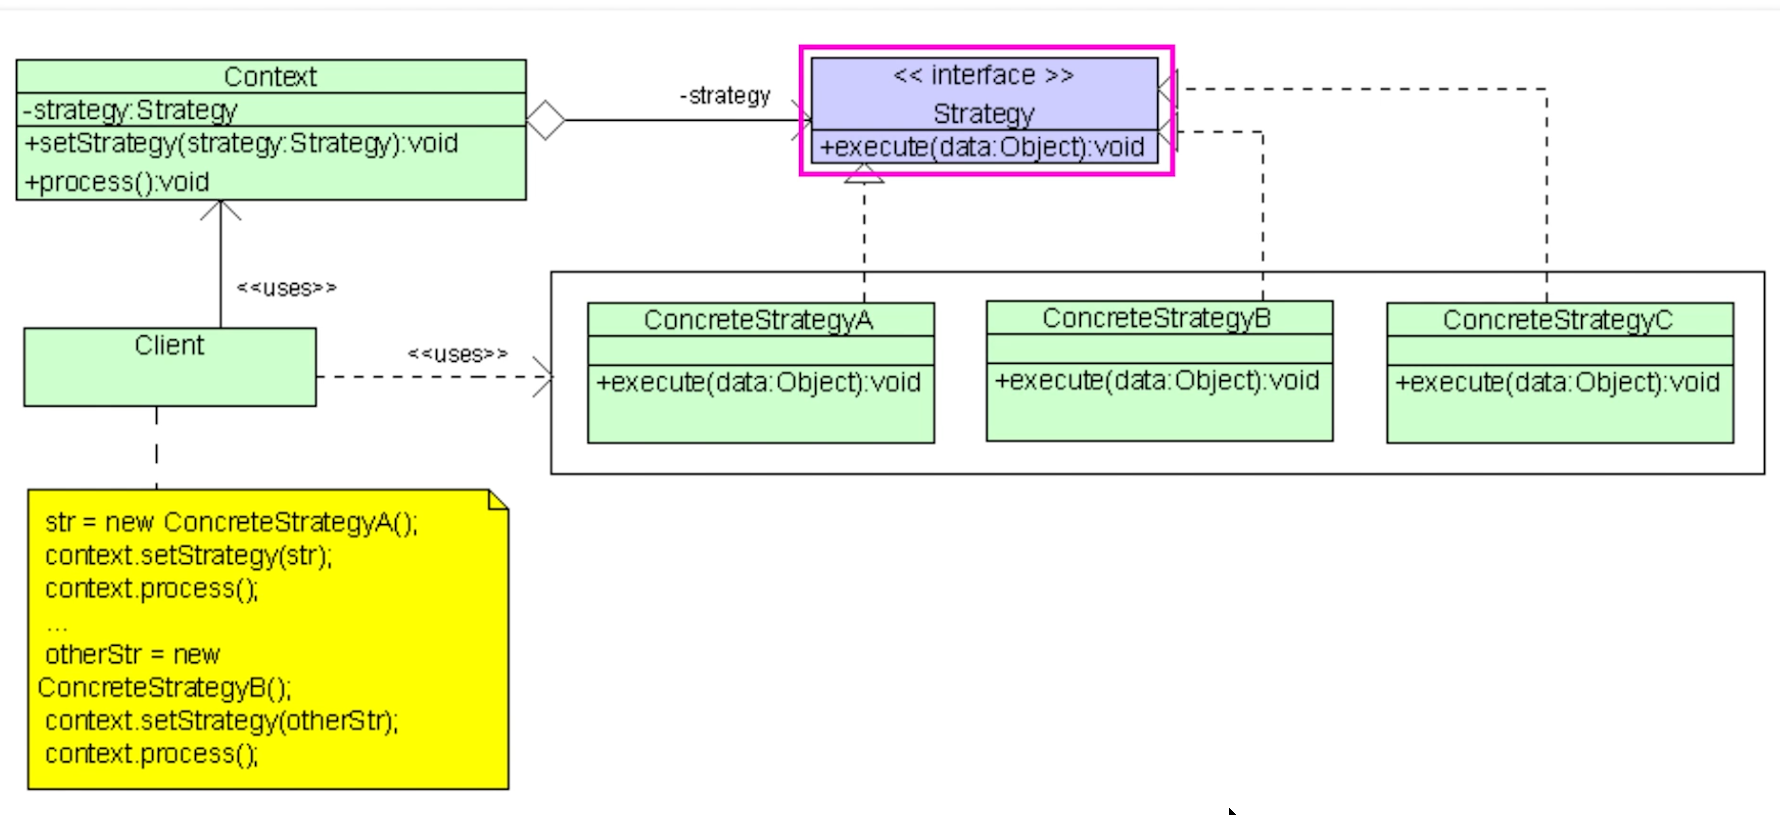
Considerations
The Strategy is considered to be one of the most practical design patterns.
Here is its motivation:
'Define a family of algorithms, encapsulate each one, and make them interchangeable. Strategy lets the algorithm vary independently from clients that use it.`
- State can be considered as an extension of Strategy. Both patterns utilize composition at their core: they allow the modification of their process by delegating work to helper objects. Strategy makes these objects completely independent and unaware of each other. However, State allows the objects to alter their behaviour when internal state changes.
- Command and Strategy seem similar, but have different motivations: a. Command allows for conversion of any operation into an object. b. Strategy allows for objects to achieve the same thing but in different ways.
When to use:
- Use this pattern to abstract the business logic of a class from its implementation details so that it can be 'plugged in'.
- Use it when your class has a potential conditional statement that switches between different variants of the same algorithm.
- Use the Strategy pattern when you want to use different variants/version of an algorithm within an object and need to have the ability to switch from one algorithm to another during runtime.
When not to use:
- If you only have a few algorithms and they rarely change, it might be unnecessary to overcomplicate your code with new classes and interfaces.
Pros:*
- In the strategy pattern, the behavior of a class should not be inherited, but instead, the behavior should be abstracted and encapsulated using interfaces. This is compatible with the Open/Closed Principle (OCP), which proposes that classes should be open for extension but closed for modification.
- You can introduce new Strategies into the context without breaking any client code. This follows the Open/Closed Principle. Cons:
- Clients must be aware of the differences between strategies to be able to select a proper one.
Strategy Pattern Example
Consider the following scenario:
- Let's assume that you have a web bot (i.e. like a web crawler) and you want it to scrape some data from the internet.
- You might be interested in data content such as XML files, SQL files, CSV files, perhaps JSON files, etc...
Wrong Approach
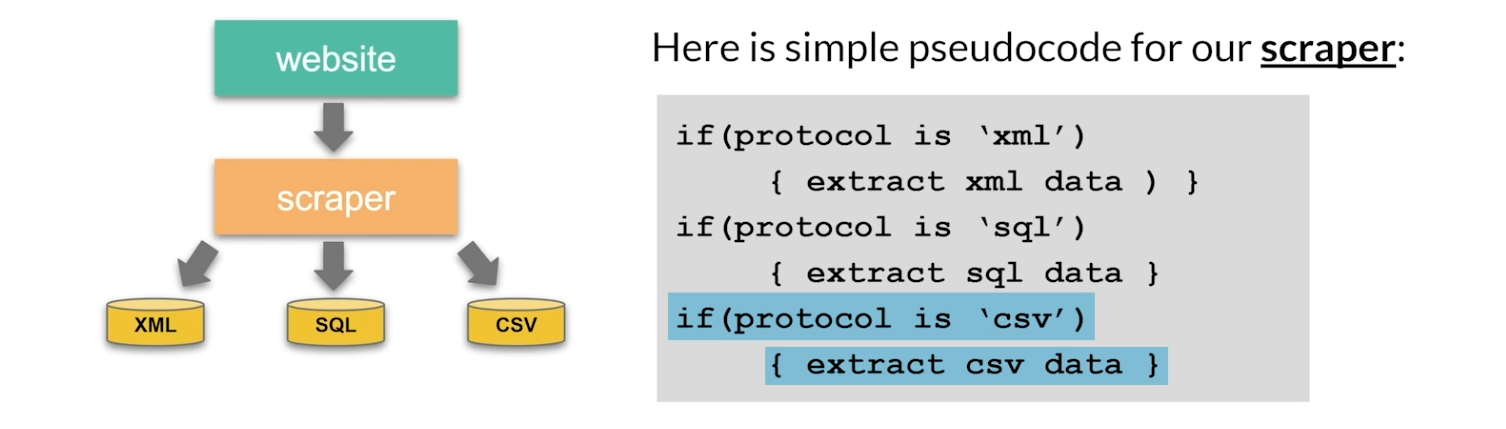
What is the problem with allowing the scraper to handle all the logic of scraping? There are a few reasons why you do not want to have the scraper handle all those different protocols:
- The Scraper class will grow uncontrollably with each new data protocol.
- The extraction code is not reusable.
- The design violates the SOLID principles, specifically the Open/CIosed Principle which states that we should extend the class NOT modify it. One aspect of the solution would be to abstract each protocol into its own class and then have the Scraper call that specific class when needed.
Right Approach
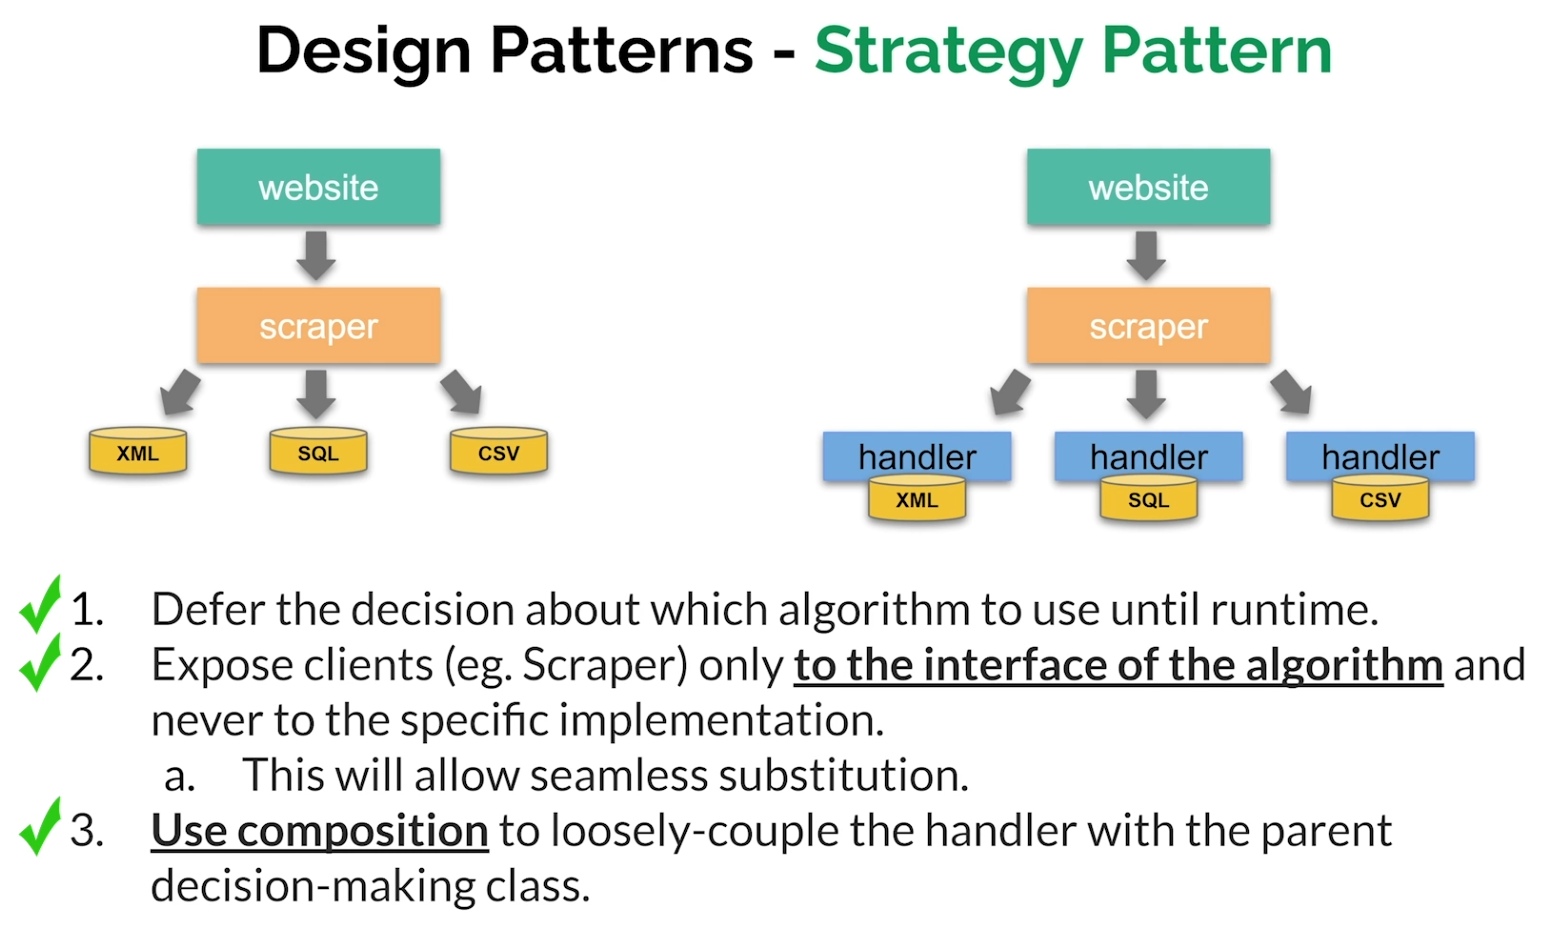
from abc import ABC, abstractmethod
import pygame
import pygame_gui
from moviepy.editor import *
import pygame_gui
# Base Renderer class with an abstract render method.
class WidgetRenderer(ABC):
abstractmethod
def render(self, screen, ui_manager) -> str:
pass
# ImageRenderer class that inherits from the Renderer class
class ImageRenderer(WidgetRenderer):
def __init__(self, image_path, size=None):
self.image_path = image_path # Path of the image file
self.image = None # Placeholder for the loaded image
self.size = size # Desired size for the image (width, height)
# Method to load the image and optionally resize it.
def load_image(self):
self.image = pygame.image.load(self.image_path)
if self.size:
self.image = pygame.transform.scale(self.image, self.size)
# Render method to display the image on the screen.
def render(self, screen, ui_manager):
if not self.image:
self.load_image()
screen.blit(self.image, (200, 70))
return "Rendering an image", None
# VideoRenderer class that inherits from the Renderer class
class VideoRenderer(WidgetRenderer):
def __init__(self, video_path, size=None):
self.video_path = video_path # Path of the video file
self.clip = None # Placeholder for the loaded video clip
self.playing = False # Flag to indicate if the video is currently playing
self.start_time = 0 # Timestamp for when the video starts playing
self.size = size # Desired size for the video (width, height)
# Method to load the video clip and optionally resize it.
def load_movie(self):
self.clip = VideoFileClip(self.video_path)
if self.size:
self.clip = self.clip.resize(self.size)
# Render method to display the video on the screen.
def render(self, screen, ui_manager):
if not self.clip:
self.load_movie()
current_time = pygame.time.get_ticks() / 1000
if not self.playing:
self.playing = True
self.start_time = current_time
if self.playing:
elapsed_time = current_time - self.start_time
if elapsed_time < self.clip.duration:
frame = self.clip.get_frame(elapsed_time)
frame = pygame.surfarray.make_surface(frame.swapaxes(0, 1))
screen.blit(frame, (200, 70))
else:
self.playing = False
return "Rendering a video", None
# Method to stop the video playback.
def stop(self):
self.playing = False
# FormRenderer class that inherits from the Renderer class
class FormRenderer(WidgetRenderer):
def __init__(self):
self.form_elements = [] # List to store form elements
self.panel = None # Placeholder for the form panel
# Method to create the form with the input fields and labels.
def create_form(self, ui_manager):
# Panel creation and configuration.
self.panel = pygame_gui.elements.UIPanel(relative_rect=pygame.Rect((300, 60), (260, 480)),
starting_layer_height=1,
manager=ui_manager,
object_id="form_panel",
anchors={"left": "left",
"right": "right",
"top": "top",
"bottom": "bottom"})
# Create and configure form elements (labels, input fields, and submit button)
# Add elements to the form_elements list and set the container as the panel.
# ...
self.form_elements.append(pygame_gui.elements.UILabel(relative_rect=pygame.Rect((30, 10), (200, 40)),
text="First Name",
manager=ui_manager,
container=self.panel))
self.form_elements.append(pygame_gui.elements.UITextEntryLine(relative_rect=pygame.Rect((30, 50), (200, 40)),
manager=ui_manager,
container=self.panel))
self.form_elements.append(pygame_gui.elements.UILabel(relative_rect=pygame.Rect((30, 110), (200, 40)),
text="Last Name",
manager=ui_manager,
container=self.panel))
self.form_elements.append(pygame_gui.elements.UITextEntryLine(relative_rect=pygame.Rect((30, 150), (200, 40)),
manager=ui_manager,
container=self.panel))
self.form_elements.append(pygame_gui.elements.UILabel(relative_rect=pygame.Rect((30, 210), (200, 40)),
text="Phone Number",
manager=ui_manager,
container=self.panel))
self.form_elements.append(pygame_gui.elements.UITextEntryLine(relative_rect=pygame.Rect((30, 250), (200, 40)),
manager=ui_manager,
container=self.panel))
self.form_elements.append(pygame_gui.elements.UILabel(relative_rect=pygame.Rect((30, 310), (200, 40)),
text="Email Address",
manager=ui_manager,
container=self.panel))
self.form_elements.append(pygame_gui.elements.UITextEntryLine(relative_rect=pygame.Rect((30, 350), (200, 40)),
manager=ui_manager,
container=self.panel))
self.form_elements.append(pygame_gui.elements.UIButton(relative_rect=pygame.Rect((80, 410), (100, 40)),
text="Submit",
manager=ui_manager,
container=self.panel))
# Render method to display the form on the screen.
def render(self, screen, ui_manager):
if not self.form_elements:
self.create_form(ui_manager)
return "Rendering a form", None
# Method to clear the form elements from the screen.
def clear_form(self):
for element in self.form_elements:
element.kill()
self.form_elements = []
if self.panel:
self.panel.kill()
self.panel = None
# RenderingContext class to manage the current rendering context.
class RenderingContext:
def __init__(self, renderer: WidgetRenderer):
self._renderer = renderer # The current renderer instance
# Method to set the current renderer.
def set_renderer(self, renderer: WidgetRenderer):
self._renderer = renderer
# Render method to delegate rendering to the current renderer.
def render(self, screen, ui_manager):
return self._renderer.render(screen, ui_manager)
#
# Main function to set up and run the application.
#
def main():
pygame.init()
screen = pygame.display.set_mode((800, 600))
pygame.display.set_caption("Renderer Strategy Pattern Example")
ui_manager = pygame_gui.UIManager((800, 600))
# Initialize the RenderingContext with an ImageRenderer instance.
context = RenderingContext(ImageRenderer("python_design_patterns.png", size=(550, 325)))
# Create and configure UI buttons for selecting renderers.
#
image_button = pygame_gui.elements.UIButton(relative_rect=pygame.Rect((20, 20), (100, 40)),
text="Image",
manager=ui_manager)
video_button = pygame_gui.elements.UIButton(relative_rect=pygame.Rect((20, 70), (100, 40)),
text="Video",
manager=ui_manager)
widget_button = pygame_gui.elements.UIButton(relative_rect=pygame.Rect((20, 120), (100, 40)),
text="Widget",
manager=ui_manager)
rendered_widget = None
clock = pygame.time.Clock()
running = True
while running:
# calculate the delta time in seconds by asking for a max number of frames per second
# to be 60 and then divide the tick time (which is in milliseconds) by a 1000 to get
# elapsed time in seconds
time_delta = clock.tick(60)/1000.0
for event in pygame.event.get():
if event.type == pygame.QUIT:
running = False
# Process button click events and change the renderer accordingly.
#
if event.type == pygame.USEREVENT:
if event.user_type == pygame_gui.UI_BUTTON_PRESSED:
if isinstance(context._renderer, FormRenderer):
context._renderer.clear_form()
if event.ui_element == image_button:
context.set_renderer(ImageRenderer("python_design_patterns.png", size=(550, 325)))
elif event.ui_element == video_button:
context.set_renderer(VideoRenderer("example_video.mp4", size=(550, 325)))
elif event.ui_element == widget_button:
context.set_renderer(FormRenderer())
ui_manager.process_events(event)
# Update the screen and UI elements.
screen.fill((200, 200, 200))
ui_manager.update(time_delta)
ui_manager.draw_ui(screen)
# Call the render method of the current context.
result_text, widget = context.render(screen, ui_manager)
# Display the result text on the screen.
font = pygame.font.Font(None, 36)
text = font.render(result_text, 1, (10, 10, 10))
screen.blit(text, (300, 20))
# Update the rendered widget.
if rendered_widget:
rendered_widget.kill()
if widget:
rendered_widget = widget
pygame.display.update()
pygame.quit()
if __name__ == "__main__":
main()